✨ Shine Bright Like Your Headlights! 🚘
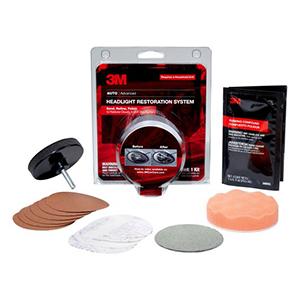
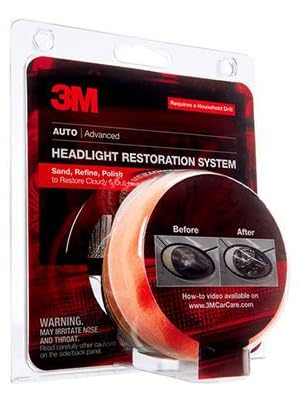
The 3M Headlight Lens Restoration System (Model 39008) is a comprehensive kit designed to restore the clarity of your vehicle's headlights. It includes a disc pad holder, sanding discs, a finishing disc, a refining disc, and a rubbing compound, all aimed at removing yellowing and enhancing nighttime visibility. Compact and easy to use, this kit is perfect for DIY enthusiasts looking to improve their vehicle's appearance and safety.
Material | Plastic |
Grit Material | Aluminum Oxide |
Item dimensions L x W x H | 6.14 x 4.51 x 0.84 inches |
Brand | 3M |
Grit Type | Medium |
Compatible Material | Plastic |
Item Weight | 4 Ounces |
Grit Number | 500 |
UPC | 051131390089 |
Number of Items | 1 |
Global Trade Identification Number | 00051131390089 |
Manufacturer | 3M |
Model | 3M Headlight Lens Restoration System, Easy Heavy Duty Kit Solution to Restore Car Headlights |
Item Weight | 4 ounces |
Product Dimensions | 6.14 x 4.51 x 0.84 inches |
Country of Origin | USA |
Item model number | 39008 |
Is Discontinued By Manufacturer | No |
Exterior | Machined |
Manufacturer Part Number | 39008 |
Mirror Lighting Type | automotive-exterior-headlight-bulbs |
J**N
Worth the money
Works amazing. First time restoring headlights. This was on my 2016 Mustang. The headlights were not yellowing. They were just very hazed over. I think someone tried to clean them with off bug spray or something, which, if you didn’t know, will melt the plastic if not wiped off immediately. I followed the instructions all the way until the end and the result was perfection. These headlights literally look brand new now. Very easy to use. Plenty of sanding discs. There was also plenty of rubbing compound left over.
A**B
The best headlight kit available
This is a great kit and the best value gong for headlight restoration. If you take your time and follow the instructions your headlights will look nearly brand new when you are done. I recently used this kit to polish an extremely yellowed and corroded set of headlights on a 2006 Volvo S60. As you can see from the pictures, the results speak for themselves. The instructions that come with the kit are quite good, but I will try to share my experience and tips for professional results. I recommend you also have painters tape, a spray bottle of water, and 2 microfiber towels for this procedure.The kit comes with a hook and loop backing plate that attaches to your drill, 6 pieces of 500 grit sandpaper, 4 pieces of 800 grit sandpaper, 1 3000 grit sanding disk, a polishing pad, and 3m rubbing compound. The first thing to do is tape off everything that is next to or in contact with your headlight lens. Next you should put your backing plate in your drill and stick the 500 grit sandpaper to the backing plate. I put my 18 volt Dewalt cordless drill on low speed for this step. You should sand your headlight with slight pressure going across the headlight lens in overlapping passes.Do not keep the drill in one place or you will sand an indention into your lens. When the sanding disk starts becoming ineffective you should swap it out with another 500 grit disk or blow the disc out with compressed air. You should sand until the lens is evenly sanded and there are no "shiny" or yellow spots showing (wipe your lens with a damp cloth frequently to check how you are doing). It is hard to explain, but when the lens is properly sanded at this stage, the whole lens should uniformly look frosted.Once you have the proper uniform frost on your lens (I used 2 discs per lens on this stage) wipe it down with your damp cloth and affix the 800 grit sandpaper disc to your backing plate. This step is where I have the slightest complaint with the kit. I really wish the kit included 6 800 grit discs instead of only four. It is really important that you take your time on this step to remove the scratches from the 500 grit sandpaper you just used. I started this step with my drill again on low, and just as you did with the first step, slowly and with light pressure sand across your lens in overlapping passes. When your disc starts becoming noneffective use compressed air to blow the build-up off of the disc. This is where an additional 2 discs of 800 grit would be nice. Continue sanding on low until this disc is no longer usable and then replace it with your second 800 grit disc. At this point I moved my drill to high to continue sanding with light, overlapping passes. Be careful when you have your drill on high. If your disc slips and hits the tape/paint it could burn a spot through the clear coat or even the base. Nothing to be scared of, but just be careful as it is harder to control on high. Really take your time on this step and sand until the 800 grit disc is unusable. You really want to make sure you get all of the deep sanding mark from the 500 grit disc out of the lens. Once you have sanded until all deep scratches are gone or your 800 grit disc is completely unusable, it is time for the 3000 grit wet sand.For this stage you should affix the 3000 grit disc (there is only one in the kit) to your backing plate and and grab your spray bottle of water. Lightly mist the 3000 grit disk with one spray of water and lightly mist the lens with 3-4 sprays. I used the high setting on my drill for this step. As you did with the previous steps, lightly sand across the headlight lens in overlapping patterns. Within about 30 seconds to a minute you should begin to see a white slur form on the lens. I recommend you sand the lens completely 2 times and then stop to wipe it off. After you wipe off the lens, mist the lens with 2-3 squirts of water and complete 2 more complete sands on the lens. Depending on your lens, it will probably take 6-10 full sands of the lens. When you think you are close, mist the lens with 2-3 coats of water, wipe it off, and make sure there are not really any scratches in the lens. The lens should be almost 100% smooth at this point. If your are happy with the lens it is time for the final step.Remove the 3000 grit disc and set it aside (do not discard as you will need this for the other lens). Attach the orange polishing pad to your backing plate and squeeze 3-4 small (smaller than a pee) dabs of the rubbing compound on various points of the pad. I then recommend you touch the pad/compound against your lens in 2-3 locations on your lens (this helps it apply evenly). You should then put your drill on low, and with light pressure. quickly but carefully spread the compound over the whole lens. Once the compound is spread across the lens somewhat evenly, turn your drill on high and with light to medium pressure (a little more than when you were using the sanding discs) make slow overlapping passes across the lens until compound goes almost clear. Add more compund and repeat until headlights are crystal clear or you run out of compound. I recommend you seal your headlights or they will begin to yellow again in a few months. I highly recommend Optimum Opti-Lens as your coating Opti-Lens Permanent Headlight Coating. This kit is expensive (approximately $50), but if you do not seal your headlights you will be doing this all over again in a matter of months to a year. The kit will also easily seal 6-8 sets of headlights.
P**K
Great results - Still needs a top coat to be completely restored
Before you buy this, don't. Get the 3M 39045, which has the top coat included in the kit!First, the before and after pictures are not an exaggeration. The system will indeed produce a clear lens by following the directions. That part of the process I would give 5 stars to. The directions are very clear, but I would add a few items of my own, having made some mistakes.1) If possible, remove the covers from the vehicle and secure to a stable work surface!! If not, put a triple layer of masking tape around the edges of the lens to protect everything within 1.5 inches of the cover. (Use the green 3M tape or blue if you have to, NOT the tan kind!!) If you are inexperienced with using a pad mounted in a drill, you will have trouble holding the pad on the surface at first and you'll end up with nicks and edge marks around it.2) Use very, very light pressure on the first stage. Let the sandpaper do the work. This will help you keep more of the pad in contact while you control the pad's movement. Plus, it will help you avoid digging in the edges of the pad and causing very difficult-to-remove marks or burns.3) Use a slow speed at first. The instructions give a min/max RPM recommendation, but I found the pad difficult to control when it was spinning that fast, plus it was very easy to cause burn marks. Once I dropped the speed to slow, it became very easy.4) The first pass is what does all the yellow removal, so take your time, use up all the sanding disks (3 per lens), and wipe the lens often to see where you've missed. If you dig into the lens a little, then concentrate on that spot more. The second pass will not correct deep scratches, so work them out on the first round.5) The remaining steps are simply to remove the previous step's sanding marks. Use light to medium pressure. Wipe often.6) With the final tri-zact pad, it takes light pressure. Be careful not to damage this pad, since there's only one in the kit. It had no problem going the distance, but be cautious around the little nibs that stick up from the lens, etc. Keep the pad wet, and also keep the lens wet. The instructions say "damp", but you'll have better results with more moisture (to a point.) Rinse the slurry off and wipe with a terry cloth often. If you have a light handy, shine it at an angle to help see any sanding marks you've missed.7) With the sanding complete, you'll need to polish. The sponge pad is very absorbent, but a little compound goes a long way. The first time you add compound, use the recommended dime size and work it lightly around and into the pad with your finger (drill turned off.) Then put another dime sized drop on and place the drill on the lens lightly before turning it on. Same as sanding, but now you're using medium to firm pressure for the first 4-5 passes. Cover the lens in repeating passes left/right and up/down until you've been over it 4-6 times (per directions.) Use reduced pressure for the last couple passes. You will probably have to add compound a couple of times, but after that there will be plenty in the pad. I only had to add it once on the second lens. If it slings off or builds up, you've got too much on the pad (just squeeze a little out on a rag.)8) Finally, use a microfiber cloth to remove the hazy compound.You are NOT done, however, because this kit only cleans off the lens. It does NOTHING to protect the lens! It's going to yellow again within a year if you don't protect it somehow.3M makes a protectant product, which is included in another kit - 3M 39045, which is an overall better choice than this one (the protectant and green tape are included in that kit.)You can also clear coat it with a clear gloss spray-can finish (as long as it's an exterior grade finish.) You've already got it taped up, so mask off the area and go for it. That will last much longer than the 3M protectant. Don't forget to do an extra prep cleaning before spraying.That's it. My total time was about 1 hour for two lenses on a Toyota Corolla. Overall, I'm satisfied, but I wish I'd known about the more complete kit for just $4 more...
K**S
Great results
Great resultsEasy instructionsFast resultsHeadlights are much cleaner lookingMuch brighter at night brighter
Trustpilot
2 months ago
1 week ago