Desert Online General Trading LLC
Dubai, United Arab Emirates
Desert Online General Trading LLC
Dubai, United Arab Emirates


✨ Elevate your privacy game with style! ✨
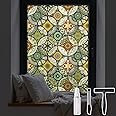
The DKTIE Static Cling Decorative Window Film is a versatile, non-adhesive privacy solution that combines aesthetic appeal with functionality. Measuring 17.7 x 78.7 inches, this vinyl film offers 98% UV protection, effectively blocking harmful rays while allowing natural light to filter through. With easy static cling installation and a variety of stylish designs, it’s the perfect alternative to traditional window treatments, enhancing both privacy and energy efficiency in your home.
| Item Dimensions L x W | 78.7"L x 17.7"W |
| Size | 17.7" x 78.7" (with tools) |
| Installation Method | Static Cling |
| Color | Yellow |
| Ultraviolet Light Protection | 98% |
| Material Type | Vinyl |
M**.
LOVE it!
I am extremely happy with this product. I got it to cover a whole wall of mirrored closet doors in a new place that I just rented, so that movement in my reflection isn't constantly catching my eye whenever I'm in my bedroom. Since I put it onto mirrored doors instead of windows I can't review the sheerness, but on a mirror reflection & movement in the reflection is completely gone, which is what I wanted. Unfortunately for me the widest roll leaves a few inches of mirror reflection on either side of each door, so I'll have to buy some glass pens and fill in with those. We'll see how that goes.Regarding installation I can see that my many years of scrapbooking made the installation much easier for me than it would have been for my husband or some other members of my family, so I'll mention a few tips here, for the non-crafters who may need to install this stuff.Tools - A few extra tools I found critical to ease of installation were;1- A pair of scissors2- A straight edge for cutting off the excess film. I used a yardstick. A ruler would also work.3- CLEAR scotch tape (gift wrap tape.) NOT the kind that you can't see through, which has removable qualities for wrapping gifts. You need sticky tape of some kind, not removable tape.4- All the tools that came with the film are in the middle of the tube. There are two pieces for the squeegie, a spray bottle, and a blade knife.Techniques -1- Gather your tools and put them right next to the glass where you want to install the decorative-film.2- Clean the glass or mirror surface that you want to put it on with soapy water and a scratchy scrubber to remove EVERYTHING that may be stuck to the glass. Every tiny little thing.3- It can be difficult to initially separate the protective backing-film layer from the decorative-film layer. Use the tape to do this. Stick the tape to the back corner (on the backing-film side) rubbing hard to make the tape really stick to the backing-film, and then pull on the tape like a tab-pull. You may need to get it started by also using your fingernail to pick at & lift the edge of the decorative film, which is a tad bit thicker than the backing-film.3- Once you've lifted the backing-film from the decorative film, cut a 2-4 inch strip of the backing-film off at the edge all the way across. Cut off the backing film on the edge that you want to install at the top of your window or mirror. If you peel off the entire backing it will be very difficult to get it aligned correctly when you go to stick it to the window, because it will grab & stick to the glass all over the place instead of just at the top.4- Spray the exposed decorative film strip and the top 10-12 inches of the glass that you want to stick it to. Not light spray, you want it moderately wet. You don't need water to pour down the glass, but you do want more than just a light mist.5- Let the film unroll from the top edge and hang down while you stick the 2-4 inches of exposed wet decorative-film edge to the glass. I did it with my hand, but if it's having trouble sticking you may need to use the squeegie that came with the film. When you are done sticking the top strip to the glass the rest should hang. Step back and make sure you aligned the top the way you want it, so that when you're done it's not installed slightly tilted.6- Once you see that the top is aligned correctly, you can peel off the back layer all the way down. Once you've peeled off the backing you should work from the top down, and from the middle outward. Do about 10 inches at a time and make sure you've removed all the bubbles before you move down to the next section, and just work your way down to the bottom.7- Once the decorative-film is installed all the way down to the bottom, get a straight edge and use that to evenly cut the bottom off with the blade knife that came with the kit.Done! Hope this helps someone. :)
J**E
Excellent Privacy Tint...Highly Recommend
I'm incredibly impressed with this privacy tint! It definitely deserves all five stars.First off, the quality is fantastic. The tint itself feels durable and well-made, not flimsy or cheap like some others I've encountered.Applying it was surprisingly easy. I was a bit worried about getting bubbles or creases, but the material was quite forgiving and I was able to get a smooth, professional looking finish without much struggle. The instructions were clear and helpful as well.Overall, if you're looking for a durable, high-quality and easy to apply privacy tint, this is nice. It exceeded my expectations,
T**M
Totally easy to install and looks great once its up.
This stuff is awesome! It was super easy to apply to my closet window. After you get the clear plastic off of the back, (using a pin or safety pin to get a hold of the clear plastic) you will notice one side is smooth and the other side has a texture. Put the smooth side against the window after you saturate the glass with plenty of soapy water.. Its a bit hard to match up the patterns because it is a busy pattern. But the part I did match up looks great. Yes if you waste a lot of film then you can definitely match the pattern up. I just choose not to waste a lot of film. The blade that comes with the film cuts like butter. What I did was to apply a thin line of clear sealant along the edges of the window and film and where my seams met. This way, there is no way for the film to ever come up over time. Enough light comes through but there is absolutely no way for someone to see in or me to see out. Even if I'm in my closet at night with the light on. Its perfect! I plan to put what's left and the other roll on my bedroom window. The sun comes in bright in the morning. And so does the heat in the Summer time. Knock out two issues with this material.
J**Y
It’s good, but can be a little tricky
I got this product to put on my car sunroof so it was a little tricky to apply by myself, which I was expecting. If you can’t get the whole thing on there in one go it’s not worth it. I didn’t cut my piece straight enough and tried to fill in a gap on the bottom, but this smaller piece just kept falling off and moving around while I was trying to apply it. I also don’t think the razor they give you works well at all in my experience so I would try and cut your piece as nicely and closely to what you’re going to need before trying to install it on your surface. I also found it a little tricky with the squeegee and found a credit card to be a little bit easier to control. Still four stars though because it looks exactly as it was described and looks nice after trying a second time using the tips I left in this review. I will add a picture if I ever get a sunny day.
M**E
Like this stuff
This is a great product it was easy to use as long as I read instructions and made sure I was well prepared had washed window ,measured and cut and used the tools that came with it so cute little window squidgy ,knife and spray .I was only doing a small window you may need help with larger surface.I like the results wish was a little darker as mine was more about too much light than privacy.
Trustpilot
1 week ago
2 weeks ago