🌿 Grow your greens, elevate your space!
The SOLIGT Stackable Stainless Steel Seed Sprouting Kit features a durable 2-tier design made from rust-resistant 304 stainless steel. It includes a base tray with fine mesh for optimal drainage and air circulation, allowing for the sprouting of various seeds with ease. Compact and user-friendly, this kit is perfect for both novice and experienced gardeners, and comes beautifully packaged, making it an excellent gift for any occasion.
Number of Levels | 2 |
Item Dimensions | 8.5 x 8.5 x 6.2 inches |
Item Weight | 1 Pounds |
Number of Pieces | 1 |
Item Dimensions D x W x H | 8.5"D x 8.5"W x 6.2"H |
Pattern | Solid |
Shape | Round |
Theme | Vegetable |
Style Name | Modern |
Planter Form | Tray |
Color | Stainless Steel |
Finish Types | Polished |
Material Type | Alloy Steel |
Indoor Outdoor Usage | Indoor |
Plant or Animal Product Type | Seed |
Mounting Type | Tabletop |
Additional Features | Drainage Hole, Rust Resistant, Breathable |
G**E
Detailed protocols for growing alfalfa, broccoli and radish sprouts in these trays or Bell jars
Growing Radish Sprouts in SOLIGT trays (takes about an hour over 4-5 days, including harvesting and cleanup)This is my third edition of my procedure, which has continued to evolve. The main difference between this and v2.0 is that I've modified my previous version to use both trays, in order to grow a larger batch.After extensive experimenting with Bell jars, I still use them to grow alfalfa sprouts, which are easy and foolproof, but have given up trying to grow broccoli sprouts, which are harder to grow well than radish, whether in jars or trays, and because I can buy them locally anyway in adequate condition. The radish sprouts I grow with the following procedure still take about an hour of my time, including harvesting and cleanup, but I find the excellent results worth the time.I've used Nature Jim seeds for all these experiments, and whereas only about 60% of the broccoli seeds germinate for me in jars, compared with about 85% of the alfalfa seeds, the following procedure for radish seeds in trays yields about 95% sprouts.To make this work optimally you will need a sharp paring knife, 2 Bell jars with screen tops, plenty of paper towels, and a pull out kitchen sink sprayer for watering and for cleaning up the tray screens.Day 0 (prepare the seeds in the trays):(A) soak 1.5 tablespoons of radish sprout seeds in 4" of water in each of two bell jars with screen tops, from noon to midnight;(B) then, for each jar,(1) leaving the screened top of the Bell jar on, dump the soak water through the screen top, fill, shake, and dump water again;(2) repeat step B1, then remove the screen top of the Bell jar, and fill the jar halfway with water;(2) lay one of the two circular screened tray layers onto the circular tray bottom catch basin;(3) dump the half filled jar quickly into middle of the circular screen, creating a small mound of soaked seeds;(4) using the bottom of a spoon, carefully spread the mound out evenly into the surrounding screen, ensuring that each seed lies flat, and leaving 1/4" of uncovered screen around the periphery for drainage.(C) stack the two trays of spread out seeds onto each other and the catch all bottom, put on the tray top, and store in a stable room temperature area for the next three days (I use part of a closet shelf lined with paper towels).Days 1-3 (water the seeds, keeping them in the dark)(D) Water each of the tray layers thoroughly, and drain, on an approximate every 8 hour schedule (say 8am, 4pm, and midnight).The best way to do this is at the kitchen sink with a pull out sprayer if you have one.Day 4 (green up the sprouts to develop chlorophyll)(E) At midnight, after watering, expose the sprouts to a light that will be on all night (I used the kitchen fluorescent) to start greening them up.To do this, take the top off of the assembly, and use it as a base to stack the second tray on, exposing the sprouts in the lower tray to the light as well.(F) water again thoroughly at 8am and again at 2pm, keeping the sprouts as is, exposed to the light. During daylight I move them to an area that gets indirect sunlight, but keep them out of direct sunlight.(G) at 8pm, or after dinner, harvest the sprouts.HARVESTING and DRYING (this step takes about half an hour and some patience)Spread out five paper towels on the counter to hold the drying sprouts.Spread out another 2-3 paper towels, layered, to make a cutting surface and protect your countertop.FOR EACH TRAY, place it on this latter surface and harvest the sprouts in small bunches at at a time.Do this by plucking up 15-20 sprouts by the roots, and keeping the hulls aligned at the bottom, lay the bunch flat on the cutting surface. Then cut off about 1/4" of the lower part of the sprout with your sharp paring knife to get rid of the hulls and any discolored (non-white) stuff at the bottom of the stem. Still holding the tops, which should be at least 1" long, spread them out on the first set of paper towels to dry.CLEANING UP (cleaning the SOLIGT screens is a pain but can be done)FOR EACH TRAY, upend the harvested tray and scrape off the underside portion of the roots thoroughly with your sharp paring knife onto the paper towel you've used as a cutting surface. Turn the tray back over and scoop out whatever remains onto the same pile of garbage to discard.Finally, clean the screens thoroughly from both the top and bottom. This is where a pull-out kitchen sink spray is especially useful: if you have one, turn on the water full blast and move the spray head over every inch of both the top and bottom of the screen. This will still leave a few tiny bits, but most of these can be rubbed off with paper towels. Then run the screens through the dishwasher.
D**E
Top of the Line!
Love how these grow my sprouts so wonderfully! So easy to wash and rinse, then easily repeat for the appropriate number of days until they grow perfectly for harvesting!
A**R
Superb
This item was surprisingly good. I will do all my sprouts this way. Ditching the mason jar. This is absolutely cleaner and awesome!!!!!
D**K
nice
good
N**Y
Nice looking on kitchen counter
It is nice design but water remains inner rim. The growth rate is same as a mason jar or slower.
M**C
Does the job
I learn more each time I use it and like the quick results. Am not thrilled with how the large surface area needs a lot of water for rinsing, but am trying to re-use some. And i find cleaning the screens of white roots, and seeds a bit of a thing, but think I'll be able to learn to streamline that, again without loads of water. It seems more pleasant to use than mason jars would be.
L**A
It rusted
It rusted! So much for stainless steel. Also, the screens allow the roots and stems to grow through making clean up a bit difficult. The bigger seeds, such as peas and beans, are the only ones that the stems don't go through. This purchase has been disappointing. Sprout jars seem to work better.
M**C
Surprisingly Good
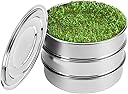
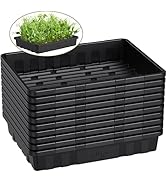
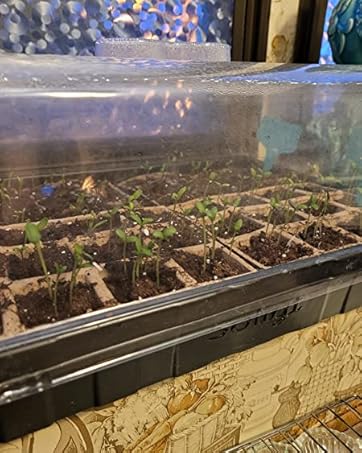
I just got this Soligt SS Seed Sprouter, and I'm pleasantly surprised by the quality. The mesh is sturdy and just right for sprouting. The base and lid and the two mesh trays all fit perfectly together. I don't buy sprouting seeds on Amazon (I use Sprout People for their high quality), but for the equipment, this is really perfect. I can have two crops of sprouts growing with varying dates of completion, and because it all stacks neatly together, I can keep my sprouts tidy in the kitchen.For my first batch (I haven't gotten my big seed mixes from my supplier yet) I used a half cup of lentils in one tray, and a half cup of mung beans in the other tray. I soaked overnight in cool water, and then poured them into their trays. You can rinse right in the tray, shake off all the extra water, then stack them up again for another 8-12 hours.Volume Planning: 1 cup is 16 Tbsp. Lentils and mung beans yield about 2:1, meaning that they double (or more) in volume when they are newly sprouted. Even more if you let the sprouts grow into microgreens. For smaller seed sprouts like alfalfa (7:1 yield) or broccoli sprouts (4:1 yield), the mass of sprouted seeds is many times greater than the original mass, so I'll use way smaller volume of seed for those crops:Broccoli sprouts: use just under a quarter cup of seed per trayAlfalfa sprouts: use ~2 Tbsp seeds per trayIf you're not sure about yields, check out sprout people's site for nutrition and yield info. They also have some helpful videos there, including how to use simiilar trays.
Trustpilot
5 days ago
2 weeks ago