Desertcart purchases this item on your behalf and handles shipping, customs, and support to Philippines.
🔧 Thread like a pro, own every project.
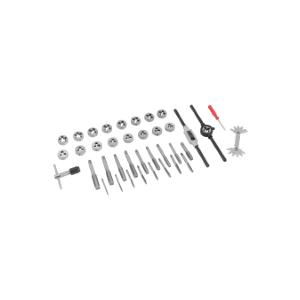
The PERFORMANCE TOOL 40-Piece Metric Tap and Die Set (W4002DB) offers a comprehensive collection of 17 taps and 17 dies in NC, NF, and NPT sizes, crafted from high-quality alloy steel for precision and durability. It includes essential accessories like tap wrenches, a screwdriver, and a screw pitch gauge, all housed in a durable blow-molded storage case—perfect for professionals and DIYers aiming to elevate their threading and repair work.

| ASIN | B000N322BE |
| Best Sellers Rank | #13,991 in Tools & Home Improvement ( See Top 100 in Tools & Home Improvement ) #8 in Threading Tap & Die Sets |
| Brand | PERFORMANCE TOOL |
| Brand Name | PERFORMANCE TOOL |
| Color | Silver |
| Colour | Silver |
| Customer Reviews | 4.1 out of 5 stars 293 Reviews |
| Global Trade Identification Number | 00039564156038 |
| Head Size | 10mm |
| Head Style | Phillips, Flat |
| Head style | Phillips , Flat |
| Included Components | 1 Performance Tool Branded Product |
| Item Dimensions | 5.1 x 33 x 17.8 centimeters |
| Item Type Name | Tool |
| Item Weight | 2.85 Pounds |
| Manufacturer | Wilmar Corporation |
| Manufacturer Part Number | W4002DB |
| Material | Alloy Steel |
| Material Type | Alloy Steel |
| Model Name | W4002DB |
| Model Number | W4002DB |
| Number of Items | 1 |
| Part Interchange Info | W4002DB |
| Recommended Uses For Product | Threading, unthreading, and adjusting threads in metalworking, woodworking, machinery repair, and other repair or assembly projects |
| Recommended uses for product | Threading, unthreading, and adjusting threads in metalworking, woodworking, machinery repair, and other repair or assembly projects Recommended uses for product Threading, unthreading, and adjusting threads in metalworking, woodworking, machinery repair, and other repair or assembly projects See more |
| Set Name | 40 Piece Metric Set PERFORMANCE TOOL |
| Special Feature | T-handle and tapped drill |
| UPC | 039564156038 077348354928 735090678647 |
| Unit Count | 1 Count |
K**Y
Value for money
Can't complain. Good value for money DIY set with everything you need
W**D
سوف تحتاجها يوما ما.
يجب اقتناءها اذا كنت من لا يلجأ لعمال الصيانة كثيرا.
L**L
Es un conjunto Perfecto de Machuelos y Tarrajas !
Están muy bien fabricados, con Precisión. Aun que son para uso doméstico, son muy convenientes ! solo hay que lubricar bien y Trabajan Perfectos. Y el precio es otra conveniencia ! muy Recomendados !
A**S
Got the job done. Affordable, but on the lower quality side. When you need this tool, you LOVE IT.
When installing one of the rear toe arms into the knuckle using the bolt in the picture with the triangular washer, tragedy struck. This was the last side, so I was in the home stretch for this (terrible) job. I say terrible because the eccentric alignment bolts get SUPER seized in the toe arms here in the rust belt, requiring a ton of effort to remove said arms, and obviously new alignment bolts from the dealer as well. Both old toe arms still have part of the bolt fused to the inner metal sleeve of the bushing. Anyways, when installing this bolt into the threaded hole in the rear knuckle/hub assembly, I noticed there was a lot of lateral pressure on the bolt. Foolish me, I decided to just use my impact to zip it on to get it started. However, when tightening it with my 1/2” ratcheting wrench, I noticed the effort to screw in the bolt was WAY too high, and the bolt hadn’t even bottomed out yet. Luckily, I did the smart thing and stopped, then backed the bolt out and tightened alternatively, yet the difficulty/high torque required to tighten remained. So now alarm bells are going off in my head 🚨. I calmed down and thought that if I’m going to have to put lateral pressure on a bolt, I should do it on the other side of the toe arm, where the eccentric alignment bolt is. I later found out that this was an extremely good idea because the eccentric bolt (long thin one on the top left of the attached picture) was only threaded at the bottom 1/3. The unthreaded “shank” of the bolt is actually much better at dealing with lateral forces because the lack of threads means it is stronger, or something like that. Also, since there are no threads to turn, the high lateral force on the bolt shouldn’t affect the threads on that side. You can just turn the nut onto the bolt. I then removed both bolts completely, and started to thread on the threaded bolt with triangular washer to the knuckle (bottom bolts in the attached pic). But alas, my luck 🍀 was not to be on this cold, hard, long winter day, in my (thankfully) heated garage. The bolt would periodically become very difficult to thread in. So, eventually I was uncomfortable with the amount of force required to continue threading the bolt into the knuckle and stopped again, and removed both bolts completely to uninstall the (rear) toe arm completely. I figured out what happened was the lateral pressure along with me trying to forcefully thread in the bolt resulted in a phenomenon known as “galling” to occur. You can look it up, but essentially material transferred onto the threads, making a few threads too thick I believe. It was very difficult to see with my eyes, but I could easily feel it when tightening the bolt. I then figured My next best bet was to try to repair the threads, and I needed a 12x1.5mm tap and die, or thread chaser and die. This set was one of the few with the correct size, and it was cheap considering I would probably only use it once (at least I hope so) in my life. That’s where this set finally comes in to this review. I used a lot of lubrication and slowly “chased” the female threads in the rear hub assembly, as well as the male threads of the bolt itself with the tap and die respectively. I could feel the resistance at 2 or 3 points in the process, but when I was finally done, the bolt threaded into the knuckle super easily by hand. I then FINALLY and LUCKILY installed the hub/knuckle side of the toe arm by threading/installing this pesky triangular washer bolt into the hub. It went super smoothly this time. Of course. Crisis averted. I then spent way too long slowly forcing the eccentric bolt through the rear subframe and through the toe arm, which was difficult due to the lack of space and the lateral force making it very hard to push the long bolt all the way through. I eventually got it fully seated after maybe 20 minutes. I then installed the eccentric washer and nut, and went to get an alignment. The end.
M**Y
Bom
Bom
Trustpilot
1 month ago
2 weeks ago