BATIGE2 Ports Dual USB 3.0 Male to USB 3.0 Female AUX Flush Mount Car Mount Extension Cable for Car Truck Boat Motorcycle Dashboard Panel -6ft
R**R
Excellent product
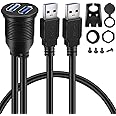
The cables were perfect for the job, with inbuilt socket at one end and brackets.Made for a very easy and neat install.
J**N
Arcade Enthusiasts Beware
While the size and threading on this sweet looking USB port looks a lot like a SuzoHapp arcade button, it is not. It is slightly smaller and may pose a couple of challenges for the unprepared.If you're looking to use this on 3/4 inch material, for example MDF on an arcade cabinet, it will not work without some easy adjustments. One challenge is that the threaded area is right at 3/4 inch (0.753 by my calipers). Meaning there won't be enough thread exposed for the nut to grab. The second is that it is slightly smaller in diameter than a standard button; so don't just drill a button hole and expect it to fit well.Working around these is pretty easy though for mounting on 3/4" MDF. First, drill a small 1/16" guide hole where you're going to be mounting the plug. You'll want this to line things up on both the outside and inside of the cabinet.On the interior of the cabinet, use a Forstner drill bit to create a cavity 1/4" deep; I wouldn't recommend any deeper. I suggest using a 2" bit unless you have very slight hands or happen to own a nut wrench, in which case I suggest a 1-3/4" bit.The plug thread doesn't go all the way up to its outer lip; this is to leave room for the flip cap. If you want it to sit flush like a button with the USB ports exposed, you'll also need to use a 1-1/8" Forstner bit to go just an 1/8" deep on the exterior side. If you want to use the cute little flip cap cover, skip this step.The diameter of the threaded area is ever-so-slightly larger than an inch (1.027). Just use a 1" bit to drill the final hole. Try it first, if it is too tight, just do a tiny drill-wiggle to loosen it up enough to get the threads through.Attached is a photo I took with the measurements I made with a set of calipers. These things are mass produced and molded, so your mileage my vary.
C**S
Perfect for an Arcade Machine - dual 3.0 = 30mm drill bit
I purchased three different size connectors and I installed them into my arcade cabinet(You can see that in my photos)The biggest issue was, which drill bit do i buy? And what size drill bit do i need?But i figured it out and i'm giving you the info to make this easier.I bought a hole saw drill bit. Very low cost and it works good._____________Drill bit info and links:_____________1. Dual USB 3.030mm (1-3/16"):https://www.amazon.com/gp/product/B07R7TJ78V_____________2. USB 3.0 / 3.5mm audio (https://www.amazon.com/dp/B072KGMJ5N)30mm (1-3/16"):https://www.amazon.com/gp/product/B07R7TJ78V_____________3. Dual HDMI (BATIGE was out of stock, so i ordered this one from overseas)38mm (1-1/2"):https://www.amazon.com/gp/product/B07RB4LCZK_____________1. and 2. (USB3.0 ports) The usb ports fits slightly loose in the hole made. I locked it in place with the plastic nuts provided and it's locked into place now. Doesn't move.3. (HDMI ports). 38mm, i pushed it in all the way, it was 99.9% flush with the wood. I had to use a hammer to give it a little tap to get it 100% in. I didn't have to use the plastic nut because it was a tight fit but i put a plastic nut on it to make sure it doesn't move._____________NOTE.... IMPERFECT HOLES:_____________My holes were NOT perfect. They were close to perfect. Probably my fault. A tiny bit of the edges of the holes were chipped due to the hole saw. It might have been my fault. You have to try to drill perfectly straight in.THE FIX:My wood is black, i used a black sharpie marker to touch up any imperfections in the edges of the holes cut. And now it's fine. These adapters will slightly cover up imperfect holes but not fully. That's where the black marker came in handy._____________ALSO NOTE... Drill direction_____________The 38mm hole saw can be removed by hand, by turning it in one direction. So it has threads. If you drill in the wrong direction. You will strip the metal threads and you'll break the bit. (i know because i did that accidentally) i had to buy a 2nd 38mm drill bit that's when i realized the mistake. Once i changed the direction of the drill. It cut really well._____________ADDITIONAL INFO:_____________Steps i took....1. I tested the drill bit by making holes in foam core (photos included) you can probably test using cardboard boxes.2. I made my own template using, pen, paper & a ruler. Drew my dots on the paper with a pen, I then cut into the little dots using an exacto knife.3. The wood is black so....I used a white sharpie paint permanent maker to color a dot into those little holes i cut. Now i have perfectly aligned dots. And i can see where to aim the drill bit.Marker i used: https://www.amazon.com/gp/product/B00E1NXVH64. I did the opposite side holes by simply flipping the template paper horizontal, so it's the reverse direction. Draw new dots with the marker.My template paper:I used the straight clean edges of printer paper to help me align things. I made the top and right side of the paper hit the top and right edges of the wood. When i flip the paper, now i do the same with the top left side of the wood.And you're DONE!_____________If anyone is wondering why i put 4 HDMI ports into the front of my arcade machine. It's for a 4 port bliss-box for all my retro controllers. Player 1,2,3,4
D**.
Multiple Mounting Options - Works Well
I mounted it in a 2007 in what was a small (4" x 2") storage box left of the steering wheel. It is connected to a Sony XAV AX-5000 radio that has two USB outputs. One port holds a small 400 GB flash drive, with a boatload of music on it. The other port has a lightning cord and is used to connect my iPhone to the Sony, giving me navigation and streaming audio in a 14 year old car. I was able to get a drill and hole cutter under the dash and cut the proper size hole in the side of the Miata plastic box. The BATIGE came with a variety of nuts and mounting options, and after cleaning up the hole I was able to push the BATIGE through and install one of the large nuts. The installation is very clean and convenient. The photo doesn't do it justice. (The white fuzzy spot is Velcro to hold my garage door opener key fob).
S**S
Nice PC cable extenders
I use this product to extend my keyboard and mouse cables over to were I can use them from my bed or wheelchair with out having a bunch of cables getting tangled up. Now I know there are other extenders out there but they would come unplugged every time I moved them. these stay connected.
Trustpilot
1 month ago
4 days ago