We remain fully operational. Our teams are working around the clock to ensure your deliveries continue safely.

DOWNLOAD THE APP


Customer Services
Copyright © 2025 Desertcart Holdings Limited
DOWNLOAD THE APP


🌟 Elevate your walls, elevate your vibe — make every surface a statement!
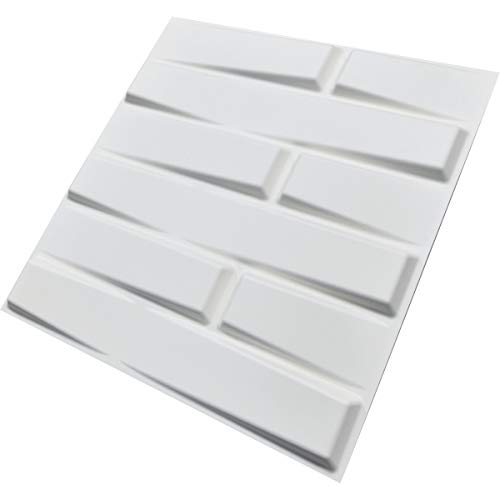
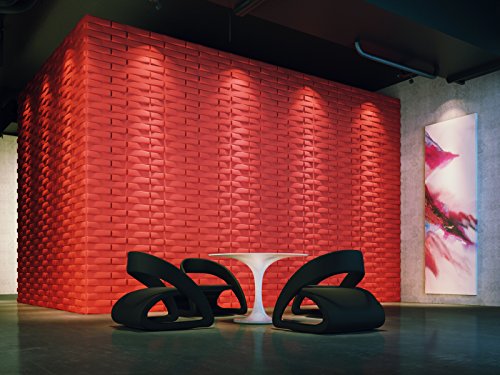
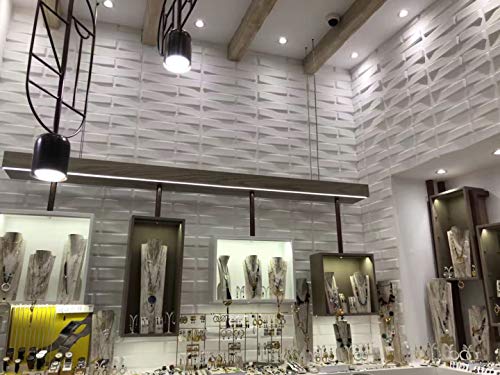
Art3d 32 Sq Ft Decorative 3D Wall Panels are eco-friendly, paintable bamboo fiber panels that cover 32 square feet with 12 lightweight, durable pieces. Designed for easy DIY installation, these heat- and water-resistant panels create stunning 3D visual effects ideal for living rooms, TV backgrounds, and feature walls, combining sustainability with customizable style.
| ASIN | B01M3QD6RR |
| Batteries Included? | No |
| Batteries Required? | No |
| Best Sellers Rank | #485,295 in Tools & Home Improvement ( See Top 100 in Tools & Home Improvement ) #614 in 3D Wall Panels |
| Brand | Art3d |
| Color | Plant Fiber |
| Coverage | 32.00 Square Feet |
| Customer Reviews | 4.3 4.3 out of 5 stars (2,331) |
| Date First Available | August 8, 2008 |
| Edge Style | Square Edge |
| Finish | Polished |
| Finish Type | Polished |
| Form Factor | Square, Thick, Smooth |
| Included Components | No |
| Installation Type | Glue Down |
| Is Discontinued By Manufacturer | No |
| Item Display Dimensions | 19.7 x 0.6 x 19.7 x 0.6 inches |
| Item Package Quantity | 1 |
| Item Thickness | 0.04 Inches |
| Item Weight | 9.6 ounces |
| Item model number | A21082 |
| Manufacturer | Art3d |
| Material | plant fiber |
| Number Of Pieces | 12 |
| Part Number | A21082 |
| Pattern | Solid |
| Product Dimensions | 19.69"L x 19.69"W |
| Recommended Uses For Product | Living Room |
| Shape | Rectangular |
| Size | 19.7"x19.7" |
| Special Feature | Permanent |
| Special Features | Permanent |
| Style | Art Deco |
| UPC | 712809586417 |
| Unit Count | 32.0 Square Feet |
| Warranty Description | 2 year manufacturer |
| Water Resistance Level | Water Resistant |
K**.
Worth the work :)
Before I purchased four boxes of the Wavy 3D Wall art I read as many reviews as possible and thought that this was something I could handle. As some reviews mentioned some do's and don'ts. Well.... it never occurred to me that the wall of my choice for the art was not entirely square. As I live in an older home. So my dilemma was how to keep the pattern going straight and level. Next was finding how to secure them to the painted wall which had texture on it. I measured out how many panels would go across and then down the wall. No problem, until I found that I had to cut down a few panels to finish the one side, seven to be exact. No matter how I placed the panels on the wall I would have to cut some down to fit so I made the cuts on one side of the wall instead of dividing up the difference and having to cut fourteen panels. I was fearful that it would look chopped up on both sides. I found that by using a large sharp pair of scissors worked best for cutting the panels. Made clean cuts. Either for cutting around an electrical outlet or for smaller pieces. Now I had to figure out what product to use to adhere them to the wall. I found that by using my Hot Glue gun worked best and was easy to work with. You must work quickly because the glue will cool down and if not in place while the glue is still hot it will not stick. I placed a small amount on each corner of the panels and quickly put them in place. I also found that they were easy to remove if they needed adjusting, just reapply more hot glue. So after a weekend of working on this project I LOVE the end results. OMG...it's beautiful. I did not paint the panels, keeping them their off white color, but painted the three surrounding walls a little darker color and now the 3D art wall just pops. I'm have had so many compliments on my DIY project. Worth the trouble and hard work.
A**.
Nice design, hard pressed card board
These are not super hard to install, but it takes time to align them and for the adhesive to set. They are a hard pressed paper / card board. Means: it does not lay totally flat and need to apply some pressure until the glue sets. The gaps between each "tile" need filled and lightly sanded to make it once professional looking wall cover. While it is not really easy to install, the result is worth it.
P**.
Really transformed a wall for our airbnb,
We had an accent wall at our airbnb, that was covered in brick wallpaper. It needed some modern updating and I came across these on Amazon as a solution. It took me about 2 days on and off to install them. I went with the plant based tiles, and while I like them, if I had it to do over I would go with the pvc option. The plant based tiles have a very comfortable finish, it really looks nice, and matte. They are basically a very nice, hefty cardboard, and I can see them taking stains and damage easier than the pvc option. With the plant based tiles too, I would be very careful about painting them, a light coat of paint or primer before hand, is probably a good recommendation. I can see them soaking up a ton of paint, becoming heavy, and not sticking to the wall. I used a contact cement and it worked well for sticking the tiles to the wall. Things that I did not think through that I should have before installation. You are going to want caulk between the tiles, even if you run them very close. You also want flexible caulk that is not going to crack. Have a good solution for cutting the tiles. I thought I could use wood saw and jig, but it did not give a clean cut like I wanted. I then tried metal cutting snips, and while they work for very small cuts, they do not do well for long cuts either. I ended up using a cutting wheel on a Dremel, and it did pretty well, I sanded and cleaned the edge a little after each cut. If I had it to do over again, I think a table saw and very small tooth blade would be the easiest and give you the best looking cuts. You are going to want to frame in the edges of the wall you do with some type of base board, I used 1/4 white square, and it worked well. If you don't, the edges of the tiles that meet the wall are not going to look good. If you have outlets on the wall, have a plan in mind. I cut out perfect holes in the tile for the outlets, then 3d printed some little riser frames to go under the outlet face plate. Also if you plan on going around a corner, this may not be the product for you, I recommend this just for an accent wall. I can think of solutions to get around corners, but it is going to complicate the job significantly. Overall very pleased, it looks great. It also looks way more pricey than it actually is. You will most likely spend the same for instillation materials as you will for the initial tile purchase, so keep that in mind.
A**A
It definitely turns a drab wall to fab
I liked the end result— but I’m not sure I can justify the price tag for what I got. For MUCH less than what I spent, I could have used trim or mounding to create a “board and batten” kind of accent wall and would have finished 4x as fast— not to mention how much easier removal would have been in the event I move. This project took FOREVER to finish and costs much more! You’ve got to find a decent construction glue and get many bottles of acrylic caulk to finish all the seams. AND you need to buy paint because the panels come in an awful yellowish color. You need a drop cloth, a caulk gun, rags to clean up the crazy mess this turns into, etc. The panels aren’t made of plastic. It feels like paper plate material and it needs heavy duty construction glue to remain on the walls until the glue dries. It was such a pain to glue them as corners would stick up and using tape to hold them down only made rips on the panel (the way cardboard looks when you rip tape off of it) If this is exactly what you’re looking for then go for it. Personally I wish I’d read a comment like mine to let me know this was going to be wayyyy more work and money than I intended (~$260) for a small ~8ft by ~8ft wall. All that said— the wall looks pretty good. Tip: place the glue on the panel AND the wall for better adhesion.
W**A
يجنن المنتج خذيت كميه صغيره اجرب وطلع يجنن بس للاسف يوم رديت اشتري رفعو السعر للضعف وتوهقت مش قادره اشتري
H**M
لا بد تشتري لصق خارجي
K**A
Received very bad quality tiles, matte and glossy mixed and too broken. Don't buy the product. Waste of money
L**E
Installation facile avec un pistolet à calfeutrer et de la colle sur tout les morceaux. Il suffit de mettre du latex pour que les joints ne paraissent pas. Et on fini avec la peinture choisi. Pour les interrupteurs ou prises de courant il faut ajouter des rallonges de boite électrique. Voilà.
C**O
Hola, me hacen falta 3 piezas. Me las puedes vender?
Trustpilot
1 month ago
1 month ago