
Desert Online General Trading LLC
Dubai, United Arab Emirates
Desert Online General Trading LLC
Dubai, United Arab Emirates


🔧 Seal the Deal with Style!
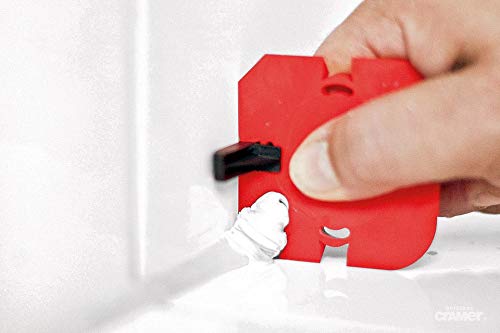
The Cramer Silicone Sealant Caulking Profiling Tool 5PC Kit is a lightweight, versatile solution for all your sealing projects. Weighing just 4.2 ounces and measuring 7.09 x 3.15 x 0.79 inches, this durable silicone tool kit is designed for precision and ease of use, making it an essential addition to any professional or DIY toolkit.
| Item Weight | 0.12 Kilograms |
| Item Form | Strip |
| Surface Recommendation | Walls |
| Water Resistance Level | Waterproof |
| Material Type | Silicone |
M**P
Excellent Results
Had to re-caulk our master bath shower and ran accross this on YouTube. It's pricey but I'd buy it again. This made tooling the silicone caulk much less frustrating. The profiling tool made the final joints look better than the original install by the home builder. I found misting a little denatured alcohol on the initial bead helped with the tooling. Have a lot of paper towels handy to clean off the excess on the tool as you go. The thing literally squeegees the silicone as you go. Don't try to pull it too far or you'll get a lot of silicone buildup that spills over the side. When this happened to me I just used one of the straight edges to squeegee up the excess on the wall
G**R
smooth line
caulking - always my nemesis - for my first time using this tool, the results were ok. i put too much caulk on and it was a messy cleanup around the sink. the corners were the hardest part, and i had to do them over 2-3 times. learned that you should start as close to the corner as possible, keep the tool straight / level, and go all the way to the other corner. next comes a tub surround and a walk-in shower, hopefully it will go well. the idea behind this tool is really good. gave it 5 stars as it was operator error vs tool deficit. (operator got 2 stars)
D**.
Great product, but practice, practice, practice!
This is really a great product! That being said, it isn't something you just pick up and do perfect lines. it is really important that you actually practice with the different pieces to figure out which one works best for the size of the caulk line you plan to make in a corner, groove, or joint. Once you get a bit of practice in, this product works great! The only negative thing (IMHO) is there needs to be a card inside the case that lets you know where to find new blades for the caulk removal tool. It is defiantly not a simple order from your local box store or Amazon. In fact, I haven't been able to locate any new blades at the time of this review.
N**E
Over priced & not easy to use
A bit spendy compared to other products. Also, practice makes perfect. Do not expect a perfect result right away. These things are VERY hard to use, especially with silicone.I don't find that a perfect right angle is found in many homes, so the larger square tools in this kit can sometimes be tricky to profile with. I don't know if other kits are made with the same material, if so I would think they would work just as well, especially for this price.
M**G
Works Great
Makes a very neat looking caulking joint and since it is not concave such as using fingers in the past, this gives a much stronger caulk joint since it is not concave which give more caulk at the joint and edges. Makes a very neat joint also but so did my finger. Using tape leaves a slightly bad edge where liquids can seep in the joint vs this allows a perfect edge of the joint against surfaces. It is somewhat expensive ordering here, but could not find this kit anywhere locally.
S**3
but they skip over how to do 3 point corners where two walls meet a base like a shower pan
It's been said that caulking would not stick to the tool. Not true in my case. I was using a caulk for a shower that matches the grout. If I did not IMMEDIATELY wipe off the excess caulk, It would stick. Luckily I discovered a green scrubbie will clean off the tool without too much elbow grease and without damaging the tool. Also, those little black feet slide thingys have some recessed grooves in them that fill up with caulk and are a pain to pick out and clean. Plan to clean these tools at least every 15 minutes or so in order to keep them from building up stuck-on caulk.Lastly, the instructions are in German. I found some youtube videos that show how to use the tools, but they skip over how to do 3 point corners where two walls meet a base like a shower pan.Oh, one more thing and it's pretty important, though not the tool's fault; If your walls are not exactly 90 degrees from each other, the tool won't give you a clean grout line. I paid BIG bucks to have my shower walls floated so they would be true and square, however, the tile guy did a piss poor job in my opinion and it wasn't obvious until I went to caulk that the walls were not perfectly perpendicular to each other. Especially the shampoo recessed shelf. I ended up using my finger to make a decent caulk because the walls were not right angles to each other.
N**.
Great Product and Worth the Price
This is so easy to use it's actually fun caulking now. I kept buying similar tools in the past so that I don't have to use my finger but they all fail one way or another. I have bought practically all types on the market. This is the one and only that finally earned its mark. Great product. Very simple, yet accurate, in its function. Never did this job any easier. This thing is much cheaper in Europe because it's a German company from what I heard. However, it's well worth paying the premium to have it in the US and right in my toolbox. Glad Amazon carries this.
L**T
Excellent tool for pro finish
This little tool works great for creating clean caulk lines. Has a little ski attachment that works smoothly over small or uneven tile. It also allows for different sized caulk lines when a smaller bead or wider bead is needed. If you are using this with silicone, know that you may get only one pass as silicon sets up pretty quick. If you go back over it, you may put a wrinkle or pocks in the smooth finish. Also, keep some denatured alcohol handy to keep the tool clean.
Q**O
Great Quality and Works Great!
I used these tools to caulk a shower niche which had lots of recessed corners difficult to access and the tools worked great. What I like about this tool is that unlike its competitors it has true right angle edges which fit tight to the wall surfaces providing a stable guide. Also I like that they are precision made and slightly flexible. They also remove excess caulking quite effectively. I used 3 out of the 5 tools. It was expensive for what it is but was worth the price when I look at how much time it saved and how good a job it did. As recommended in videos apply the caulking in short sections of a few inches at a time to avoid excess caulking on the tool. Have lots of shop towels handy to wipe the tool clean as you go.
Y**O
Vielseitig und äußerst hilfreich.
Ja ja, das mit dem Selbermachen ist schon so eine Sache.Früher, als es die „Baumarktkultur“ noch nicht gab, mussten die Lehrlinge (Azubis) noch 3 Jahre von der Pike auf lernen, um handwerkliche Fähigkeiten soweit zu entwickeln, dass sie, zunächst noch in Begleitung erfahrener Gesellen, beim Kunden einigermaßen bestehen konnten.Heute braucht man das scheinbar alles nicht mehr. Man schaut sich ein paar Videos auf YouTube an, fährt in den Baumarkt,besorgt sich alles nötige und schon kann‘s losgehen …Ob das funktioniert, ist neben einem gewissen manuellen Geschick, vor allem abhängig von den Ansprüchen, die man an eine fachlich richtige, handwerkliche Umsetzung stellt. Wenn man mit dem Ergebnis seiner Arbeit zufrieden ist, ist ja zunächst alles ok.Viele Heimwerker schaffen es auch tatsächlich, ihre Projekte fachlich und optisch einwandfrei zu bewältigen.Es gibt aber auch viele, und das erlebe ich immer wieder, die sich das, was sie da zusammengemurkst haben, einfach nur schönreden.Von den oft unwissentlich verursachten Folgekosten, die sich in der Regel erst viel später zeigen, ahnen sie noch nichts …Das glauben Sie nicht? Dann lesen Sie doch einfach mal aufmerksam die Bewertungen hier auf Amazon im Bereich „Baumarkt“.Nein, nicht die 5 und 4 - Sterne Bewertungen.Bei den 1, 2 und 3 – Sternen wird’s interessant und zuweilen, zumindest für den fachkundigen Leser, auch amüsant.Wer es versteht, zwischen den Zeilen zu lesen, dem offenbaren sich hier ganze Dramen ...Doch nun zur Bewertung des Fugi II:Im Rahmen einer Fassaden - und Badsanierung, galt es die Anschlussfugen der Fliesen und der Natursteinfensterbänke zu versiegeln.Dazu habe ich mir dieses Fugi-Set bestellt.Zum Fugi-Set selbst muss ich eigentlich nicht viel erklären. Wer sich das Produktvideo anschaut, ist bestens informiert.Das Set ist gut durchdacht und deshalb auch sehr vielseitig einsetzbar.Beim erstellen der Flieseneck - und Anschlussfugen im Bad, erwiesen sich die Gleitschienen, die zusammen mit den roten Werkzeugen benutzt werden können,als cleveres Zubehör.Sie gleiten auf den Wand- und/oder Bodenfliesen, überbrücken dabei die quer verlaufenden Fliesenfugen, und ermöglichen so,dass das Werkzeug trotz der Fugen gleichmäßig und gerade geführt werden kann.Doch Vorsicht, wer wie auf dem einen Anwendungsfoto fälschlicherweise gezeigt, nur eine Gleitschiene einsetzt, wird mit der Seite,an der die Gleitschiene fehlt, in die nächste Querfuge absacken.Mit etwas Gefühl und noch mehr Übung kann man das zwar verhindern, aber über beides muss man erst einmal verfügen können. (Siehe oben)Während das Versiegeln von Fliesenfugen mit dem roten Fugi II in Verbindung mit den Gleitschienen, noch relativ einfach zu bewerkstelligen ist (Vorausgesetzt die Fliesen sind Fachgerecht verlegt - 90° Winkel - siehe oben), stellt uns das Versiegeln von Fensterbänken vor neue Herausforderungen.Hier haben wir, bedingt durch das nötige Gefälle, (Vorausgesetzt die Fensterbänke sind Fachgerecht eingebaut – Wasserablauf - siehe oben) keinen rechten Winkel.Das bedeutet, dass jeweils nur ein Schenkel des Fugi-Werkzeugs Flächenbündig anliegen kann.Liegt ein Schenkel bündig am Fenster an, entsteht zwangsläufig an dem Schenkel, der auf der Fensterbank gleiten soll ein keilförmiger Spalt.Umgekehrt verhält es sich genauso. Dieses Problem ist lösbar. Leider lässt sich nicht genau sagen wie.Das ist abhängig vom Grad des eingebauten Gefälles der Fensterbank.Ich empfehle zuerst (nach Fugengröße) das passende Werkzeug auszuwählen.Dann ein paar Trockenübungen, ohne Fugenmasse, mit diesem Werkzeug durchzuführen.So bekommt man ein Gefühl dafür, wie das Werkzeug zu führen ist und erkennt auch den oben beschriebenen Spalt.Man wird sich dann für eine Seite entscheiden müssen.Sind Fensterbank und Fenster etwa gleich glatt, ist es zweitrangig ob der Spalt am oberen oder unteren Bauteil entsteht.Nachdem die Fugenmasse aufgespritzt wurde, setzt man einen Werkzeugschenkel bündig an und beginnt zu ziehen.Dabei sollte ein gleichmäßiger Druck auf beide Bauteile ausgeübt werden. Da wo der Spalt ist, wird sich meistens auch etwas Fugenmaterial seitlich verteilen.Das wird sich nicht verhindern lassen und braucht uns in dem Moment auch nicht zu kümmern.Wichtig ist, dass das Fugenwerkzeug auch an der Seite wo der Spalt ist, mit konstantem Druck geführt wird.Dann entsteht eine scharfe Trennung zwischen der Fuge und dem Material, das sich unter dem Spalt verteilt.Dieses wird in einem zweiten Arbeitsgang mit dem Fugenwerkzeug weggenommen.Dabei sollte ein Kontakt mit der fertigen Fuge vermieden werden.So habe ich die Fugen an allen unseren Fensterbänken mit dem Fugi-Set herstellen können.Das Fugi-Set war mir sowohl bei unseren Badfugen (18 Meter) als auch bei den Fensterbankfugen (14 Meter) eine wichtige Hilfe.Ohne dieses clever durchdachte Set hätte ich die niemals so gut und gleichmäßig hinbekommen.Abschließend noch ein paar grundsätzliche Tipps, die man beim Versiegeln und der Arbeit mit dem Fugi-Set beachten sollte:(Beim Versiegeln kann man wirklich viel falsch machen. Wer sicher sein will das richtige zu tun, sollte sich dieses Merkblatt googeln: IVD NR.3)Die Fugenflanken müssen trocken und sauber sein.In den Fugen darf sich kein Staub/Schmutz/Mörtelrest befinden.Das gilt auch für die Anschlussflächen, das sind die Bereiche, auf denen das Fugenmaterial haften muss.Die Öffnung der Spritztülle muss so geschnitten werden, dass sich das Fugenmaterial in einem Zug auftragen lässt.Versucht man z.B. eine 10 Millimeter Fuge mit einer Spritztülle zu füllen, die bloß 3 Millimeter geöffnet wurde, macht das wenig Sinn.Nur so viel Füllmaterial auftragen, wie auch in kurzer Zeit bearbeitet werden kann.Das Fugenwerkzeug muss so gewählt werden, dass die fertige Fuge an beiden Seiten ausreichend Auflage hat.Der Fugenquerschnitt soll möglichst ein gleichschenkliges Dreieck ergeben. (Dreikantfase)Bei der Arbeit mit dem Fugi-Set braucht kein Glättmittel verwendet zu werden! (Ganz wichtig)Das Fugi-Set nimmt das überschüssige Material, rückstandslos auf.Zwischendurch das Fugenwerkzeug immer wieder mit Küchenpapier - trocken!- säubern.Sauber Arbeiten, erst gar kein Geschmiere entstehen lassen.Überschüssiges Material sollte nicht, wie in dem Werbevideo gezeigt, wieder verwendet werden.(Es gibt Ausnahmen, aber darauf einzugehen würde jetzt zu weit führen. Bei den oben beschriebenen Arbeitenwird kein überschüssiges Material weiter verwendet)Langfristig gesehen ist es unwirtschaftlich zum Versiegeln ein billiges Fugenmaterial zu verwenden.Hochwertige Fugensilikone kosten heute (17.08.2017) 10 bis 13 € pro 310ml Kartusche.Sie lassen sich einfacher verarbeiten und besitzen bessere Produkteigenschaften, die sich auf lange Sicht bezahlt machen.Der Preisunterschied ist dadurch gerechtfertigt.Nur Mut und gutes Gelingen! ;-)
L**E
Silicone a noi due!
Prodotto integro e fedele alla descrizione. Completo di varie misure per tutti i tipi di fuga o sigillatura! Non vedo l'ora di usarlo!!!
S**K
Excellent kit for working with sealants
Excellent product. A must have in any tool kit for tooling off sealants: silicone, acrylic, whatever. It allowed this amateur to turn in a professional, impressive finish the first time and every time.The tooling pieces are smooth and firm - very sturdy - which is good for maintaining even pressure and shape on a sealant bead. The little glide guides are good for maintaining a smooth, straight sealant edge over bumpy areas. The bits are easy to clean too.Only downside is the high price, especially compared with around AUD$3.00 for similar though smaller and flimsier tooling squares from a big box store.Even so, I would never work with sealants without the Fugi Kit on hand.
B**J
Joint parfait
Quel bonheur de ne plus s'enquiquiner pour lisser des joints silicones!!!Un coup de silicone, un coup de produit à vitre, on prend la lame dont on a besoin et c'est partit...Avantage: le silicone ne colle pas sur les lames, ce qui est très agréable pour les nettoyés entre chaque passe.Je recommande vivement ce produit aux bricoleurs et pro
Trustpilot
3 weeks ago
3 weeks ago
3 days ago
2 months ago