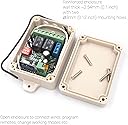
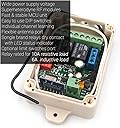
🔑 Secure your smart space with next-level wireless control!
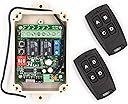
The Solidremote 12V-24V Secure Wireless RF Remote Control Relay Switch KIT-1 is a versatile, dual-channel receiver kit featuring ultra-secure rolling code encryption with over 18 quintillion combinations, a high-sensitivity -113dBm RF module for extended range, and flexible relay modes. Designed for both indoor and outdoor use with IP55 protection, it supports 12-24V AC/DC power and switches up to 10A loads, making it ideal for garage doors, LED lighting, home automation, and industrial controls. Easy to program and install, this kit empowers professionals to upgrade their smart environments with reliable, secure wireless control.
| ASIN | B01JGDV8UM |
| Best Sellers Rank | #264,734 in Tools & Home Improvement ( See Top 100 in Tools & Home Improvement ) #947 in Garage Door Keypads & Remotes |
| Brand | Solidremote |
| Brand Name | Solidremote |
| Coil Voltage | 12 volts |
| Connector Type | 3-pin Terminal Block Connector |
| Contact Current Rating | 10 A |
| Contact Material | Steel |
| Contact Type | Electrical |
| Current Rating | 10 A |
| Customer Reviews | 4.5 out of 5 stars 1,738 Reviews |
| Included Components | 1 x 202U receiver + 2 x TX134 remotes + 1 x instruction sheet |
| Manufacturer | Solidremote Technologies Ltd |
| Maximum Switching Voltage | 24 volts |
| Minimum Switching Voltage | 12 volts_of_direct_current |
| Model | SR-RCS-202U |
| Mounting Type | Wall Mount |
| Number of Items | 1 |
| Number of Packs | 1 |
| Number of Terminals | 3 |
| Operation Mode | Automatic |
| Part Number | KIT-1 |
| UPC | 708296998994 |
| Unit Count | 1 Count |
| Wattage | 120 watts |
D**2
Versatile Device with Plenty of Applications
I'm using this switch to control some things on my home automation system. It's small, very intuitive to program, and the range seems great (but admittedly I didn't need a whole lot of range for this particular setup). The relays make a satisfying "click" when toggled, and having status indicators for each one is a nice touch. The terminal block quality is excellent. They even provide a gasket for the lid, though it's not much use since the provided holes for the antenna and your cabling are wide open. It would have been an improvement to make the lid screws captive, but you can't expect everything at this price point. The internal DIP switch allows you to choose independently whether each relay transfers momentarily, or is latched (push on - push off operation). In momentary operation, a brief press of the button triggers the relay contact for around 0.5 seconds. If held, the appropriate relay stays engaged until the button on the remote is released. There are also other modes available for more esoteric functions, including the use of a limit switch to force a relay off when an external contact triggers. Note that with the provided 202U receiver, two of the buttons on the remotes are unused. Per the manufacturer's website, it appears that a four channel receiver (402U) is sometimes produced, but is not widely available due to low demand. So far, I am quite impressed.
S**R
Simple but effective
I have purchased a v5, a v6 and now a pair of extra remotes. The v6 has not been installed yet so my comments are regarding v5 only w the newer remotes. One of the original v5 remotes was crushed by traffic so I purchased the v6 with the intent of using the remotes w the v5 unit and keeping the v6 unit as a backup. I then decided I would use v6 in another project so bought a pack of the spares anyway. But before the spares arrived I had already programmed the v6 remoted to my v5 and they are working fine. (More on that below.) I'm pretty sure I have an older review on the v5 so I'll just throw a few points out here. First, i have it installed inside an aluminum trailer (to turn on interior and exterior lights A=interior B= Exterior C= Both) but it still has pretty good range and reception. Batteries last a long time. Set up, even utilizing relays to handle more amperage, was very simple. This has been working flawlessly since 2019 (now Q2 2024). PROGRAMMING NEW REMOTES - I don't recall having any issues programming the original remotes, and I'm betting that would be true of the new v6 unit, however linking newer remotes to the older units may require changing the remotes 'mode'. This is not stated very clearly, if at all, in most documentation or videos. I don't have all of the details but here's the basic idea. When you press one of the buttons on an original remote does it blink once and go out, stay on for a longer moment, or blink several times? This is an indication of its 'mode'. When you get new remotes the mode is likely set to the default mode at the time of its fabrication, thus different from an older model, and you probably see the new remotes flash differently from your old remotes. You need to get the new one to match the old one. To change the mode you hold the C+D buttons at the same time until you see the remotes light come on/flash, let go of C+D and press A. You should now see a different pattern when you press a button on that remote. If you are 'lucky' that's the one that matches your base unit so you should try to pair them again following the documented (simple) process. If the unit and remote didn't pair up then try changing the remotes mode again. I had to change the modes many times before they finally linked up. Not sure if it makes a difference but I also tried pressing the B and C buttons (after C+D) in case that did anything special since the C+D> A just plain didn't work after the first few tries. It can be frustrating but after a couple minutes of feeling like I was getting nowhere it eventually worked. Overall a great product! UPDATE June 2024 - I ended up adding the additional standalone remotes to the same v5 controller and found that they were already in the correct 'mode', unlike the remotes that came with the newer v6 unit (described above). This is neither a plus nor a minus since it just depends on your situation as to whether you'll need to adjust the modes or not for pairing. If i had wanted to pair them with the newer v6 unit then I'd likely have needed to change the mode.
K**H
Replaced my old Craftsman door controller.
This was easy to install and works perfectly as a garage door controller. I followed this reviewers directions: I bought this remote control to replace the problematic remote controls built into my two aging garage door openers. It does that wonderfully. When it came to puzzling out how to wire the unit up, the instruction sheet had me scratching my head. Even the illustrations were confusing. For example, the diagram of the circuit board does not call out the P1 and P2 switches, which are used to program the unit. But when I looked at the markings on the circuit board for the terminal block, everything became clear. There are two positions for the power input, and there are three positions for each of the relays -- a normally open contact, a normally closed contact, and a common contact. The P1 and P2 switches are also clearly labeled. For garage door operation you need to wire up a 12-volt power supply. Pretty much any old wall-wart power supply that outputs 12 volts will work. (This is why you have a drawer full of old wall-wart power supplies!) You need to cut off the plug, separate and strip the wires, then connect them to the power contacts on the terminal block. Polarity doesn't matter, nor does whether the output is AC or DC. Sweet. For each garage door you need to use one relay. You can wire up to the two contacts on your existing wall switch -- one wire goes to the N/O (Normally Open) contact on the terminal block, and the other wire goes to the C (Common) contact right next to it. You don't use the N/C (Normally Closed) contacts. And you don't need to disconnect the existing wall switch -- the wall switch and the remote control can operate in parallel. Since there are two relays in this remote control you can control two garage doors independently. Just wire up the second relay like you did the first. You might notice there is a DIP switch on the circuit board. If you, like me, are using this remote control for your garage door openers just leave the DIP switch alone. Its default position is what you want. (If you don't know what a DIP switch is, don't worry. You don't need to.) You do need the instruction sheet to figure out how to program the two small hand-held remotes. Pretty simple, but not something you'd intuit. A couple of hints. I removed the circuit board from its box to make wiring the terminal block easier. You do have to remember to thread the wires for the power supply through the holes in the box first. I connected long-ish wires to N/O and C terminal block contacts, to make wiring "in the field" easier. All the wires and the antenna got threaded through the holes in the box before closing things up. And the relays make audible clicks when they operate. This helps when testing the unit under power. But good luck trying to detect which relay made the click. A length of white gasket material comes with the kit. You fit that into a groove in the box, to help create a water-tight seal. You'll probably need to trim it to length. While this gasket makes a nice seal, the three open holes in the box, used for the wiring, will let lots of water in anyway. Mount the box with the holes at the bottom to avoid that. I haven't figured out just how much range this remote setup has, but it is clearly much better than what I had before. I can stand across the street from my house and get reliable operation. I'm satisfied with that.
E**I
Simple If You Ignore The Wiring Instructions
The manufacturer says you should have some electrical experience, and that is true. A complete newbie is going to have issues. But if you know how to wire a terminal block, and run wires from Point 'A' to Point 'B', you should be able to install this unit. I bought this remote control to replace the problematic remote controls built into my two aging garage door openers. It does that wonderfully. When it came to puzzling out how to wire the unit up, the instruction sheet had me scratching my head. Even the illustrations were confusing. For example, the diagram of the circuit board does not call out the P1 and P2 switches, which are used to program the unit. But when I looked at the markings on the circuit board for the terminal block, everything became clear. There are two positions for the power input, and there are three positions for each of the relays -- a normally open contact, a normally closed contact, and a common contact. The P1 and P2 switches are also clearly labeled. For garage door operation you need to wire up a 12-volt power supply. Pretty much any old wall-wart power supply that outputs 12 volts will work. (This is why you have a drawer full of old wall-wart power supplies!) You need to cut off the plug, separate and strip the wires, then connect them to the power contacts on the terminal block. Polarity doesn't matter, nor does whether the output is AC or DC. Sweet. For each garage door you need to use one relay. You can wire up to the two contacts on your existing wall switch -- one wire goes to the N/O (Normally Open) contact on the terminal block, and the other wire goes to the C (Common) contact right next to it. You don't use the N/C (Normally Closed) contacts. And you don't need to disconnect the existing wall switch -- the wall switch and the remote control can operate in parallel. Since there are two relays in this remote control you can control two garage doors independently. Just wire up the second relay like you did the first. You might notice there is a DIP switch on the circuit board. If you, like me, are using this remote control for your garage door openers just leave the DIP switch alone. Its default position is what you want. (If you don't know what a DIP switch is, don't worry. You don't need to.) You do need the instruction sheet to figure out how to program the two small hand-held remotes. Pretty simple, but not something you'd intuit. A couple of hints. I removed the circuit board from its box to make wiring the terminal block easier. You do have to remember to thread the wires for the power supply through the holes in the box first. I connected long-ish wires to N/O and C terminal block contacts, to make wiring "in the field" easier. All the wires and the antenna got threaded through the holes in the box before closing things up. And the relays make audible clicks when they operate. This helps when testing the unit under power. But good luck trying to detect which relay made the click. A length of white gasket material comes with the kit. You fit that into a groove in the box, to help create a water-tight seal. You'll probably need to trim it to length. While this gasket makes a nice seal, the three open holes in the box, used for the wiring, will let lots of water in anyway. Mount the box with the holes at the bottom to avoid that. I haven't figured out just how much range this remote setup has, but it is clearly much better than what I had before. I can stand across the street from my house and get reliable operation. I'm satisfied with that.
V**R
a good clean design goes to show that a lot of ...
WOW!!! I want to say mahalo (Hawaiian for "Thank You") to the folks who put this together. This kit is VERY WELL designed for those who want to use it exactly for it's intended purpose or get creative in how you utilize this product. Let me take a moment to break it down as to why I feel this is a high quality product. 1. The remote snaps shut with precision. It doesn't feel cheaply made at all. 2. The same goes with the receiver box and receiver board. It is very well manufactured. 3. The remove has a silicone cover that keeps it protected from the rain (not waterproof) but definitely should have no problems getting a splash or two on the keypad. 4. The design of the circuit board is very clean and well laid out. I know many people don't care how a board looks as long as it works but to me, a good clean design goes to show that a lot of work went into creating this product. It does not come off as some 20 cent product that was soldered by some guy who took a 10 minute course is soldering and got a shiny gold certified to solder sticker. Lastly, the reasons why I highly recommend this product. 1. It's built with customization in mind. For starters, I plan to use this for a remote mailbox alarm. The remote opens up easily to a very clean circuit board. On the circuit board, there are points where you can solder a positive and negative lead (it's labeled on the board and I tested the voltage on the points to reveal a 3.3v rail (powered by a CR2032 battery) 2. There is a sticker that protects the contact points of the switches on the board. If you peel off this sticker, you get a very clean soldering interface to solder you wires to so you can add a magnetic switch or a mercury switch etc to allow you more freedom in the type of switch you use. So simply put, this device was designed to be very usable and customized. I highly recommend if you are looking for a RF relay type of switch and want ease of customization or high quality parts, look no further! Here's a photo of the remote disassembled and ready for soldering. I'll attach a photo of the entire project once completed (future date)
S**E
Well built and worked with hydraulic lift
UPDATE: ONE MONTH IN System is still working perfectly after a month of operation. Very VERY please will how this all worked out. This remote receiver is mounted in a reasonably warm engine room environment on the boat, so it does get exposed to heat loads in excess of 120F at times. Unit is functioning perfectly. -------------------------------------------------------------------------------------- I have a hydraulic lift on the back of a boat. The remote control receiver that came with the lift has always been a bit of a problem with reliability, signal range and a variety of key FOB failures. The OEM of the remote system for the lift is also out of business, making parts like key FOBs either stupidly expensive, or just unavailable. One vendor quoted me $50 for a single key FOB. The solution offered by the lift vendor was a new remote control system, for over $550, a fee I was not keen on paying, given the system is not that complicated. So began the search to find an alternative, and I landed on this Solidremote system. It is well constructed, compared to others I tried out, and offers many configuration options. The remote key FOBs offer excellent security, and more signal range than I will ever need. Note: my application for this remote receiver is NOT recommended for this remote control system, unless you know what you are doing! Connecting a hydraulic system like this CAN be dangerous, so make sure you know what you are doing, or get someone to help you that does. You need to have a solenoid in the circuit to ensure you are not running high current through the remote control box. The next challenge was figuring out how to wire the Solidremote into my application. I made up a new wiring harness that essentially picked up the connections of the old remote system. The use of a couple of 5A diodes to prevent current flowing back up through the Remote Receiver's relays solved the only issue --without those diodes the system will activate both hydraulic valves when you press either up or down button. The Solidremote system works like a charm, offers superb range and so far seems to do everything I need. I also like the fact I can buy additional key FOBs for $5 each!!
K**R
Works well super easy to program
This product for 17 bucks is no doubt the best buy on Amazon. It comes with 2 remotes that can handle 4 different devices. Try just buying 2 remotes. They don't ship a power supply but i just found an old brick that I had tossed the device and kept the power supply for, but the ends of measured the voltage and connected it up. Programming the remotes is so easy if i had to buy a new remote I would just buy one of these. Press the button on the controller then the remote the controller flashes and you are done. There are 2 relays in the controller so you could use it to control 2 separate garage doors, or if you wanted to get fancy you could put the power to the opener on a relay and then no one could open the door unless they pressed the relay to power up the door. I cannot say enough over how easy it was to set up. Do you need a little bit on knowledge yes each relay has 3 connectors and you only use 2 of them. But unless it dies in a year it really is a great value. The unit has a rubber gasket that goes all the way around and while the bottom of the controller is open you could seal it up pretty easily. Is this the most wiz bang thing I have purchased from Amazon nope. But has it impressed me with no issue setting up and working out of the box and lots of other features included yes. I can see where they probably cut the cost by 50% by not including a power brick and most people probably have one hanging around. I just used the 2 wires that come down to the door button on the door going into my house to test the unit. It was for my brother in law and he was also very happy he could still use his old remote too!
T**Y
Highest quality, great design
I don't know how this product can be priced so cheap. I do a lot of DIY electronics and as a result buy a lot of controllers, switches, other misc hardware and connectors from China. This company is based in China as well but the quality and support is much higher than the generic white label products you find on aliexpress. I'll keep it short, here are the main pros: Rolling code implementation - Other DIY kits use a fake rolling code implementation meaning they look at the signal only to confirm that the remote ID matches one that has been programmed to the receiver. Once that matches, they discard the rest of the bits where the rolling code logic is applied. This basically downgrades all rolling code remotes to a fixed code remote. Solidremote implements true rolling code logic so that replays do not work. I will update this review if I get around to making a video on this topic. Quality components - The PCB, soldering, case, power distribution are all top tier. Nothing feels cheap and the power distribution has logic in place to accept a wide range of AC/DC volts. It is even rectified so that you can swap positive/negative. Low power consumption - at 24VDC, I measured 3.5ma at idle and 36ma (multiply by ~2 for 12V) when powering 1 relay. Parasitic draw is almost non existent. Quality support - Solidremote has a great support forum where user questions, some extremely technical are answered.
J**A
Funcionalidad perfecta y buen alcance.
Todo perfecto para controlar puertas eléctricas e iluminación exterior. Solo tienen que mejorar el instructivo que no es muy claro.
D**.
Great installation video available on Utube
Works and way better than all the cost of a complete new garage door opener
A**R
Good one
easy to install, nice ...
G**G
لم استخدمه
لم استخدمه
A**A
Calidad a buen precio.
Más que satisfecho.excelentw producto.gracias.
Trustpilot
1 day ago
2 months ago