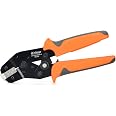
🔧 Crimp like a pro—precision and power in your hands!
The IWISS SN-2549 ratcheting wire crimper is engineered for professional-grade crimps on AWG28-18 open barrel terminals, supporting multiple pitch sizes including JST, Dupont, and Molex. Featuring a high-precision ratchet mechanism and ergonomic grip, it ensures consistent, fatigue-free performance for demanding electrical and hobbyist applications.


| Brand | IWISS |
| Color | Orange |
| Item Weight | 13.76 ounces |
| Handle Material | multicolor |
| Grip Type | Ergonomic |
| UPC | 709619251635 |
| Manufacturer | ZHEJIANG IWISS ELECTRIC CO.,LTD |
| Part Number | SN-2549 |
| Item Weight | 13.8 ounces |
| Product Dimensions | 7.48 x 2.56 x 1.1 inches |
| Country of Origin | China |
| Item model number | SN-2549 |
| Is Discontinued By Manufacturer | No |
| Item Package Quantity | 1 |
| Usage | connecting electrical wires on rechargeable battery packs, battery balancers, battery eliminator circuits, 3D printers, and radio-controlled servos |
| Batteries Included? | No |
| Batteries Required? | No |
D**B
Excellent, High Quality
The iCrimp Crimping Tool has become an essential tool in my arsenal for working on servo wires for RC planes. It's a game-changer that ensures a reliable and secure connection, and here's why.The precision and ease of use of this crimping tool are simply outstanding. It's designed to work with Dupont-style connectors commonly used in the RC hobby. The ratcheting mechanism guarantees a consistent and firm crimp every time, eliminating the frustrations of loose connections.I particularly appreciate the tool's ability to handle a range of wire gauges, making it versatile for various RC projects. The ergonomic handles provide a comfortable grip, even during extended use.Overall, the iCrimp Crimping Tool has made working on servo wires a breeze. It ensures that my connections are not only secure but also professional-looking. If you're into RC planes or other electronics projects, this tool is a must-have for achieving reliable and precise crimps with ease. It's a small investment that makes a significant difference in your projects' success and overall enjoyment.
S**S
These crimpers work way better than I was expecting.
These work really well. My first test crimp was perfect. Inner and outer crimps were dead on.
P**8
Experienced maker, hacker, builder wishes he'd bought this sooner
My only regret is not buying this sooner. I've been a lifelong builder and hacker; R/C cars, planes, helicopters, arduino robots, raspberry pi arcade cabinets, etc. I'm really good with needle nose pliers because that's all I've used for decades. I can (usually) get just the right diagonal grip to do complex crimps and work my around a connector to pinch the wings around wire and insulation alike. Yea, the end result wasn't always the prettiest but it (usually) worked even though it took a while. THEN I found this crimping tool.This tool has changed my life. The crimping is so much faster now. This tool is very intuitive and well designed. You can see in the pictures there are three crimping channels for various sized connectors and wire gauges. What you might not see are the two 'zones' within each channel: There's a tighter zone for the wire-crimping wings and a slightly wider zone for the wings that crimp a wire's insulation. This allows the user to slide a connector into the channel, 'hook' the wider wings in just the right spot, then ratchet down 2-3 clicks to hold the connector in place without crimping yet. Then the user can slide the wire into the connector until bumping the insulation against the tighter zone for exact alignment. Finally, squeeze down the remaining ratchets and a perfect crimp is made. Looks like it came straight from a factory.The process is straightforward to execute and achieves the same results every time. The tool feels solid, sturdy and well made.
R**Y
Good Tool--But Requires Research and Practice
As far as I can tell, iCrimp/IWISS is the only company that makes the SN-025 crimper. The SN-025 crimper makes “B” profile crimps over the stranded wire and “O” profile crimps over the wire insulation. It took me three days to learn how to do use this crimper properly. This type of crimper does not come with any instructions whatsoever. The available videos and tutorials are often conflicting or inaccurate, and therefore not very helpful. The result is that you need to do a lot of research, practice, and trial and error, before these crimpers can be used effectively. Specifically, proper use of these crimpers requires that you determine:• the best arrangement for the crimper’s removeable jaws• which slot is most appropriate for the wire gauge and connector you’re using• whether to place the connector in a valley or on top of a tooth before crimping• how far the wire and connector should be inserted into the jaws• how to keep the components properly positioned throughout the crimping process• the best crimping pressure for the wire gauge and connector you’re usingInterestingly, even though I'm left-handed, the tool arrived with the jaws arranged in the way that's most practical for me. That's a rare treat for lefties. If you decide that you want to try a different arrangement, the jaws can be removed and replaced by using a 2.5mm hex wrench.After a lot of trial and error, I now achieve excellent crimps of Dupont style male and female connectors with 22 and 24 AWG wires as follows:1. Adjust the crimper to the third force setting (counting from the highest setting).2. Remove approx. 2mm to 2.5mm of insulation from the wire.3. Use a nipper to remove the connector from the sprue, and then use the nipper to remove the extra metal from the bottom of the connector.4. Insert the wire into the connector so that the wire’s insulation butts up against the conductor tabs.5. Use needle nose pliers to partially crimp the insulation tabs onto the wire’s insulation. Crimp just enough to hold the wire in place. Don’t try to make a complete “O” crimp.6. Insert the wire and connector (plug end first) into the crimper from the left side (again, I'm a lefty):a. Place the wire and connector on the front tooth of the lower jaw.b. Position the tabs and wire facing upward.c. Make sure that the insulation tabs are located completely to the left of the line that runs down the center of the lower jaw, that the conductor tabs are located completely to the right of that line, and that the plug section is entirely outside the crimper jaws.7. Squeeze the crimper handles as far as they will go, and they should release automatically. If the handles don’t release automatically, its probably a sign that the crimp force is set too high.That's it. I hope this helps someone.
O**G
iCame, iSaw ...
iCrimp! A little tricky to get small connectors positioned. But seems to make a good solid crimp.
L**.
definitely worth the price
These crimpers work real well and have enough different sized dies to accommodate many size wires/pins. You have to use your own judgement on which size die to use, and not 100% follow the size chart that comes with it. So far I've used the crimpers for just the tiny JST XH 2.54mm series pins, and the smallest die was appropriate because it's narrow and matches the pin size.In the first picture you can see each of the 4 dies has a small side, and a larger side. The "dividing line" between the two die halves has to align with the white line in the second picture to properly crimp the wire and insulation in the pin. The insulation is crimped by the larger side of the die.The third picture shows how the pin is placed in the die. If you look closely, you can see the tabs that grip the insulation are seated in the larger side of the die.
M**R
Servo ESC and TRANSPONDER CRIMPER
Suggested by WestHobbies RC. Awesome tool. Works great. Servo, esc, and transponder connections are secured. No more splicing and soldering to shorten wires.
Trustpilot
1 day ago
2 months ago