💅 Elevate your nail game with DIY magic!
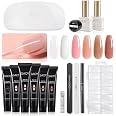
The GAOY Poly Gel Nail Kit is a comprehensive starter kit designed for beginners, featuring 6 essential poly gel colors, a UV nail lamp, top and base coats, and a manicure set. This kit allows users to create stunning nail art at home while ensuring a lower odor and toxic-free experience. With proper application, nails can last up to 4 weeks, making it a perfect choice for those seeking durability and style.
A**R
Polygel isn't for beginners
UPDATE:I've now used this exact kit for YEARS. The UV lamp still works well. I've purchased new files, brushes, a nail drill, more tubes of polygel. I've learned a lot from doing them consistently every 3-4 weeks depending on regrowth. Filling them is very easy. The nail drill has cut time exponentially too. These will last weeks and weeks IF you prep the nail bed correctly, DON'T put any on your cuticle, AND don't make them too thin. They won't crack, pop off, lift, break, or budge! I've made all the mistakes, and have learned a lot. With consistency, you really learn what works and what doesn't. Amazing brand too. I've bought nail colors, gels, tools, and everything from this brand. Highly recommend.ORIGINAL REVIEW:Packaging is absolutely beautiful. It came with everything listed in the description. Eventhough I have lots of nail equipment and at home kit experience with gels, acrylics, press ons, and powder dips, I tried to use almost everything it came with to have a more accurate experience of the product. The only thing I replaced was the slip solution. Since the polygel was so thick, 91% alcohol worked best with the brush but not dripping wet. I did this according to YouTube vids. The kit itself did not come with instructions, but youtube has thousands.. i used a nail prep for polygel vid, and several how to polygel vids. I used the nail prep supplies provided in the kit and preferred the kit tools to mine.. they are sturdy and professional. I loved the cuticle pusher the most. The cuticle trimmer was also easy to use. I did an ombre effect but it took HOURS. I mean hours... the ombre effect is very hard with thick gel.. alcohol makes it pliable, but too much makes it watery and extremely messy. The uv lamp works well, and cures it fast. The polygel has beautiful colors. I used light pink, clear and white for the French manicure ombre look. I love the colors included. Nudes, pinks, browns are so beautiful. I also purchased glass nail jars for the alcohol and brush use, lint free squares for cleaning the brush and nails, and the alcohol I got comes in a spray bottle. I use it for prepping my table, natural nails, cleaning utensils and more. This kit is an incredible value. I just did 1 set but these are crazy durable. I'll update it after I've worn them longer. The only thing is that you NEED a nail drill. I did this look without one.. only the black file provided but it took forever!! Also the underside of the nail looks crazy. Filled with hard goops of gel that need to be filled out. I definitely struggled with the amount of gel to use and made them thicker than I would have liked. The nail drill after they were cured was helpful to clean it all up and slim them down. The base coat is nice and viscous. The top coat cures very shiny and hard. Love that! I also already have a uv nail lamp but like the one that came with the kit better. It doesn't burn my hands/cuticles and has more time settings. The cord is short but most lamp cords are. I liked the cuticle oil as well. That was a nice addition. The only thing I didn't love was the dust brush. The bristles are a thick synthetic that is stiff and not great for removing powder. I sprayed my hands with alcohol and used the small brush to clean crevices instead. The small brush and spatula work well. They both got annoyingly sticky throughout the process (operator error), but cleaned up easily. I would definitely recommend this all inclusive kit.
N**I
Poly nail set
I NEVER leave reviews unless the product is stellar. I LOVE this poly nail set! I finally found a product that does what it says it will do. It lasts! Showers, baths, hand washing and endless dishes and they have not budged. I’m on day 10 and these babies don’t feel like they will fall off anytime soon. I just bought a nail drill today and applied a UV gel color on top. I highly suggest getting the drill from Sally’s as well it was only $37. They are strong but at the same time feel lighter than traditional acrylic nails. More natural. I feel like this is as close as I’ve gotten to a professional salon visit as I can get at home. I have a long way to go before I’ve perfected it as I just started doing my nails at home but I’m so happy with it! No more long nail salon trips or spending hundreds each month on acrylic nail sets!
E**T
Not bad. Needs better instructions on box
I am not yet 24 hrs since applying these. I have struggled doing my own dip or finding someone that I like to do them. So for the last year I have only painted and even then my dominant hand always looked like a kindergartener coloring.I ordered these hoping that they would work and not be too upset I didn't spend a small fortune on them. I am not a nail tech. However, I want my nails to look nice and last 2-3 weeks. Also, keep me from picking at my cuticles or nails. I am bad! 😀 I will share my tips and tricks and a list of the extra tools I used.First, go to You tube and watch the lady apply to one nail, it is a 33 min video and SO worth the time. She is a nail tech but still nice to see her apply and tips and tricks. The instructions on the box, not clear at all. I used the natural nude because if I messed up at least it's not TOO obvious.Tip:1. When sizing the forms, make sure that the curve is not too narrow and the whole thing touches your nail without pressing it down hard. This may mean you have to trim or file the form to fit right. My first nail I chose wrong and it hardened at an angle and not touch my nail towards the tip. Use a marker so you know how much and where to trim the form.2. Depending how long you want your nail depends how much poly you need also how thick. More you use more ooze you have on the underside. Make longer and clip then file to size and shape. Use the form just to get it on. When you press to your nail it will ooze all around and under. As the video shows if you want to do 2 layers, you can. I did not want to do that.3. Make sure you give yourself plenty of time and bright bright lights. It took me 2.5 hours and the lights were not nearly bright enough. In the morning sun, I saw alot more to file or touch up.4. If you find that you did not go close to your cuticle. You can do a "fill" by repeating the steps shown in the you tube video. I had to do this on my right pinky. Can't even tell there is a "fill" piece.5. You think you will need help with your dominant hand. You probably will not. This product is much easier than painting.6. Keep brush and poly away from light, it does harden just being close to it.7. Cord on light is SHORT. So plan to be next to an outlet. I had to do the first 30 seconds with the light upside down to make sure nail was in the right place.Items used not in kit:*Acetone to clean brush after and small cup or lid of bottle to soak*100 grit file to shape form and get skin away from nail*block file, if you choose to file any part on top of nail where it oozes out you need to smooth entire nail*electric rotating file to get the excess under the nail. May get better with practice but first time, I had ALOT*nail dehydrator or alcohol pad/cotton ball*block to plug the light into*cuticle clippers, very helpful in cleaning ooze from cuticle area.Overall thoughts. I am very happy with it. I even like the transparency, to me it looks very natural. I assume the removal is going to be very similar to a dip removal. Hoping they last 2 weeks, tired of doing my nails every week.Good Luck!!**update**Day 3 they started breaking. Not terribly upset because they are long. However, when I do again I will make them the same length as my real nails. This will give them the shine and thickness.Just keep on mind these are poly so basically plastic fingernails.
S**S
Great quality
Entire kit was well worth the money. First set was a little hard to do as I've never used this before. After doing a second set of nails and more sets it is super easy to use.
Trustpilot
3 weeks ago
2 weeks ago