🌿 Water Smart, Live Smart! Your garden deserves the best.
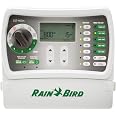
The Rain Bird SST400IN is an advanced indoor sprinkler timer that offers easy programming, customizable watering schedules for up to four zones, and features like one-touch seasonal adjustments and a rain delay function. Designed for durability and protection against the elements, this timer is perfect for maintaining a lush garden effortlessly.


A**R
Incredible product for the money!
To me, these are the best sprinkler clock made much better than Hunter I think! They’re easy to install they work great all of my customers love them!
S**S
It works
Best I have ever used.
C**L
im happy with it
works great
J**F
Very nice unit.
Easier to use than the competitive company we had before.
D**R
I would buy again.
Very easy to install. A great price!
J**S
Difficult to Replace Battery and Add Wireless Sensor
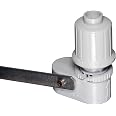
Basic set up for this device is easy, but battery replacement and attaching a wireless sensor are more complicated. This is the second time I have installed a sprinkler timer. The first one was from Orbit, and it lasted 12 years. Looking at the wifi models, there were several reviews that said if the wifi connection dropped, the controller wouldn't operate. So I decided to get this basic Rain Bird because I liked the programming features and I hope it will last another 12 years.However, there are a couple of big trade offs. First of all, if you want this to last for 5 or 10 years, you will need to replace the battery more than once. I recommend doing a search on YouTube for Rain Bird SST600in Battery Replacement. Basically, you have to uninstall (remove power and all wires) to the unit, and take the unit apart to get access to the battery. It needs a CR 2032. Then you have to put the unit back together and reinstall it. My old Orbit had a convenient little tray that slid out for the battery.Secondly, I have a wireless rain sensor. My city requires sensors for all sprinkler systems. The directions in the user manual only show the procedure for installing a wired sensor. The big difference is that the wireless sensor needs a power supply. What I ended up doing was using the power cord for my old Orbit, twist the wires together, and wrap it in electrical tape. In the attached picture, those wires look like rabbit ears. For existing homes, wireless sensors are a lot easier than running a wire from the controller to the sensor. It looks funny, but it works fine. This is in my garage, so I care more about function. But I did wrap all the wires in white electrical tape since the walls are (kind of) white.The battery issue is annoying. Rain Bird must want people to buy a new unit when the battery goes out. I wish I had researched that before I bought the controller.
M**Y
Easy to use and works flawlessly.
I had installed a different type of Rain Bird controller and returned it to the store. I found this Rain Bird controller on Amazon, and it is very easy to use. Even if I schedule too long of a sprinkling time for a couple of stations, so that it does not complete the 4 stations within an hour, it remembers to go back to the other stations and water them. It also has provisions for 4 watering periods on the same day, so that shorter watering periods can be used and repeat after the water has soaked into the ground.
J**E
Yes! You can install this yourself!
Our spring irrigation startup appointment didn't go as planned because our indoor Irritrol timer wasn't working properly. All of the sprinklers themselves were working fine, but when the tech tried to test the timer, the zones would only turn on for a few seconds before shutting down. 24 V was flashing on our timer display (same as last year too but it worked fine), so the tech switched out the AC adapter thinking that had to be the issue--it wasn't. So he recommended we purchase a new indoor timer. The Rain Bird one he had with him would have cost us $150, so he recommended I purchase one elsewhere and install it myself. I was hesitant because I had no idea how easy it would be, and trust me, it was very EASY TO INSTALL this timer. (And it was 1/3 the cost of having the irrigation technician do it for us.) All I had to do was: 1) remove the wire cover from existing timer and take a pic of the wire configurations. 2) detach all the wires and unscrew the existing timer from the wall. 3) attach the new timer to the wall (I did have to make new holes but it was a snap). 4) reattach the wires to the new Rain Bird timer. 5) program the timer, which was also SUPER EASY. The whole process didn't take longer than fifteen minutes.So if you have an existing indoor irrigation timer that isn't working properly, I can safely recommend this one. Great price, easy to install (with existing wires), and easy to program.
Trustpilot
2 weeks ago
3 weeks ago