
DOWNLOAD THE APP


Customer Services
Copyright © 2025 Desertcart Holdings Limited
DOWNLOAD THE APP
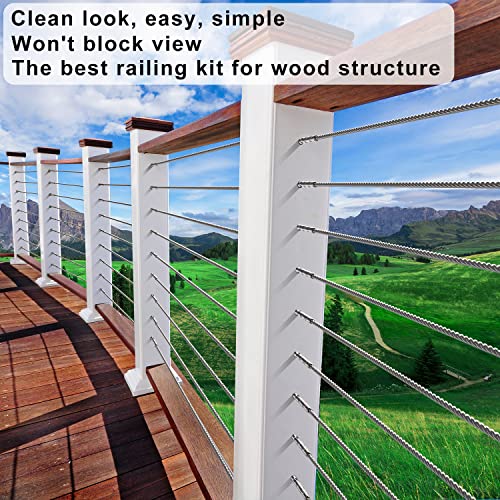


🔧 Elevate your deck game with sleek, twist-free cable railing hardware!
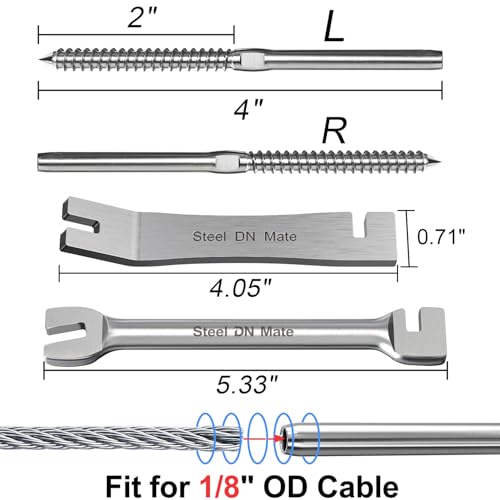
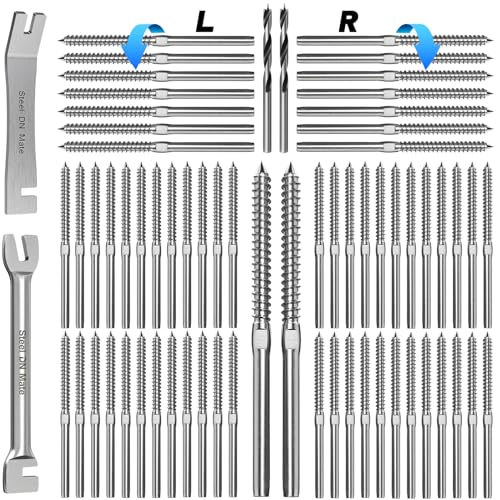
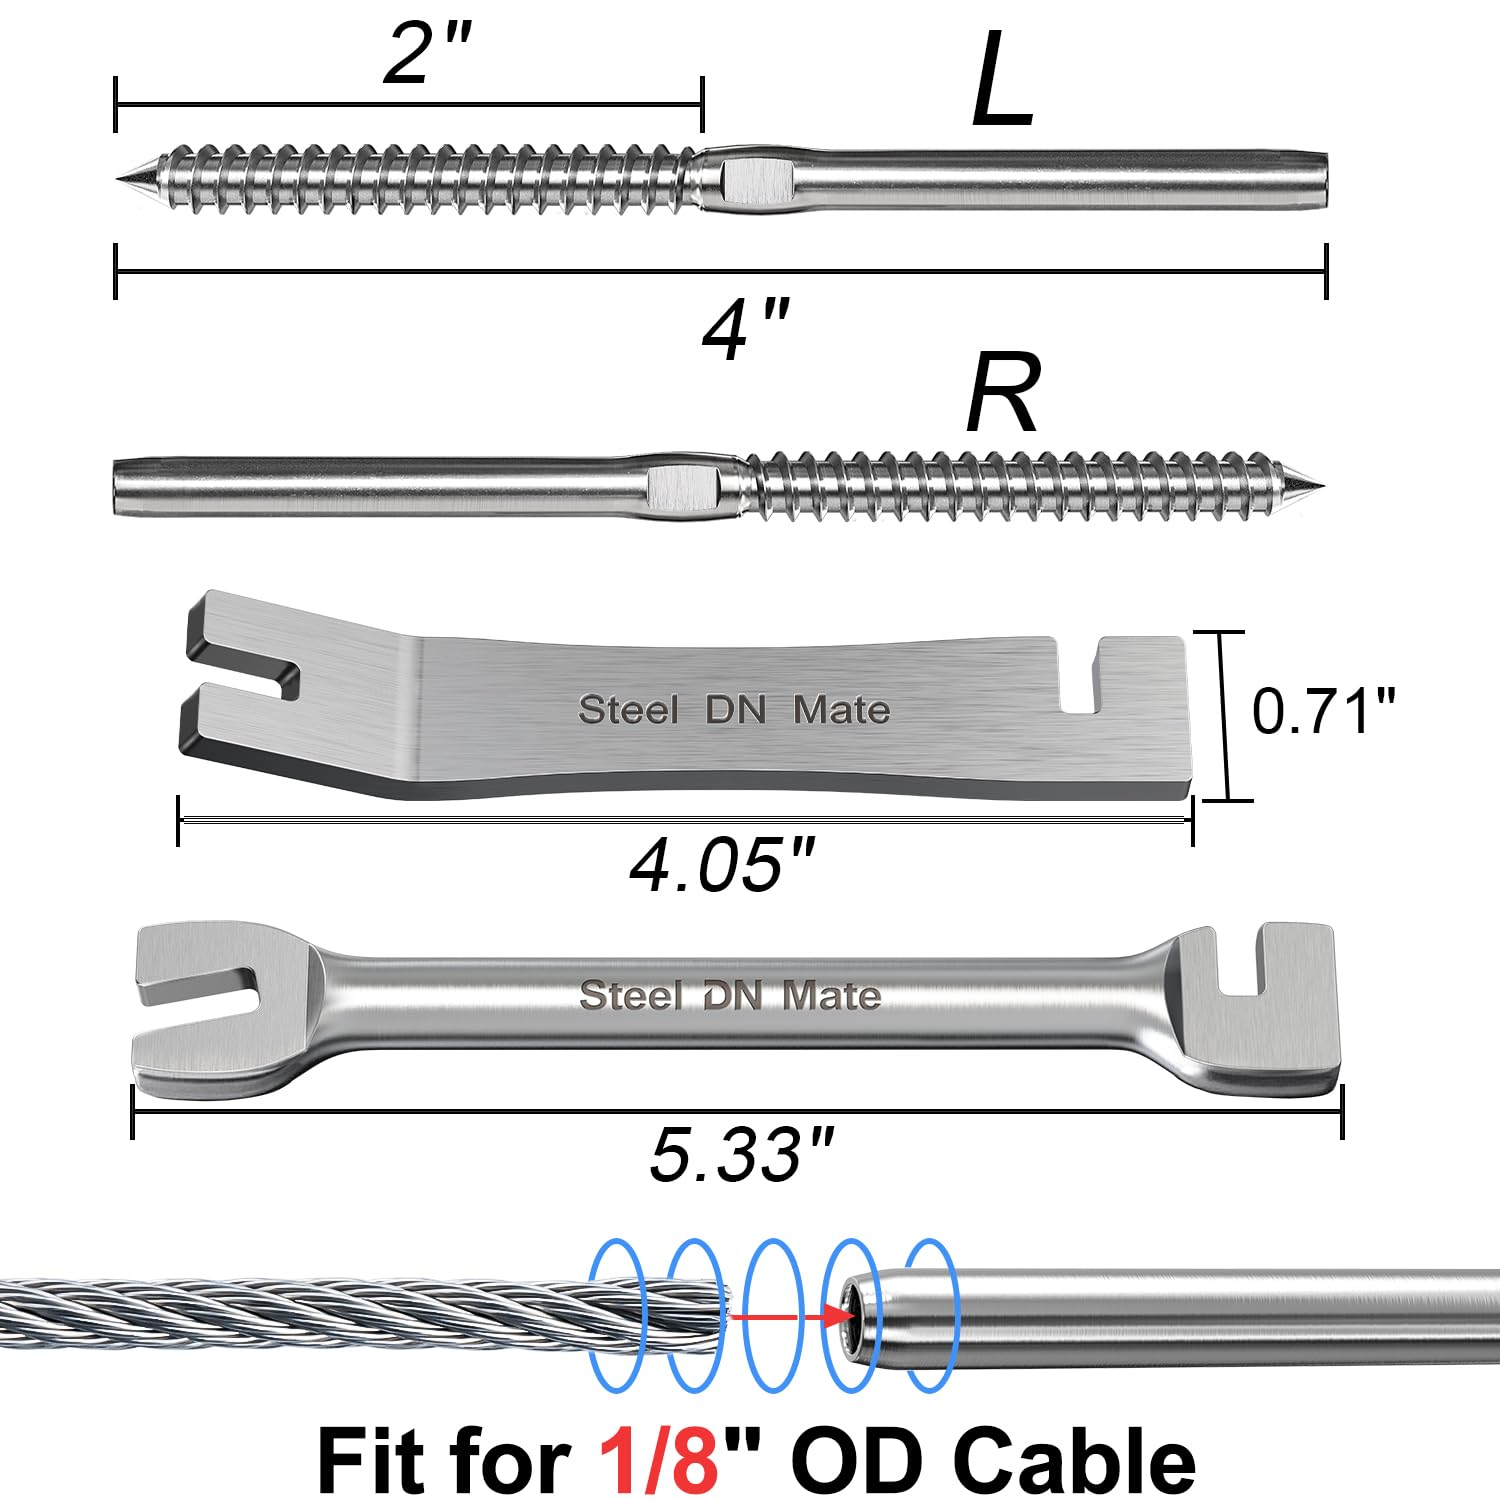
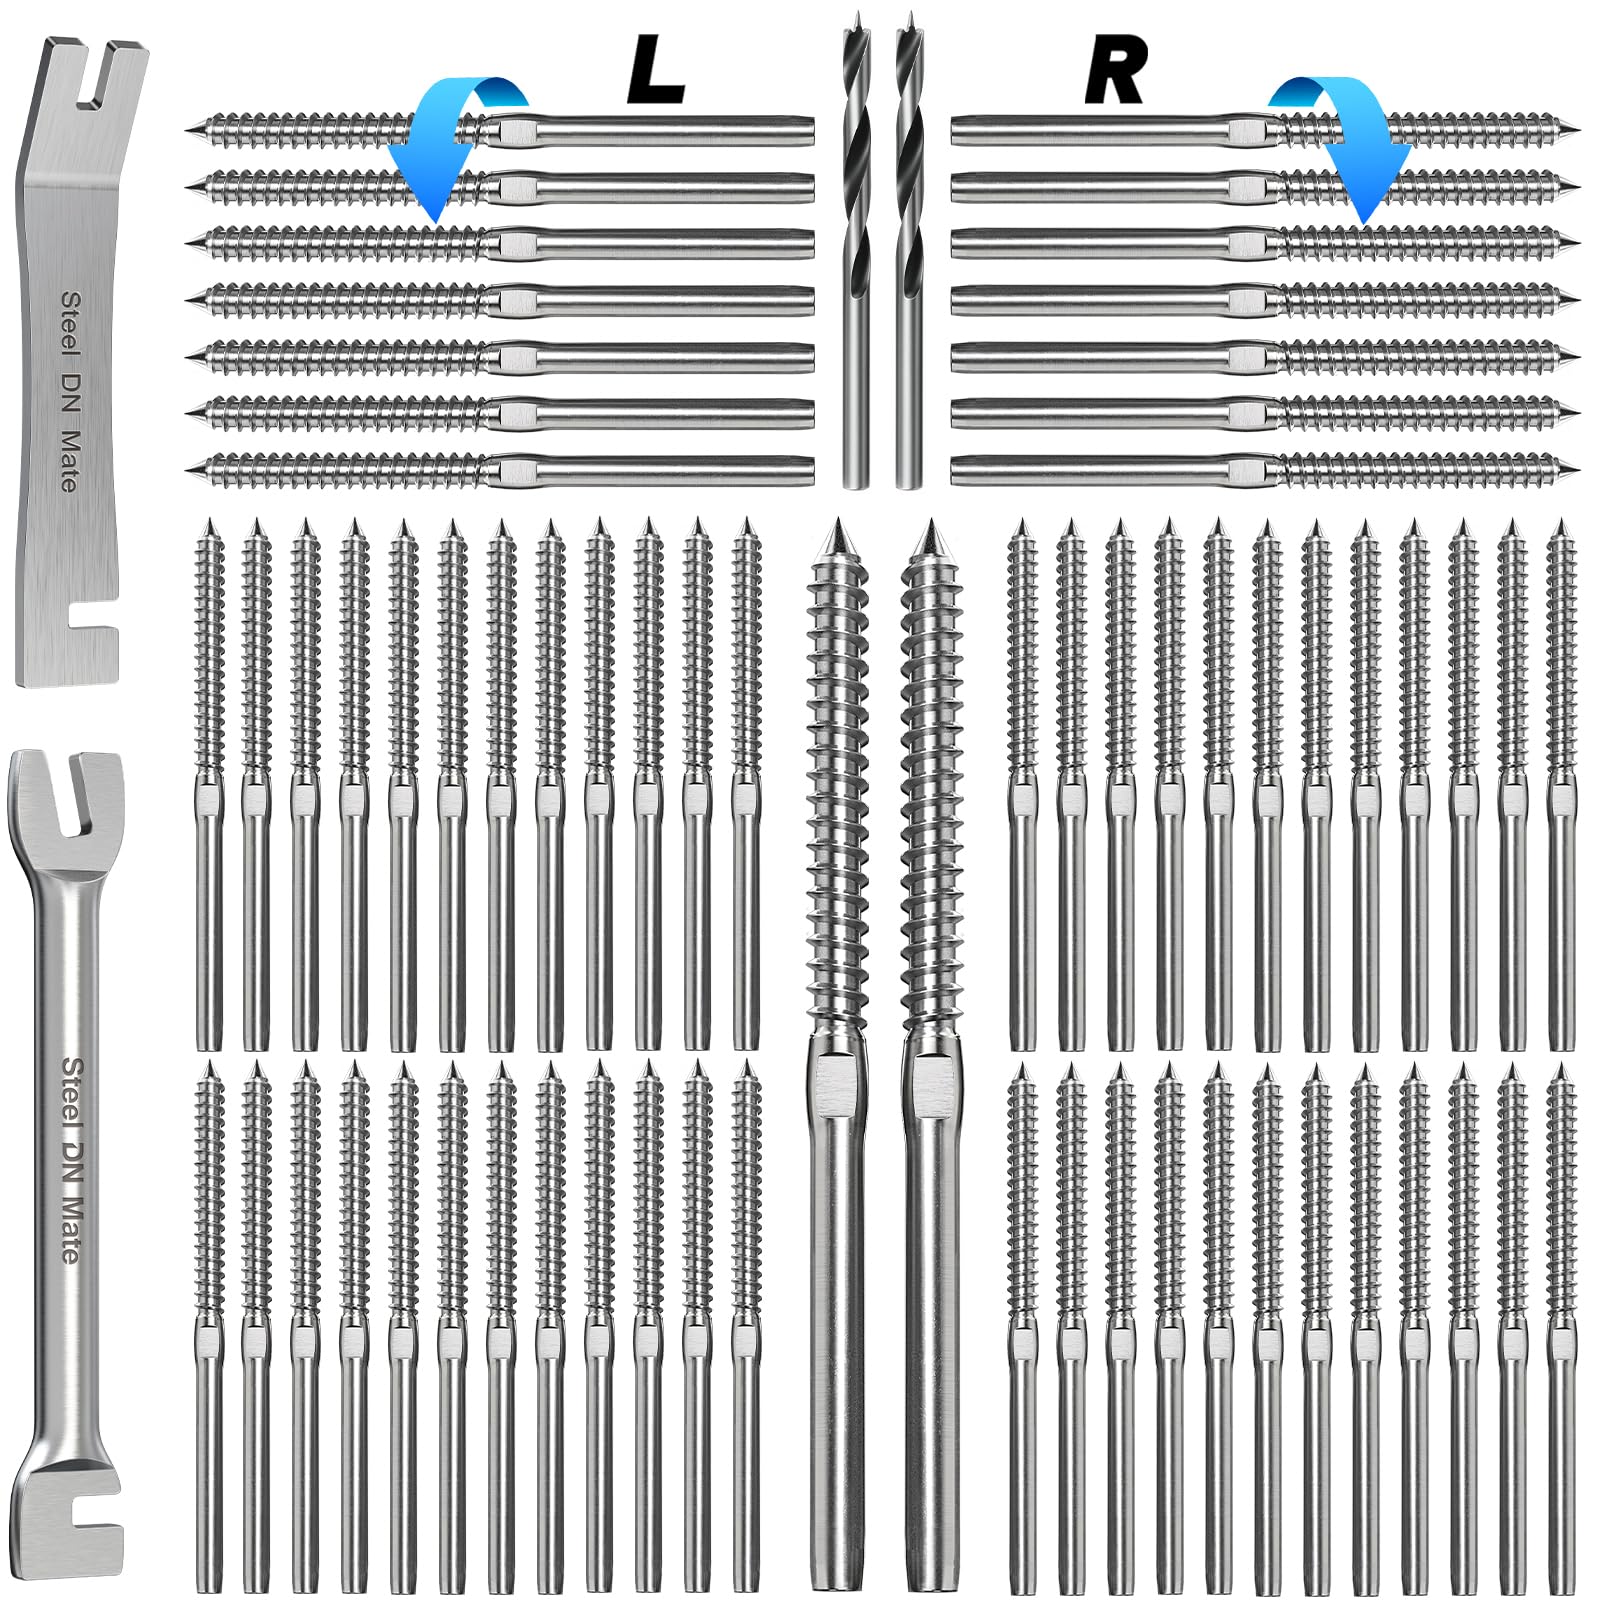
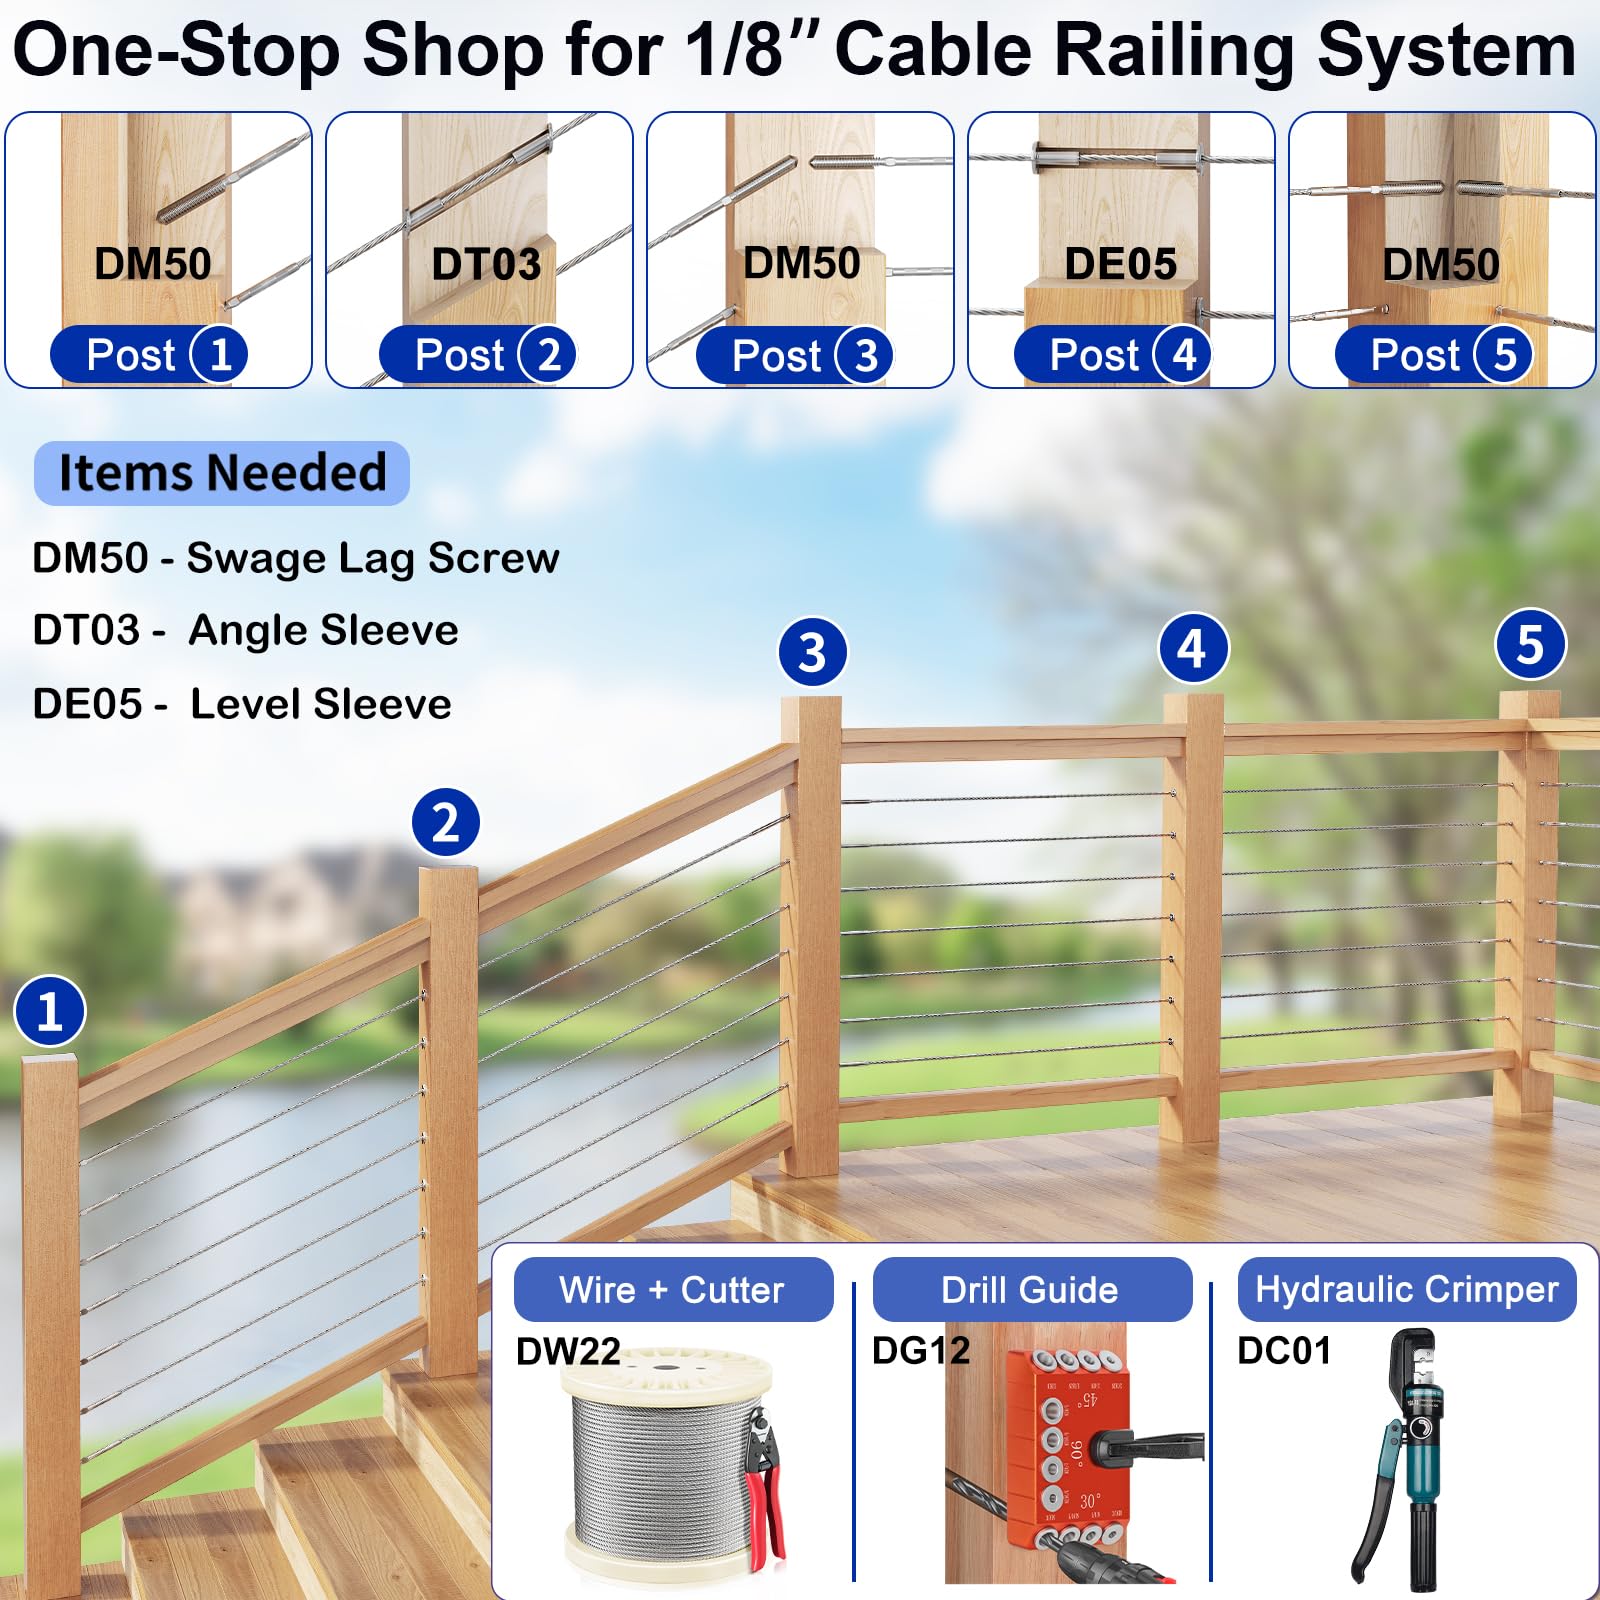
Steel DN Mate’s 100-pack T316 stainless steel swage lag screws are engineered for professional-grade cable railing systems. Featuring right and left-handed threads to eliminate cable twisting, marine-grade corrosion resistance, and two included wrenches for streamlined installation, this kit is the ultimate upgrade for modern wood post railings. Designed for 1/8" steel cables, it offers a durable, elegant, and easy-to-install solution backed by a 10-year warranty and expert support.


| ASIN | B08WX6YC68 |
| Are batteries included? | No |
| Brand | Steel DN Mate |
| Colour | silver |
| Compatible groove diameter | 0.13 Inches |
| Customer Reviews | 4.7 4.7 out of 5 stars (1,061) |
| Date First Available | 23 December 2021 |
| Exterior Finish | Stainless Steel,Steel |
| Fastener Type | Deck Screws |
| Head Style | Rod |
| Head Type | Hex |
| Item Diameter | 0.25 Inches |
| Item Weight | 1 kg 450 g |
| Item model number | DM50 |
| Manufacturer | steel |
| Material | T316L Stainless Steel |
| Metal Type | Stainless Steel |
| Model number | DM50 |
| Net Quantity | 1.0 Count |
| Number of Memory Sticks | 100 |
| Point Style | Type A Point |
| Set Screw Thread Type | UNC or UNF |
| Size | 1/8" |
| Special Feature | easy to install |
| Specific Product Use | wood |
| Thread Class | Standard |
| Thread Coverage | Partially Threaded |
| Thread Size | 1/8 inches |
| Thread Style | Right Hand |
| Thread Type | UNC |
S**E
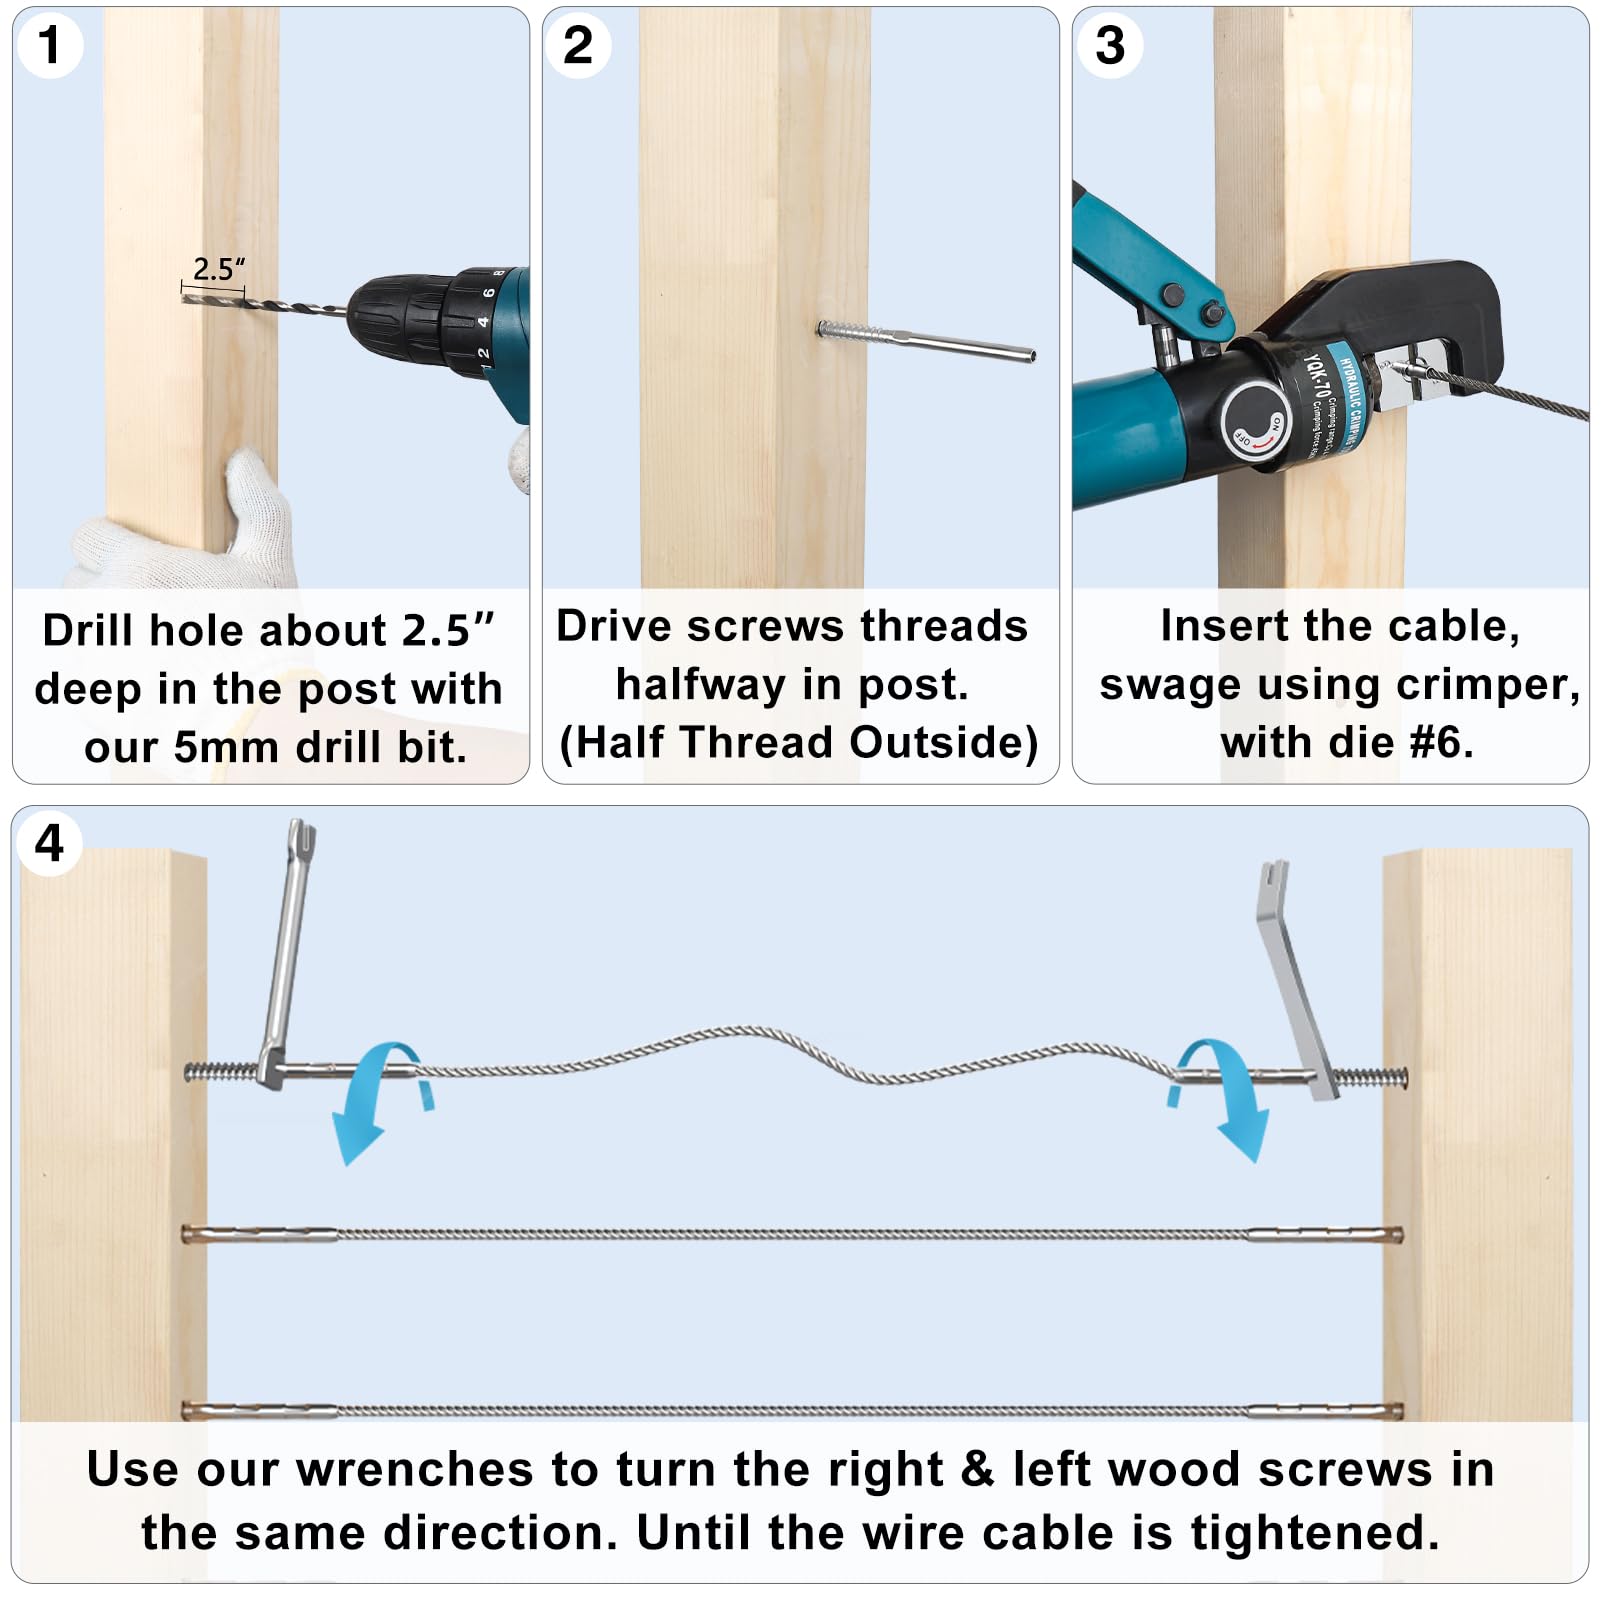
Finally bit the bullet and replaced our railing on our log cabin on the lake with a wire railing. It came out great and I should have done it years before. We have a log cabin lake house on a lake in new York we built in 2012. The log cabin kit used log spindles for the railing. Looked good for the log home theme but… My wife is only 5 foot tall and when sitting in a chair on the deck, the railing blocked most of the view of the lake! So I did a bunch of research and came up with the below installation as the best for us and it looks fantastic. As you will see in the complete photos, I kept the log up rights but took out the log rails and spindles. Since I was keeping the log up rights, I realized that trying to drill the wires through the logs and keep them perfectly straight and evenly separated, even using a jig, was going to be nearly impossible. Thus my first idea of one long wire run from end to end (40 feet) using turnbuckles on one end, didn’t look like a valid solution. Then I ran into the Threaded Swag Lag Screws. I realized I can do 5 different groups of wires using the lag screws into the log up rights and not have to drill through them, only predrill starter holes for the Lag screws. We laid out the top rail, out of same wood as the cabin. And for the two widest sections on the left we used a section of the top rail as an upright that is drilled through as a wire support. The two long section on the left are 10’ 6” each and the three shorter sections on the right are 5’ 6” each (give or take a little). Material I purchased to do the job: All I bought were items 1 through 5 below, all through Amazon. The total was only $332 for all of it including the tools. With the outcome I got at the end – this was a steal in my book (no pun intended). 1. Steel DN Mate 40 Packs T316 Stainless Steel Right&Left Handed Thread Swage Lag Screws for Wood Post of 1/8" Cable Railing Kit,Deck Railing Hardware/Stair Deck Railing,DIY Wood Baluster Kit,With Wrench 2. Bysn 1/8 T316 Stainless Steel Cable, Aircraft Cable for Deck Railing, 7 x 7 Strands Construction Braided Steel Cable, 500FT Wire Rope Cable for Railing 3. Muzata Wire Cutters, Stainless Steel Wire Rope Aircraft Bicycle Cable Cutter, Up to 5/32" Deck Railing Cable, CR12,Series CT1 4. Muzata Custom Hydraulic Hand Crimper Tool for 1/8" Stainless Steel Cable Railing Kit System Fittings- Wire Rope Swaging,2019 Upgrade Version Crimping-60 Ton CT01,CT1 5. 100Pack T316 Stainless Steel Protective Protector Sleeves for 1/8" 5/32" 3/16" Deck Cable Railing Kit with A Free Drill Bit (100 Pack) Installation: Took two days. Day one was removing the old railing sections and I had to replace three up right logs as they were starting to show signs of rot. Once we had the uprights replaced and the top rail wood in place, we could start running the wires. Day 2, running all the wires. The front of my deck is 40 feet wide. I put the wires at 3” apart and made a plywood template with predrilled holes at the exact placements I need to put the lags screws. We would then hold the template up against the log up rights, and I would predrill the holes for the lags using the template holes. The logs come with a drill bit for predrilling them. So no errors in the holes being too big or too small. I had predrilled out the two upright sections that were being used as wire guides and I put in the steel protective sleeves on each side of those holes. When you start, put the lags in (noting one side the lags are reveres threaded for turning later) per the instruction we put the lags in about 1/3 to ½ way in. a tip we found somewhere is do every other wire first as the little wrenches you have to turn the lags in will hit the next wire. This helped make them go a lot faster. Also for pre-starting the lags, I chucked them into my cordless drill and used the drill to start them. Way faster than by hand. Then measure the distance from Wood to wood and subtract 1 1/2” from the length of the wire. We used the Muzata wire cutters above and had to make over 100 cuts. They worked great for all cuts. Didn’t detect any dulling by the end which was nice! Then slide the wire into a Lag and use the crimper to put two crimps on each lag. Seems easy enough but by the teim you are getting to your 200th crimp, your arms are definitely tired. Just keep repeating this for all the wires. And your done. Well… We had five sections of wire, 10 wires each section so that is 20 lag screws per section or 100 lags total, 2 crimps per lag or 200 crimps, and 50 lengths of wires totaling ~ 400 feet. Took all day but when we were done, it looked great! I highly recommend this and it is totally a do it yourself task if you are just even modestly handy. My wife and I did it by ourselves and our friends can’t stop complementing how big a difference it makes. We were very pleased with all the wire products and tools we used. We had no issues with any of it and would do it again in a heartbeat.
S**S
J’ai refait les rampes de mon deck. j’ai acheté les vis , les câbles noir et le kit de crimping sur amazon. Il y a plusieurs petite étapes à faire avant d’installer un câble: 1-mesurer le câble, le couper à 1,5 pouces de moins que la longeur entre les 4x4 2- enlever environ 3-4 cm de revêtement noir de chaque côté du cable 3- installer les vis avec Léa pince à crimper Nous avons fait deux crimp par vis 4- viser les vis un peu à droite et un peu à gauche en même temps donc si la distance est longue, vaut mieux être deux Ca donne une rampe moderne et jolie Je suis très heureuse du résultat
D**N
S**R
I recently bought 4 products from Steel DN Mate: -The Stainless Steel Lag Screws for Wood Post of 1/8": Works really well with the tool provided. Because there are Left and Right screw, it prevents the cable from twisting. Good quality, really solid! -The 1/8" Stainless Steel Cable for Deck Cable Railing System: Great quality again! It comes with a cutter that works perfectly. -The Stainless Steel Protector Sleeves for 1/8" Wire Rope: Nice look for a finish on a wood post. I really like the way the sleeve can hide a hole that isn`t perfectly drilled. -And the Hydraulic Crimping Tool: Works perfectly for the Stainless Steel Lag Screws. I crimped the screws at two different places. It seems really strong, even with a lot of tension on the cables and the finish look is great. I am really satisfied with all of the products above. As you can see on the pictures, the finish look is awesome. It was super easy to install. Honestly it took me about 4 hours to install everything. I didn’t waste any screws or cable and no defaults were found on the tools provided. I would strongly recommend this company for your deck project. Overall, it gives a great look at a low cost!
C**H
Worked great! Instructions were easy to follow and cable railing system looks fantastic.
Trustpilot
2 weeks ago
2 days ago