🎶 Light up your soundscape with DIY brilliance!
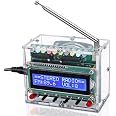
The ICSTATION FM Radio Kit is a compact, 272-gram DIY soldering project featuring a full FM band tuner (87-108MHz), a crisp LCD1602 display for easy frequency and volume control, and 10 colorful LED lights that pulse with your music. Housed in a transparent acrylic case, this kit is perfect for electronics enthusiasts and STEM learners aiming to build practical skills while enjoying a visually engaging radio experience.


| Item Weight | 272 Grams |
| Item Dimensions L x W x H | 2"L x 0.78"W x 0.4"H |
| Material | Plastic |
| Style | LCD Display |
| Color | Green |
| Hardware Interface | Mini USB 2.0 Type A |
| Frequency | 87 MHz |
| Voltage | 5 Volts |
| Display Type | LCD |
| Power Source | dc |
| Radio Bands Supported | FM |
| Water Resistance Level | Not Water Resistant |
| Display Technology | LCD Display and LED Lights |
| Special Features | FM Radio Kit with LED Lights |
| Connectivity Technology | USB |
| Tuner Type | FM |
R**R
Great Radio Kit and Project to Teach Basic Electrical Engineering Skills and Soldeirng
I got this radio kit to teach my 12-year-old sister how to solder and assemble as a way to teach basic electrical engineering principles and terms. Upon unboxing the kit, I found the acrylic box was separated in its own space while the electrical components were in their own ziplock bag which is great and prevents scratching of the acrylic and losing electrical components. However, the instructions weren’t included, but I looked at the listing and found the instructions there as a PDF file. The PDF instructions were very high quality, and the English was pretty good for a kit like this and very understandable. There was also a list of materials which tell the item names and their quantities as well as a circuit schematic. The instructions even used proper engineering terms. As I was at a house without access to a soldering station, all that was available was a $3 harbor freight soldering iron and some very cheap solder. First, I explained the components and gave a brief overview of how each one works. I then taught my sister how to solder and soldered two pins of the SMD component to show her was it was like and explain. I then let her solder the rest of the pins, and amazingly, she was able to solder them correctly. She was also able to solder all the resistors, and the header pins, and the LEDs without more than 2 bridged connections which she corrected on her own without me telling her how to correct them. As this was her absolutely first time soldering and she did so well and picked it up without a problem, I was very amazed. As an electrical engineering student myself, I see a good number of college students (around half) having trouble soldering their boards of even easier difficulty and a lot of them even messing up their boards and needing to get a new one. After doing about half of the kit, my sister wanted to take a break, so I let my 16-year-old brother complete the rest of the kit which he easily did as he has been soldering for a while.I also let my brother assemble the acrylic part. As acrylic smudges with fingerprints, he made sure to not touch the inside surfaces of the acrylic as he installed the panels to prevent the final product from looking dirty. Once the product was assembled, we applied power via USB port and the product turned on. Upon changing the channels and cycling all the way through, we couldn’t get the radio to pick up any radio stations. However, the radio was tested in Japan and the FM band in Japan is about 76-90 MHz while in America, the FM band is about 88-108 MHz. Furthermore, the frequencies in Japan are in different increments for tuning than in the US. This radio supports frequencies 87-108 MHz and most radio stations in Japan also aren't going to be close to 90 MHz either. This explains why the radio doesn't pick up Japanese radio stations. While the radio doesn't pick up Japanese radio stations at all, this is not a design flaw of the radio at all and it was demonstrated that the radio does work on US frequencies when I used a radio transmitter to test. . We tested the radio by using a portable radio transmitter and set both the transmitter and this radio kit to the same channel and it picked up the sound perfectly. The sound quality was really decent for a radio. That tells that the radio kit does work.Regarding the functions of the kit, there were minor things I found awkward. The volume increase button and decrease button were “switched” in a way. Volume up was on the left and volume down was on the right. The same was done for the channel increase and channel decrease buttons. This “switching” wasn’t intuitive and goes against what you would expect and can cause confusion. The other thing was the screen said stereo on it, but this radio isn’t stereo at all as it is only one speaker and therefore mono. This isn’t a bad thing, but the screen shouldn’t mention stereo.Overall, I am pretty satisfied with this kit. For one, it has taught my 12-year-old sister to solder and allowed her to find that she could solder to a very reasonable proficiency at such a young age and at her first try which I am sure she found amazing. Now, she discovered another skill she could use later which is very useful. My brother liked soldering it up too and assembling the product and I enjoyed using it as a teaching tool and we all enjoyed testing the final product. The whole assembly process in itself was a lot of fun. While we did it in one sitting, I would highly recommend doing half the assembly, taking a break, then doing the other half. The things I would recommend improving are having the volume buttons and frequency buttons arranged so left is lower volume and up is higher volume. I would recommend also having the volume settings persist even when power is removed. I would also recommend including a headphone jack to listen with headphones and get stereo sound as well as having an audio in jack to allow the radio to also be used as a portable boombox. Otherwise, the product is really cool and functioned as intended. The LEDs were an extra cool feature that is fun to watch as the radio plays too. Overall, I am giving this product a 4.5-star review because the volume and frequency buttons were “reversed” and there isn't any stereo output as it says as well as there not being AM channels or an audio in. Since Amazon doesn't allow 4.5-star ratings, I am rounding to the nearest whole number which is 5. Overall, I am very satisfied with this product and the teaching/learning opportunity it brought.
M**2
Didn’t Fully Function But Fun to Build
Building this radio was a fun and challenging project, but it didn’t fully function when completed, which is why I’m giving it 4 stars. I could get a radio station on it and make out what’s being said, but the main display showing the station information doesn’t work at all. It was difficult to install the display into the socket, and I could have easily damaged a pin in the process The instructions are excellent and easy to follow, but the board and components are very small, so I had to use a magnifying glass to solder them in place. Overall, it was a great experience, but I think it’s probably best for more experienced builders.
A**R
Please read this BEFORE reading 1 star reviews
I see a lot of comments about the radio not working. I'm a troubleshooting training instructor and we use this in our training classes to get soldering practice and to understand how basic radios function and are laid out on PCBs. First, let me say THE RADIO WORKS. In my years of teaching it comes down to the person soldering it and HOW they solder it. We've ordered several dozen of these. In all but two cases where things didn't work, it was because of typical hobbyist mistakes. (FYI, in those two cases, read the last bullet point.) So, follow these rules:1. You must keep the RF module off of a lacquered, metal, or plastic surface. Any good soldering station user will have a silicon soldering mat to place environmentally sensitive (eg. static) components on. Also, do not put the main PCB on those same surfaces as you begin constructing it.2. DO NOT set your soldering iron above 610 degrees F. If you do not have an adjustable temp soldering iron, get one. Non-adjustable ones are often at 900 degrees F. Butane soldering torches are not meant for these PCBs.3. Read the instructions thoroughly & completely BEFORE soldering anything.4. Be careful of polarized part orientation. (One of the photos here clearly shows a part in backwards).5. DO NOT apply power to the board to check progress before it's completely constructed!6. Let's face it, most people are mindful of steps 1 - 5 above...and things break. In the two cases things did NOT work after verifying everything else was correct, the RF module was the culprit. So you can get it here: https://www.amazon.com/dp/B0BVRP1CNR?ref=ppx_yo2ov_dt_b_fed_asin_title.Me and my instructors are VERY happy with the product and its operation. But we do this for a living and know where mistakes are made. I recommend to invest in a few things to support the soldering process and projects like this will work more often than not.
S**M
Not worth the time & money. 2nd kit from this company not working.
Built with my kid and we were so excited to get it working but the LCD was not displaying anything like other users have reported. We really liked building but were very disappointed and the radio works little bit with plenty of distortion. Wish we had built in sooner and now after 30 days, we cannot return it as well. Waste of money and time.
Trustpilot
1 day ago
1 week ago