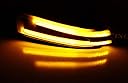
I bought this as a an upgrade for the existing factory dynamic turn signals. It bothered me the lego brick effect on the mirror. You can see the original pattern vs the new smooth pattern. Much cleaner look overall and very factory fitment externally. Tools needed: - Pick - Plastic Pry Tool - Torx 8 Bit and Screwdriver Directions: Remove the mirror cap: Despite a number of other videos that have you remove the mirror, you can move the mirror cap without removing the mirror. Move the mirror so the bottom and top are even and in the mirror cap. Once this is done, you can pull out from the bottom while pulling up. You can use the plastic pry tool on the bottom to help separate. Slow, even pressure. Once the bottom separates you can unclip the mirror cap on the bottom and pull up and out. Remove the dynamic rurn signal: With the mirror cap out, you will need to undo the two Torx 8 screws at the top and bottom of the mirror. These are next to the white tab in the picture. Once these are removed, you can use the plastic pry tool and, starting from the portion of the turn signal that has the connector, start to pry the turn signal from the mirror cap. Loosen it up, then flip the mirror cap over and gently and steadily pry the center fin of the mirror cap from the light as shown in the picture. This will loosen the double stick tape. You can then remove the turn signal. Install the new dynamic turn signal to mirror cap: Make sure to remove the remnants of double stick tape from the mirror cap. Make sure to remove the protective blue strip from the double stick tape on the new dynamic turn signal. Insert the new dynamic turn signal. The signal will have to be all the way in the mirror cap, and you will have to twist a bit and press out gently of portion of the mirror cap for the dynamic turn signal to click into place. Verify fitment and then press to stick to double stick tape. Re-screw Torx 8 screws. I mounted the switch first in the locking loop on the dynamic turn signal. I then put the two-pin connector over the switch. This switch just changes from sequential turn to the normal turn signal. The lights come set to sequential. This was my first and only annoyance with the product. I wish the manufacturer had gone to the effort to replicate the plastic bell housing of the original. This bell housing keeps the two-pin connector in place and makes sure to guide the connector in place and lock on assembly. Without this it's a bit more annoying to get set right. Install mirror cap back on car: You will want to slide the mirror cap back over the mirror but leave enough room that you can, with two fingers, connect the 2-pin connector to the socket. Gee, this would be great if we just had a bell housing connector like the original. Test at this point to verify that the signal is working as expected and you have it set to the turn signal style you want. Once this is done, fully slide the cap over the mirror and verify it locks in place. Verify mirror functions. Post Installation: Verify no CANBUS issues and clear any stored codes. Additional Comments: Some have made the observation that this is very dim during the day. The factory turn signals are equally disappointing during the day, so it was a non-issue for me. At night, these are really stunning and are on the same sequence as the factory headlight and taillight turn signals.