🚗 Elevate Your Drive with Seamless Sunroof Functionality!
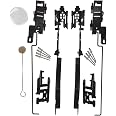
The Sunroof Track Assembly Repair Kit is a comprehensive solution for Ford and Lincoln vehicles, specifically designed for models from 2000 to 2017. This kit includes everything you need for a successful installation, ensuring your sunroof operates flawlessly. With no batteries required and precision-engineered components, it's the perfect choice for maintaining your vehicle's luxury features.
| Batteries Required | No |
| Batteries Included | No |
| Package Dimensions | 36.07 x 9.4 x 6.1 cm; 0.28 Grams |
| Item part number | SRRK_Fseries |
| Manufacturer | SunRoofKits |
| Item Weight | 0.28 g |
K**L
Open skies
I got this for my truck but have not had the time to install yet,as I need to drop the headliner to installFrom looking it appears to be very complete
B**R
So far so good
Was a little skeptical from all the problems people were having. Went with this seller because they higher numbers.The job is not difficult, just time consuming as so much disassembly has to be done. I had no issues with extra tabs or anything, but things change between years. The kit worked like a charm for me. Also, if it has been a while, if at all, that the glass seal has been replaced, now might be a good time to replace it. Installing the new glass seal was the hardest part about this job.Pull the fuse for the interior lights. On my truck this fuse is also for the power windows and sunroof, so if you want the windows down, now is the time to lower them.Move the front seats forward to help remove the front seat belt trim cover, pull the seat belt way out, and lay them cross ways behind the front seats. Some videos show leaving the headliner in. Do yourself a favor and take it out. Pull the front head rests out, lay the seat backs back as far as they will go, and you can rotate and remove the head liner through the front passenger door, sunroof opening first.When you have the frame laid out on your working surface, take a picture of how stuff is laid out.Drill the rivets on the cable end, NOT the air deflector end. There is a butyl sealer between the end caps and the track. Slow easy pressure and the end cap will come out. DO NOT SCRAPE THAT SEALER OFF !!!!!! It's going to seal the pieces back together later. On my 2002 F1500 Lariat, the sliding cover will not come out the cable end of the track, so be careful when cleaning. If you want to remove it, you need to remove the air deflector cap. (remove the 2 little screw holding the air deflector limit straps, fold the deflector back onto the track, and slide it from under the retainer. Drill the 3 rivets like the other end, and carefully remove the cap. You will need more 3/16 aluminum rivets, The cover can now be removed out that end. Note that when you reinstall the end cap, you will need to trim the excess off the rivets so the air deflect and spring will clear them and lay down all the way. I actually have to use a small file for final fitment, but was no biggie.)The instructions say to use carb cleaner, but if the tracks have dried up moly grease like mine did, soak it down with WD40 first to dilute the old stuff, do a light scrub with a old tooth brush to loosen it up, and a quick rinse with cleaner that is safe for plastics. You need to clean the aluminum tracks end to end. Do the cleaning outside or have cardboard under it. This is a messy job. Most of the grease supplied is going to be used in the tracks. Coat everything liberally. This includes the air deflector ramp and the top of the track. Leave a small amount to coat the new rail pieces. You should also apply some to the cable ends upon installing them. You will need a rivet gun that can handle 3/16 rivets (fyi 1/4in rivets are to short). The track to end cap sealer appears to be a liquid butyl sealer they use in the factory. I couldn't find any, so I just cleaned all the aluminum chips out with a pick, heated it a little with a heat gun on low (be careful not to get the plastic to hot or the rivets will pull through) just enough to soften the sealer, then re-assemble. The reason this sealer is used is it does not dry at all. It stays soft and flexible. Rtv and silicone will be as flexible as this stuff is.Other things you NEED to know. Don't install the head liner until you test run the sunroof first, and don't run it with power until the glass is in. When you reinstall the glass used the old marks from the washers for locating it temporarily. Install the frame completely, and make sure all the bolts are tight. Install the glass, and plug the motor up. Temporarily install roof control button assembly and the fuse if your windows stopped working when it was removed. Turn the key on and try the roof. Chances are it just wiggled at best. Needs to be re-initiated. on mine, press and hold the close/tilt button. Eventually it will do a little jig. Let off the button at that point. It should be set to go. hit the auto button and see what it does. If everything is good, run it though a few complete cycles 3 or 4 times.Now you need to adjust the glass. Close the sunroof. Loosen the glass retaining screw just enough to move the glass. Factory setting are for the front of the glass seal to be 0.000-.039in blow the roof, and the back 0.000-.039 above the roof. I set mine at just under the roof on the front, and just over the roof on the back. Prob in the .015-.02 range. The reason for this is to keep rain and wind from getting forced past the seal when driving.Now pull the fuse again and reassemble your ride. Just a side note. I would get some spray silicone grease (not lubricant, grease) of even just some silicone grease, and give it a coat every year to keep things from binding up.
R**.
This kit is the best quality on the market when writing this review 07/2023
I paid for this product with my own money. My 2010 F150 Platinum Crew Cab had sunroof assembly broken down and after watching videos on YouTube decided to take this up myself. Lot of hours spent since I'm a weekend fixer. I wanted to make sure, I buy the best quality parts to fix the sunroof since it requires pretty heavy teardown and don't want to do this again, especially not for bad parts. I bought ALL the parts available on Amazon for fixing the sunroof. I also bought Sunroof Doctor kit available at $110 currently while this product is around $44. I found this product and all individual parts substantially superior to Sunroof Doctor. Please see pictures attached. Parts were great fit. I recommend this highly to all fellow F150 owners looking to buy the best parts and save some 💰 as cherry on top. Good luck with your fix.
B**W
Works great
Worked fest on my 2009 F150. Saved me a ton of money too.
B**S
Very hard to install
Works great and is a great value compared to spending $2500 at the dealership to replace it. Plan a couple of days or a very long day to replace it. I had to remove the entire headliner to replace this part and it will take a long te to do on your own. But the part worked perfectly. There a videos online how to do it.
Trustpilot
1 week ago
3 weeks ago