Desert Online General Trading LLC
Dubai, United Arab Emirates
Desert Online General Trading LLC
Dubai, United Arab Emirates


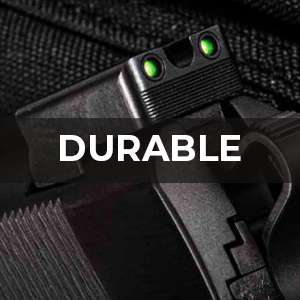
🎯 Lock your shot with sights that never quit!
The TRUGLO Fiber-Optic Handgun Night Sight features a high-visibility TRIDOT aiming system with a bright red front dot and dual green rear dots, optimized for quick target acquisition in all lighting conditions. Its compact, snag-resistant design fits standard holsters seamlessly, while the durable Fortress Finish coating ensures long-lasting protection. Compatible with Glock 17, 17L, and other models, this sight is engineered for professionals and enthusiasts demanding precision and reliability.


| Brand | TRUGLO |
| Color | Black |
| Style | Glock Low Set |
| Sport | Airsoft |
| Item Weight | 1.6 ounces |
| Material | Alloy Steel |
| Magnification Minimum | 1 x |
| Compatible Devices | Handgun |
| Mounting Type | Picatinny Mount |
| Night vision | No |
| Weight | 2 ounces |
| Thread Type | Picatinny |
| Model Name | Fiber-Optic |
| Manufacturer | TruGlo |
| Reticle Type | Dot |
| UPC | 788130080733 |
| Global Trade Identification Number | 00788130080733 |
| Item Display Dimensions | 8 x 7 x 1 inches |
| Item Package Dimensions L x W x H | 7.32 x 7.05 x 1.38 inches |
| Package Weight | 0.05 Kilograms |
| Item Dimensions LxWxH | 1 x 1 x 1 inches |
| Brand Name | TRUGLO |
| Country of Origin | United States |
| Warranty Description | Limited |
| Suggested Users | unisex-adult |
| Number of Items | 1 |
| Part Number | TG131G1 |
| Model Year | 2015 |
| Included Components | Sights |
| Size | One Size |
T**F
Great sights!
Purchased for a Sig P220. After messing around with more finicky, expensive sights that needed to be filed down to fit, I bought a set of Truglo fiber optics. These fit the Sig dovetails extremely tightly (they're not going anywhere without a punch or sight pusher), but did not need to be filed to fit. A trip to the range and a slight push of the rear sight put them right into the bullseye. These are not tritium sights, but the fiber optic glows brightly in outdoor conditions, and are still really bright under indoor lighting. These are tough steel combat sights, not super precision, but are still more than accurate. Honestly, for most people's uses, they're a fantastic deal.
S**L
Bright, strong, accurate, easy to install with the correct tools.. one minor nitpick.
These are nice, bright steel sights and Amazon has the best price I could find . I only wish they had side-cutouts to let in more light when the light source is not overhead. In usual conditions, these are VERY bright.I had already replaced the stock sights on a Glock 43 with these and decided to buy the larger version for my full sized Glocks.I caution that you will need a Glock front sight tool and a rear sight pusher to install these. The VISM rear sight pusher and a magnetic front sight tool, available on Amazon.com, will likely cost as much or less than a gunsmith and you can use them over and over.You will also need some blue or purple LocTite.Disassemble a firearm after clearing it, remove the barrel and the recoil spring. Using the front sight tool remove flat hex screw holding the old front sight in place. With the slide upside down and suspended it over roll of masking tape use a small punch and gently tap out the old front sight.Using the small hex-key supplied in the kit, clean out any old Loctite from the oval cut out in the front slide. Place the new front sight into the oval cutout. If necessary, gently tap it firmly into place... ( I used the back of a small wooden screwdriver.) in my experience, this front sight fits very snugly and is perfectly parallel, without any wiggle.Place the hex nut into the magnetic driver. Do not apply Loctite on it at this time. Drive screw home to see if it fits snugly. Is it does remove the screw and apply Loctite to the threads and reinsert it. If it is too long, use the shorter Gen 4 screw that is supplied in the kit.Wipe off any excess Loctite with a dry Q-tip. Next go over the site with a Q-tip soaked in bore solvent. Your front sight is now installed.For the rear sight, please refer to the numerous YouTube videos on the use of your own particular rear sight pusher.Do not forget to completely remove the Allen screw from the rear sight before installation. Once the rear sight is exactly where you want it, apply Loctite to the Allen screw and insert it using the hex key into its hole. Using a Q-tip wipe up any excess LocTite. Ask before use a dry Q-tip first and then one soaked a little bore solvent second.
A**R
Quality and price!
Great sights!
J**R
Very
These sights are awesome! I installed them on my 26 and shot 50 rounds.They are very easy to install and very bright and easy to line up on target.
G**T
Great sights at a great price
Great replacement sights at a great price. I purchased these sights to replace the all black target sights that come on the Kimber Custom II. If you are as frustrated with these stock sights as I was, the Truglo Fiber Optic sights are a great replacement for them. The green rear sights and red front sight are exceptionally easy to align and the red front sight really grabs your attention for sight alignment and target acquisition. These are fiber optic, so they use plastic tubes to gather available light so they seem to illuminate more brightly than the surrounding illumination - they are not night sights. On the range, in sunlight, they are very easy to see and are not overwhelming at all. In the evening just before sunset or at night under say street lights, you can easily get sight alignment quickly and accurately. As for installation, they were very easy. To remove the old sights, use penetrating oil like Kroil and allow it to set for 15-30 mins. I used brass punch cushioned by a scrap piece of leather to gently tap out the front sight from left to right (left to right as the gun points away from you). The leather or a thick cloth will keep marring down to a minimum on the slide as well as the sight. The rear sight is best removed using a sight removal tool (looks kinda like a clamp, but pushes the sight (from left to right) out of the dovetail in the slide. You can use the same brass punch and hammer as for the front sight, but the sight pusher makes a much faster, cleaner job of it. I did do some very minor fitting with a file. Use the file to remove a small bit of material from the bottom of the dove tail on the sight itself. Make 4-5 passes on the file then test fit. Repeat until the sight will snugly slide in the dovetail (from right to left). Then either tap it in to position using the brass punch and hammer or sight pusher described above. Mine went in with very very little filing. I love these sights!!
P**J
Works.
No complaints. Works as intended too, and great price point at the time i bought it.
J**X
Bad set
Doesn’t work at all, great during the day you get up and sight picture is there but did not work at night seem I got a bad set.
Trustpilot
1 month ago
1 day ago