


Desertcart purchases this item on your behalf and handles shipping, customs, and support to Philippines.
✨ See and be seen: Illuminate your drive with Meguiar’s brilliance!
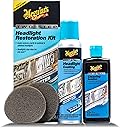
Meguiar's Two Step Car Headlight Restoration Kit offers a simple, drill-free process to remove oxidation and yellowing, restoring headlights to crystal-clear condition. This easy DIY kit includes cleaning and coating solutions that improve nighttime visibility and protect headlights from re-oxidation for up to 12 months, all backed by Meguiar’s 125 years of trusted automotive care innovation.


| ASIN | B01M75GUJB |
| Best Sellers Rank | #7,580 in Automotive ( See Top 100 in Automotive ) #22 in Automotive Headlight Restoration Kits |
| Brand | Meguiar's |
| Brand Name | Meguiar's |
| Customer Reviews | 4.4 out of 5 stars 11,546 Reviews |
| Global Trade Identification Number | 00070382012632 |
| Included Components | Meguiar's G2970 Meguiar's Two Step Headlight Restoration Kit, 4 fl. oz, 1 Pack |
| Item Form | Cream, Spray |
| Item Highlight | Headlight Cleaner Restores Clear Car Plastic & Protects from Re-Oxidation, Includes Coating & Cleaning Solution, 4 Piece Kit |
| Item Type Name | Meguiar's - G2970 |
| Item Volume | 12.72 fluid ounces |
| Item Weight | 12.8 ounces |
| Manufacturer | Meguiar's |
| Material Feature | Fragrance Free |
| Material Features | Fragrance Free |
| Model Number | Meguiar's - G2970 |
| Number of Items | 1 |
| Part Interchange Info | G2970 |
| Part Number | G2970 |
| Product Benefits | Durable |
| Scent | Unscented |
| Size | 1 Count (Pack of 1) |
| Special Features | Durable |
| Specific Uses For Product | Head Lights |
| Surface Recommendation | Headlights, uncoated clear plastics |
| UPC | 070382012632 |
| Unit Count | 1 Count |
| Warranty Description | Manufacturer Warranty |
K**K
Clearer headlights
The two-step setup was easy to follow. I used the cleaning solution first, then put on the coating from the kit. It took a bit of rubbing, so I wouldn’t call it a quick wipe-and-done job, but I could see the plastic looking clearer as I worked. The four pieces gave me what I needed for the job, without making me hunt around for extra products. The moment that made me glad I bought it was driving home after a rainy school pickup. The headlights looked noticeably clearer, and I felt better about seeing the road ahead. I still want to see how the coating holds up over time, but for now the front of the van looks less tired. If your lights are hazy, set aside a little time and follow the steps rather than rushing through them.
E**I
Easy headlight cleanup for my car between campus runs
Even with my car parked in the dorm lot, the cloudy headlights were bugging me whenever I drove back from evening classes. I got this kit to clean them up without making a trip to a shop. I used the cleaner first, then applied the coating, following the steps in the box. The process was pretty simple, and I finished both lights during a study break. They looked clearer when I checked them that night, and I felt glad I bought it when my headlights lit up the campus road more evenly on my next drive. It took some rubbing, so I wouldn’t rush through it, but the kit was handy for a quick DIY job.
J**S
A clearer ride after night shifts
Since I drive home after night shifts, cloudy headlights were making the dark stretch of road feel harder than it needed to. I picked up this kit for my older car instead of putting off the cleanup again. The two steps were easy to follow, and after working the cleaner over each lens, I could see a real improvement when I checked them in the garage. I used the coating afterward, and the headlights looked clearer on my next drive home. It took more rubbing than I expected, especially around the edges, so I was a little tired of it by the end. Still, it was manageable, and I’m glad I tried it.
B**S
Better night visibility
Buying this was mainly for our old family SUV. The headlights had gone cloudy and my wife was saying it felt sketchy driving the kids home from soccer at night. I used this kit on a Saturday afternoon. Took my time on the cleaning step, then put on the coating and let it dry. It is not hard, just follow the pictures on the box. That night I drove to pick up pizza and noticed the beams looked a lot clearer and whiter. The one thing that made me glad was my teen saying, “Whoa, the lights look new again.” For the price and an hour of work, I’m happy with it.
S**B
Best part is the finishing spray. Good results. Hybrid technique described here.
This worked for me, but I combined items in two kits to get a good result. Neither were expensive. After reading way too many reviews, I decided to use a modified method. I'll describe this hybrid approach below. The headlight lenses on my 2008 Honda CR-V were not too bad, about half was moderately oxidized. I double masked the area so that I didn't damage the adjacent painted or plastic parts. First, 3/4 inch tape to get close, then 1-1/2 inch over it to protect it and give a bigger area for final masking (spraying). Step 1: I wet sanded the light first, starting with 400 wet sandpaper that I had, then moved to the 600 and 1500 from the kit, using some 1000 that I had. I think you really only need to use three grits, and if the lights are only lightly oxidized, start with 600. Remember to always sand with a circular motion. Wearing rubber gloves make all this easier. Keep splashing water on it to remove the residue before continuing to sand. As others have noted, you'll see the yellow residue of the oxidation running down as you sand. When the residue turns to white, then you have removed all the oxidation in that area. Some areas will need more sanding than others. Be careful next to the masked areas. When done, rinse it and wipe dry. It should look like a nice even frosting on the surface. Note: if the oxidation is really light, you may be able to get away with just using the cleaner, but the cleaner is only a light rubbing compound. You've got to remove the yellow oxidation. Step 2: I polished it with a foam drill attachment from another kit (Mother's 07251 NuLens), using the polishing compound from that kit. Perhaps I could have skipped this step and gone straight to the cleaner (try that next time). This changed the frosting to a haze. Maybe next time I'll try the drill attachment with the cleaner. You can also do it by hand. If you use something on a drill, use it on a low speed. Going too fast at the same spot (and I can tell you it doesn't take much) will melt the plastic and cause marks which are hard to sand out (I had to go back to step 1 in an area). I used a cordless drill on the low speed. (Note: I did not use sandpaper on the attachment with that other kit. I think that would have been too aggressive and left bad circular scratches. I did it by hand. It's some work, but you can more easily control how much you sand when doing it by hand.) Step 3: Use the cleaner with a soft cloth. Go over the whole area with a circular motion. Rub off any remaining residue. I splashed water on it again and dried it really well. The light should start to look clear, but not perfect, still a little hazy. Step 4: Add newspaper or plastic to the masking tape. The spray is not directed, it comes out in a wide pattern, and there is a lot of overspray. I wouldn't worry too much, but you'll want to protect a foot or two. It's actually better if there is a slight breeze, as it carries the overspray away from your car. Spray a nice even coat on the light, overlapping each pass. Not too much or you'll get drips. The spray is very fine and it goes on easily. You'll be amazed how the spray makes it shiny and clear. Let it dry 5 minutes and do it again. Let it dry 10 minutes and carefully remove the masking. You're done. I just did it today, so I can't yet tell you how long this lasts. If I'm lucky, I can update this in a year and report that it still looks great. Some kits contain polish only, and I don't see how it can get completely clear and last for a long while without this protective spray. There is plenty of spray here, enough to do this process a few times. Lots of cleaner too. Both headlights took me about 2 hours, including set up and clean up. If you can remove the whole headlight lens from your car, then do this and avoid all the masking. Just remember to tape the bulb openings and don't let water inside your lens. If I was ordering again, I would only buy this kit along with 400, 600, and 1000 wet sandpaper. Hope this helps!
S**E
Meguiar's kit helped clear my headlights
My older car's headlights had started looking cloudy, and I noticed it most on the drive home at dusk after picking up a print proof for a client. I bought this kit to tackle them in my driveway between studio jobs instead of putting off the cleanup. The cleaning step took some rubbing, but I could see the plastic look clearer as I worked. I used the coating afterward and let it sit before taking the car out. The result looked better in daylight, though one lens still has a slight haze near the edge. I also wish the kit included a little more solution for working at a slower pace. It gave me a useful weekend project between deadlines.
C**N
It works!
My truck is 10 years old and the headlights were pretty bad and foggy. So I wasn’t really expecting this to work, but I was pleasantly surprised. After I did the scrubbing with the pad, it still looked kind of foggy so I was disappointed, but went ahead and put the sealer on. And that made all the difference. They’re clear and look really good.
J**E
Nice fix for cloudy headlights
I bought this for my 10-year-old SUV because the headlights were getting that ugly yellow haze and i was tired of squinting at night. The kit is simple. Wipe with the cleaner pads, let it dry, then use the coating wipes. I did both headlights on my driveway in about 25 minutes while my kid was doing homework inside. No tools, no drama. The biggest win for me was driving to work the next morning and actually seeing the lane lines clearly again. The lenses look much clearer and the car just feels less “old” now. For a quick weekend chore, this worked well.
M**S
No more hazy headlights
I wasn't sure if this was going to work, but it seems to have done the job. Ive included before and after photos of the light that wasn't too bad. The one that was badly hazy received the same treatment but got a medium wet coat of the clear, but it was too much and I'll probably have to redo the treatment once it's had a chance ro cure properly. On the left light seen here I only did a light coat and that seemed to do the job.
M**A
Best product for your car
Excellent product. Don’t think, just buy and use.
M**1
Feels like new headlights
Love this product. Works wonders. My vehicular is oldish and I cleaned my headlights and fog light and they look like new. Very clear. Careful on first use a the cleaning is easy and precise but when spraying the second step be careful it's not windy lol. Or careful not to put anything in the lights until it's dry. OUPS
A**L
Good but…
It’s a good product, but if you’re going to clean the headlights manually with hands only it’s gonna take forever. It would be better to use a 75 mm diameter orbital tool. Make sure the headlight is clean before you spray it or you’ll be spraying it often.
F**O
Se ve de muy buena calidad y es practico al usar
Llego a tiempo y en excelentes condiciones
Trustpilot
3 days ago
2 days ago