Desert Online General Trading LLC
Dubai, United Arab Emirates
Desert Online General Trading LLC
Dubai, United Arab Emirates


🔋 Power your ride, protect your vibe.
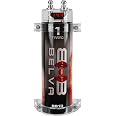
The Belva BB1D 1.0 Farad Car Audio Power Capacitor is engineered for car audio enthusiasts seeking stable power delivery up to 1000 watts. Featuring a bright red digital voltage display (10-16V DC) and audible alerts, it ensures real-time monitoring and protection. Easy to install with included mounting brackets and equipped with automatic shutoff to prevent over-voltage damage, this capacitor is a must-have upgrade for professional-grade car audio systems.

| Maximum Voltage | 16 Volts (DC) |
| Mounting Type | Surface Mount |
| Product Dimensions | 4.5"W x 3.5"H |
| Manufacturer | Belva |
| UPC | 818060010781 |
| Item Weight | 3 pounds |
| Item model number | bb1d-bb2d-parent |
| Is Discontinued By Manufacturer | No |
| Manufacturer Part Number | bb1d-bb2d-parent |
| Wattage | 1000 watts |
C**E
1) Get it. 2) Read the Q n A. 3) Not convinced, read on.
The Belva BB2D works great. But first, lets get the little stuff out of the way. The resister for first charge (and discharge if necessary) is incorrect in some way. The guy in the Q n A who used his test light nailed it. my resistor did not work and I used this idea and it worked like a champ. Basically put any type of resistance (like a light bulb) in series with the positive for the first charge (or across the + and - to discharge for safety) or if it has been discharged to work on system. Cap's store a lot of energy, these techniques are important.Discharging. (Decreasing voltage when stereo is turned off) A cap will naturally decay when no power is flowing. Decreasing voltage until the circuit board shuts it off at 9.5Vdc (I believe that's correct, but hey, no quotes) is normal. This way the cap is still 3/4 the way full when the system comes on. This is why you charge slowly with "resistor" (pronounced Light Bulb) the first time, the cap is empty. this stops the cap from over taxing your electrical system each time you start your car.Blue light. Cover it. Be creative.Why I am writing this review. I enjoy my music. I have been into car stereo for some time and have installed about a dozen systems. All under 1000W systems. About 5 years ago I built a 1600W system All JL Audio amps. This system included a 250A alternator upgrade and a 1/0 wiring kit. I have been experiencing "cut out" or "overload" mostly for the sub and sometimes the tweeters. Lots of troubleshooting and a little google searching led me to the idea my VOLTAGE was DROPPING. Naawww, not with my BIG ALTERNATOR! Surely not. Turns out, YEAH! Still feeling unsure about a cap purchase, I saw this Belva BB2D for only $40 bucks. Wired it in and VUAL LA. My system is Pa Poundin'. It Works!The techy stuff. Pioneer DEH 80 PRS head unit, JL Audio HD750/1, JL Audio HD 600/4, JL Audio 300/4v3, JL Audio 12W6v3-D4 subwoofer, Focal 165FX in front, Boston Acoustics SX60 in back. 600/4 feeds mid-woofers and 300/4 feeds tweeters. All crossover/ slopes/ levels/ eq are set up in the Pioneer head unit. I removed one of the the 3rd row seats in an suv and made a platform to mount my amps, covered it with a board and made a custom, sealed, 1.0cu ft sub box that fits over the "arm rest"/ rear wheel well. All 4 mids and the front tweeters are custom fit into stock locations. The rear tweeters are visible.Buy this and get rockin'!
J**W
The perfect band-aid
I knew I needed one going into my subwoofer install. The car had stock subs with about a 80 watt amp. With the stock 8 ohm subs, the voltage was fine with the high amp alternator I put in years ago. I tried 2 ohm subs on the stock amp, just to see. It didn't burn out the old stock amp, so that was nice, but it really dragged the system voltage down to about 13, volume depending. I put in a 600 watt rms amp and sub combo with this capacitor and the voltage holds pretty steady at 14+ regardless of how much I want to damage my hearing. Perfect.And the resistor worked fine to charge up the cap. It probably took a couple minutes, but did what it was supposed to. The cap didn't appear to respond for several seconds, so have a little patience with it.
C**N
That is just what I ordered
I absolutely love it so far but I have not tried to charge it yet because I am not quite ready to install everything. Maybe tomorrow I will try again.but for what I paid.i can't complain. Update I have installed it and yes it works great I have no issue with my headlights dimming at all. I have 2 amps running one 4000 watts and 1600 watt amp it's great. I highly recommend buying one. just my opinion though. You need to make sure it's big enough for your system.
R**S
I assume it does good. I have installed this in a 1987 F150 ...
I assume it does good. I have installed this in a 1987 F150 along with an 1100W amp. Headlights do not deminish under the heaviest of loads so far. This product would get 5 stars....two reasons why it doesn't for me. 1.) The instructions on how to charge it aren't clear. It comes with a separate small circuity board with LEDs, small capacitors, and two obvious slots (one positive and one negative) to install on the main capacitor...but for what reason I don't know. I did use it to charge but only used the positive side....not sure if this was correct. While charging the on board volt meter showed the voltage increasing however the moment I would disconnect the positive battery terminal after charging the voltage would begin to drop...and fast. I think it is still doing it's entended purpose, it was little frustrating during install. 2.) The second item is it has a bright blue flashing LED that comes on when it is under load (i.e. bass is hitting hard). At night this lights a lot of the cab up blue....distracting...I have had to place tape over it so shadow it...All in all it looks goods...comes with all the mounting hardware...and does what it is supposed to....and a great value....
W**Y
Awesome
Back in the day, these were expensive. Now, they are cheap. The fact it has an led voltage display is a bonus. Great deal for $35 bucks. I used it to compensate for the 8 guage wire i ran to 2 powered subs. (120w each rms). Might be everkill, but i like it.NOTE: be sure to use the included resiser to power this up the first time, slows the charge time. Takes awhile to charge. Also keep this resister if you have to remove it and discharge it.
A**O
I am glad I got this
It’s a pretty good capacitor for how cheap it is. Gets the job done and has a decent digital display.
Trustpilot
2 days ago
2 weeks ago