Desert Online General Trading LLC
Dubai, United Arab Emirates
Desert Online General Trading LLC
Dubai, United Arab Emirates


🚗 Transform your garage into a sleek, showroom-worthy space in just days!
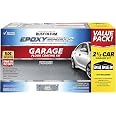
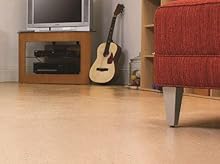
Rust-Oleum EpoxyShield Garage Floor Coating is a 2-part epoxy formula designed for interior concrete surfaces. It delivers a durable, high-gloss finish that is 5 times harder than traditional epoxy paints, waterproof, and resistant to chemicals like gasoline and motor oil. The coating is walk-on ready in 24 hours and vehicle-ready in 3 days, with low odor and low VOC for a professional-grade, easy-to-apply garage floor solution.


| Brand | Rust-Oleum |
| Color | Gray |
| Finish Type | High-Gloss |
| Size | 240 Fl Oz (Pack of 1) |
| Item Volume | 2 Gallons |
| Special Feature | Low Odor |
| Unit Count | 240.0 Fluid Ounces |
| Paint Type | Oil |
| Specific Uses For Product | Floor |
| Surface Recommendation | Floors |
| Indoor/Outdoor Usage | Indoor |
| Item Form | Liquid |
| Included Components | Concentrated cleaner, Decorative chips, Stir stick, Detailed instructions and instructional video, Paint |
| Is Waterproof | True |
| Model Name | EPOXYSHIELD |
| Package Information | Packet |
| Color Code | #D3D3D3 |
| Full Cure Time | 24 Hours |
| Coverage | 100 |
| Water Resistance Level | Water Resistant |
| UPC | 020066210991 |
| Global Trade Identification Number | 00020066210991 |
| Manufacturer | Rust-Oleum |
| Dry Time In Hours | 24 |
| Part Number | 261845 |
| Item Weight | 27.2 pounds |
| Product Dimensions | 14.25 x 11.5 x 9 inches |
| Item model number | 261845 |
| Is Discontinued By Manufacturer | No |
| Style | Coating |
| Finish | High-Gloss |
| Material | Epoxy Resin |
| Item Package Quantity | 1 |
| Special Features | Low Odor |
| Batteries Included? | No |
| Batteries Required? | No |
| Warranty Description | Satisfaction Guaranteed |
A**R
Easy to apply and great looking
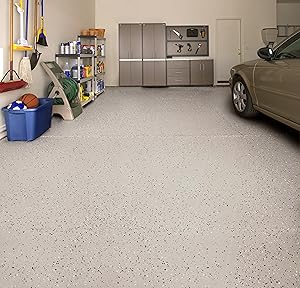
It's so awesome, turned my garage completely. In the end it looks totally professional grade. Make sure to mix it well before applying. Coverage is enough for two car garage of standard size. Also, i put epoxy on the side wall where dry wall board ends and 1 feet concrete wall starts. Decorative chips aren't enough if you want a good coverage, recommend to buy two extra packets of same color to give better coverage on chips. Otherwise it's a great product and easy to apply. Also make sure to not rush put it on the floor. Give yourself some time and thoroughly clean the garage with anti greasers and wash multiple times to make sure there is no dust on the floor. Also while you etch the floor make sure to fill any gaps or dividers on the floors as after etching it will be like you will have to clean the floor many times. I have also applies the cleat coat on the top which made it more good looking and rock solid.Just remember to clean all the tools after epoxy as that could easily stick on the tools and hard to remove and make the tool unusable for clear coat. (Paint brush, buckets, rollers etc.)
M**R
Beautify your garage!
OK, the process is finally done on our 2 1/2 plus 1 garage and we love the outcome. It came out great and I want to tell you the full story. Yes, using this product you will save a lot of money versus calling a professional and yes, it is easy to apply with caveats that I will spell out for you and yes the kit does cover 2 1/2 standard garages. First, do not believe that you can apply this and be back in your garage in 3 days; second, it comes out better with the clear over coat; third, make sure you watch some YouTube videos on the process so you know what to expect. Now for the details:1) You must clean your garage floor thoroughly before application. The etch product is included with the kit however if your floor is oily, greasy, painted, or otherwise stained, you will need additional products to clean it first. My garage floor was new so not stained however the builder did spill something on the floor that water beaded on so I knew I had to strip that prior to application. The epoxy actually bonds with the concrete so anything that prevents bonding will cause the finish to peel later. Clean, clean, and clean again! I pressure washed first, used the provided etching, then bought additional products as necessary and repeated the process until I was satisfied the floor was clean. You will need a squeegee and a stiff floor broom for this process.2) After cleaning, wait 3 days for the floor to dry thoroughly, longer if it is very humid or you live in a damp area. If it is not dry, the epoxy will not bond with the concrete. The instructions say to tape a 2 x 2 piece of plastic to the floor for 3 days to test for moisture; DON'T DO THIS! I did it the first time and the adhesive from the tape left a residue that I then had to remove and reclean the floor again! The 3 day clock restarted. To help the drying process I ran a floor fan 24 hours a day for the 3 days which helped a lot.3) Once the floor is dry, you can start the painting process. Pay attention to the instructions on painting time and temperature as this affects how long you can work with the paint. Only walk on the cleaned floor with clean shoes or socks to avoid any contamination. Use your blower to ensure there is no dust, dirt or bugs on the floor prior to painting. Mix the product as directed but I found that the color was consistent and did not need to mix the base paints first. Also, mixing is a PITA and very messy, losing precious paint. If you are painting the foundation walls too like I did, start here. This is tedious work and takes time so have help. Remember, once the epoxy is mixed in the paint, you are on the clock before the product becomes unusable (called pot time). It took us the full 2 hours to paint the 12" foundation walls, cut in along the wall/floor joint, and paint the floor which stretched the limit. Use a 12" or 14" roller if you can. I believe the instructions say paint in 4' x 4' sections but I found it easier to add the color chips, if you are using them, by painting a 2' x 8' section (it is easier to spred the color chips this way). Clean up tools with soap and water.4) Color chips; we wanted more color than the base gray so we went very heavy on the chips. We actually bought 2 extra bags of chips for the 2 1/2 car garage (4 total bags used) and used both bags from the kit for the single car garage. After 3 days of drying, we used a shop vacuum to knock off any loose color chips before we used the clear coating sealer.5) At this point elapsed time is a minimum of 7 days (unless you have to reclean like I did) and if you apply the clear sealer, which I highly recommend, it takes another 3 days of drying.So my floors look great and make the garage pop; only time will tell if it lasts.
J**A
Great End Result!
Did a lot of research and this is the most highly recommended without lift so I went for it. Did two garages. There are plenty of flakes. I was worried we would run out of paint so put it on too thin on the first garage and had to do a second coat. The square footage shown on the box is a generous single coat...I did up the wall about 12" also ... there is enough. Don't be afraid to put on a nice thick coat and then you only have to do a single coat. It has a great sheen... you don't need to buy an additional top gloss. The second coat made the garage floor look absolutely perfect since we did the first coat too thin. (Note: I had already sprinkled flakes lightly on the first coat because I didn't know we put it on too thin and I'd need a second coat. I was worried it wouldn't look good painted over the paint chips but because I did more chips on the second coat you really couldn't tell. Not ideal but just in case the same thing happens to you fyi you can paint over it!) I liked it better when I sprinkled more flakes compared to the other garage where we did less flakes. The single box I bought at home depot to do the second coat had a plastic pouch which made the job 1000 times less messy than the double kit which had cans. Its hard to mix the cans (part A and B) completely and I think it contributed to our first coat not looking the best. The pouch is SOOO easy and neat its a dream. They should make all kits this way and get rid of the cans! Make sure you etch the floor and rinse thoroughly and allow to dry for a few days before applying the paint and frog tape your edges. The prep work is the hardest part. If you plan to paint your upper walls do it before you do the floor. (Once you see the floor painted you may want to paint the walls too... that happened to us. It's way easier to paint the walls first so you don't have to tape, its ok if it drips, etc). By the time you get to painting the floor and sprinkling the paint chips its the rewarding (somewhat fun) part. You must sprinkle the floor chips immediately.... work in 4 foot by 4 foot sections and sprinkle right away. It's best to throw up in air in small handfuls. Dries quickly and they won't adhere well after about ten mins or so. Make sure you read the directions beforehand because there is a pot life (amount of time the paint is good for) depending on the temperature. Maximum is two hours so best to do with two people if possible and work fast. Also read about temperature requirements.. can't be colder than 55 degrees at night for two nights, etc. Def wait at least 3 full days to move stuff back in your garage. I'd wait longer if you can as it take a full three days for the paint to fully cure. I wouldn't drive on for a week. I did not add the grit... the flakes give it enough traction. All my paint kits (2 from amazon and one from home depot) were the same color and blended perfectly. Complete transformation and worth the effort... so much cleaner now. Highly recommend!! :)Update: Just did another small two car garage at a rental property that was previously painted and I only purchased a single garage pack because I thought I might be able to get away with that since it would not soak up as much pain as it would on a unpainted cement floor. I was right there was more than enough left over (I could have done a three car garage with a single pack) so if you are painting over an existing painted floor you don't need to purchase as much square footage also when I first wrote this review two years ago there were more than enough paint chips. I even threw some out. Although I was putting down slightly more chips on the floor I just painted we literally ran out when we had only completed a quarter of the garage . I'm not sure if they now don't give you as many chips as they used to but I would recommend buying an extra pack of the paint chips. You can always return them but it's a bummer when you're in the middle of your paint job to not have what you need because the pot life is so short you can't stop and run out and buy more.
R**Z
Epoxy garage
Good product. Worked well
Trustpilot
1 month ago
3 weeks ago