💡 Connect your creativity—light up every corner with zero fuss!
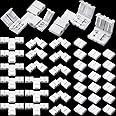
This 40-piece LED strip connector kit by Mudder offers a comprehensive set of L, T, and gapless 2-pin connectors compatible with 3528 and 2835 SMD RGB LED strips. Made from flame-retardant, heat-resistant PBT plastic, it supports up to 72W and 24V, ensuring safe and durable indoor lighting installations. Its solderless, tool-free design enables quick, clean, and flexible connections, perfect for modern DIY lighting projects in kitchens, behind TVs, or holiday decorations.


| Color | White |
| Brand | Mudder |
| Indoor/Outdoor Usage | Indoor |
| Special Feature | Waterproof |
| Light Source Type | LED |
| Power Source | AC adapter |
| Light Color | RGB |
| Theme | Indoor |
| Occasion | Christmas |
| Style | Modern |
| Material | Plastic |
| Controller Type | Button Control |
| Number of Light Sources | 2835 |
| Voltage | 12 Volts |
| Wattage | 72 watts |
| Included Components | 10 x L shape RGB connectors, 10 x T shape RGB connectors, 20 x Gapless 2 pin connectors |
| Item Weight | 0.05 Kilograms |
| Number of Items | 40 |
| Control Method | App |
| Water Resistance Level | Waterproof |
| Manufacturer | Mudder |
| Part Number | 20 |
| Item Weight | 1.76 ounces |
| Package Dimensions | 4.96 x 3.94 x 0.67 inches |
| Item model number | 20 |
| Special Features | Waterproof |
| Batteries Included? | No |
| Batteries Required? | No |
| Wattage | 72 Watts |
K**N
Must have for tape light install
I installed tape lights in an awkward closet underneath a set of stairs. Never used them before, wasn't really sure what to expect or how to make the connections. After I realized the tape is designed to slide underneath the contacts in these connectors before closing the shell these were very simple to use. The tape lights I used had a very strong adhesive backing, and I found it helpful to stick my finger on the tape a few times at the ends where it would seat in the connector before attempting to slide it in place under the contacts. Makes it easier to jam in the connector which can be a bit like pushing a sticky rope. Anyways, after getting the hang of it these were fairly easy to use and give a pretty clean look at a low cost. I'm very satisfied for what I paid. If you're also new to tape lights, I suggest double checking your polarity each time before making a connection. After making that mistake early in my project I ended up doing the rest live so that I could be sure both the polarity was right and connection was good before locking down the clamp and sticking the tape to the wall. If you do it that way you know each step is right before moving on.
G**Y
No need to be technical
Perfect to connect your light, easy yo install.
R**D
Works well but be very precise
These worked well even though it can sometimes be difficult to make a reliable connection. When cutting the light strips there is such a small spot to make the connection. My wife was very happy with lighting the multiple levels of her display cabinet.
D**E
Make sure your lights have the electric tabs 8mm apart
The lights I have were listed as 8mm. However I learned the 8mm is the width of the tape...not the width of the electric tabs. The electric tabs on mine were only 5mm apart. So my 8mm wide tape fit perfectly inside these connectors, but I had to add solder to the tabs on the tape to get them wide enough to make contact with the pins on these connectors.Not a big deal... but wish there were more dimensions listed with connectors and light strips.I have the lights mounted around the inside of a closet door and what an amazing job they do at lighting that closet.The closure on these connectors works great if you don't build your solder up too high. The (+) and (-) were hard to discover at first. They are molded into the white plastic and I ended up marking the polarity with a sharpie for easy reference when putting everything together.
V**D
Hard to apply
The media could not be loaded. Getting these tabs open is a pain, and when you put in the strips, sometimes the connectors don't hit it, so you will need to bend them to connect it, there is no adhesion, for mine at least, so overall it is a pain for me, but I did get them to work out.
B**R
Not worth it
Only half of them worked, no adhesive, so they don't stick to the side. The T shaped ones didn't work, and if they did, only one side. Don't buy
J**.
Great products!
I love the cleverness of the invention and the strong connector to clip the wires/LED strip in place. One word of warning, howver, watch YouTube video first before using it the first time. I didn’t, but by the chance of luck - after ruined a straight connector and a T connector - I learned that with care the LED strip and wires can slide under the brassed tongues inside before clipping the connectors.
A**W
Brightens a dark closet!
I purchased the two strip set to light up a corner pantry closet, with two doors at a 90 degree angle. The two sets allowed me to go around the inside of both doors, with enough across the top to reach to the inside corner. Installation was easy and I purchased a two wire connector kit (https://smile.amazon.com/gp/product/B08T9BT5C2/ref=ppx_yo_dt_b_asin_title_o00_s00?ie=UTF8&psc=1) so I could make T connections across the top from the sections mounted on the sides of the door. There are clear markings on the LED strips where to cut so that contacts can slide into the connectors correctly. For now I mounted the switch inside the door frame but eventually plan to install a switched outlet and wall switch. What an amazing amount of light these strips give off! Finding items, even in the back corner, of our previously somewhat dark pantry closet is now a breeze! Highly recommend this kit for closets without existing lighting.
Trustpilot
1 month ago
1 week ago