🌊 Dive into a Greener Aquarium Experience!
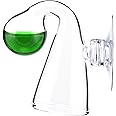
The Fluval Pressurized 1.6oz CO2 Kit is an essential tool for aquarium enthusiasts looking to cultivate lush, vibrant plants. Designed for aquariums up to 30 gallons, this kit is simple to install and made in Taiwan, ensuring quality and ease of use.


N**R
Junk!
Straight out of the package leaking from the bubble counter. Not to mention the regulator is crap. It’s either all or nothing, I could not get it set to a certain amount of bubbles per second. The diffuser was also junk and let huge bubbles out rather than diffusing them, and yes I pre soaked the diffuser. Everything in the kit is flimsy and not worth your money. This lasted a whopping 10 minutes on my tanks before throwing back into the box it came out of.
N**W
Great little system! Initial problems solved!
The media could not be loaded. I set this up on my new nano tank today and have had no issues so far. No leaks (I immersed each of the connections to check) and I'm getting fine bubbles from the diffuser. I read lots of the reviews here before I even ordered this and found some good tips. There are a lot of negative reviews, but my overall impression is that many people don't take the time to read the instructions and they set up this system before they have a good feel for what they're doing.As suggested by at least one reviewer, I used teflon tape on all the threaded connections, even on the bubble counter, which was probably overkill, but there's no downside. I made sure to install the bubble counter correctly, with the arrows indicating the direction of flow. I soaked the diffuser for a whole day before installation, as some reviewers suggested. I didn't have any trouble adjusting the regulator to get the bubble rate as I wanted it, and it has remained steady all day. The pressure gage is down about 200 psi after about eight hours of use, so I don't know how long the CO2 cartridge will last. We'll see...Lastly, I just wanted to add that this mini-sized kit is just perfect for a nano tank. A big gas bottle would have been in the way and unsightly, not to mention expensive. I also bought the tank on Amazon (Marineland Portrait Glass LED Aquarium Kit, 5 Gallons, Hidden Filtration). I hung the CO2 cartridge on the back and put the diffuser in the sump area, which also houses the pump and the heater (it came with the pump and I added a heater). There's no equipment in the main tank and the only part of the CO2 system visible from the front is the bubble counter on the side. The video shows fine CO2 bubbles being carried from the sump into the tank by the pump. Very aesthetically pleasing setup!Update: After using this system for two weeks, I changed my rating to two stars. The CO2 cartridges are lasting only three days each, which makes this cost-prohibitive to continue using. I’m so disappointed, because I love the overall design and size of this little kit. It fits perfectly and unobtrusively on my 5gal nano tank.Update 2: Before giving up, I took the system apart and added a lot more Teflon tape to all the connections, especially where the tubing connects to the bubble counter. Those connections seemed loose; the plastic nuts don't fit tightly enough to compress the tubing around the connectors, so I suspected I might have leaks there. I wrapped Teflon tape around the threads, connected the tubing, then wrapped more Teflon tape around the ends of the tubing and over the threads again, before screwing the nuts on. I also added more Teflon tape around the threads of the bubble counter itself, and also around the connection between the tubing and the regulator. And I replaced the gasket in the regulator (where the CO2 cartridge attaches). The kit came with two spares, so I figure why not. And of course I wrapped the threads of the CO2 cartridge with Teflon tape, as I had been doing. The result: I think my problems are solved! After three days of running the CO2 system about ten hours/day, one bubble per minute, the CO2 pressure has decreased almost imperceptibly. Yea! So I changed my rating back to 5 stars.As a side note, Fluval should really include a roll of Teflon tape with this kit and mention the importance of using it for leak prevention in the instructions! It might save a lot of frustration and disappointed buyers!Update 3: 9/22/24 – I'm consistently getting two weeks from each CO2 cartridge now, running the system ten hours/day at about one bubble/second. That puts the cost at about $5/week for CO2, which works for me!
J**.
Be Patient With It
This thing is great for the price. I use this kit for about a month or so on a new aquarium setup to get my plants established and going before mainly dosing with fertilizer and occasionally using CO2. If I wanted to run CO2 automatically on a timer I'd end up buying something way more high end than this. I can understand the negative reviews because I gave it a shot and experienced most of the problems people came across. Those reviews are misguided however. You cannot rush the process as you're dealing with a little bit of science here. After I got the kit working the way I wanted it to, I ended up buying another kit for a second aquarium and that one works great as well. Follow the assembly instructions or setup videos as described, but here are few keys to success the directions don't do a great job of conveying:The water in the bubble counter should be about 70% full when filled with water and the top screwed on. Enough to cover the opening on the stem that goes into the cup.Turn the valve slowly. And by slow I mean 1/16 of an inch at a time. Let 5 seconds or so pass between each turn. This is super important for newer cartridges. As the cartridge runs lower on CO2 you can make your valve turns larger since there won't be as much pressure build up in the cartridge. As a side note I found the PSI gauge reader to not work well and isn't necessary anyway.When you begin to see the water slowly rise in the bubble counter you know its getting pressure. Bubbles will begin to come from the stem when its filled and built enough pressure.At this point you need to wait for pressure to build in the second hose and push through the diffuser. This can take a few minutes. I also noticed it can take a few days of usage before the diffuser breaks in and starts producing the finer bubbles you're looking for. They'll be a mix of large bubbles with smaller ones at first, just keep running it.Over time you may get small beads of water in the hose you can use to see the pressure moving through the hose as you turn the valve open to inject CO2. Just a useful visual aid, but you will get the hang of this kit over time if you use it everyday.Also get a CO2 drop checker as one is not included. You want to make sure you're not suffocating your livestock.I run these for 5-6 hours when the aquarium lights are on at 1-1.5 drops per second. I think I get 2-3 weeks usage out of a cartridge.
E**N
Valve is awful, impossible to adjust bubble rate
Trust the bad reviews. Hagen released a dud. The bubble counter/check valve is cheap and hard to seal, and the regulator is truly terrible. A fraction of a turn and it goes from no bubbles to 10 bps. I had to spend a half hour opening the tank, letting the sytem come to pressure, and trying to adjust until I finally got lucky and got it to a spot where it's doing 1 bubble every 3-4 seconds. There's no way I'm going to turn this off every night and spend 1/2 hour messing with it in the morning so the cartridge will last half the time. It's a shame because it's a neat little kit that takes up very little space and the diffuser works beautifully. Do yourself a favor and spend a little more money on a paintball CO2 setup.Update: Nearly killed my fish trying to adjust this wretched thing. One star. Do not buy.
Trustpilot
4 days ago
5 days ago