We remain fully operational. Our teams are working around the clock to ensure your deliveries continue safely.

DOWNLOAD THE APP


Customer Services
Copyright © 2025 Desertcart Holdings Limited
DOWNLOAD THE APP

🏡 Store smart, live clutter-free — your backyard’s new best friend!
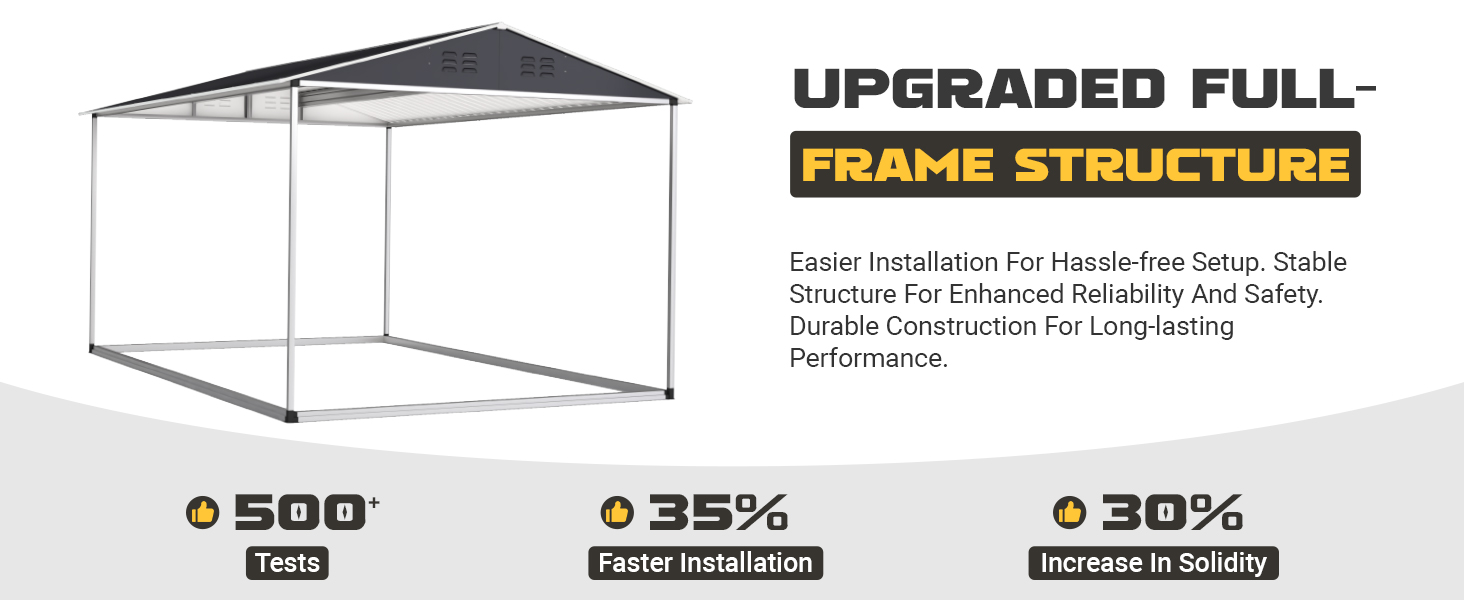
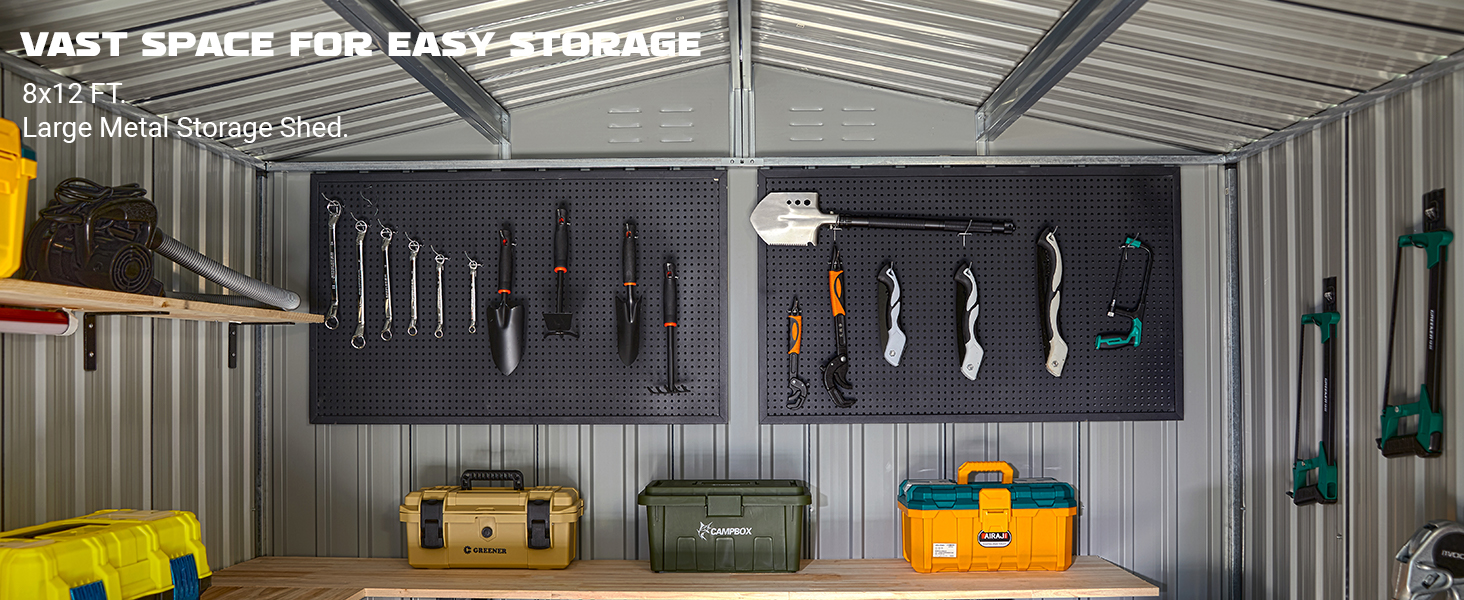
The Polar Aurora 8x12 FT Outdoor Storage Shed combines a robust alloy steel frame with a weatherproof, UV-resistant finish to deliver a spacious, secure, and durable storage solution. Designed for easy assembly with a 29% improved setup process, it offers lockable doors, ventilation, and a sloped roof to protect your tools and equipment. Ideal for millennials seeking organized outdoor living, this shed balances practicality with sleek black aesthetics and reliable customer support.


| ASIN | B0F3X9JMXJ |
| Assembly Required | Yes |
| Base Material | Alloy Steel |
| Best Sellers Rank | #8,684 in Patio, Lawn & Garden ( See Top 100 in Patio, Lawn & Garden ) #10 in Storage Sheds |
| Brand | Polar Aurora |
| Color | Black |
| Customer Reviews | 3.9 3.9 out of 5 stars (1,086) |
| Door Height | 80.3 Inches |
| Door Style | Lockable Doors |
| Door Width | 46.5 Inches |
| Frame Material | Alloy Steel |
| Item Weight | 223 pounds |
| Item model number | PSS0812BT-C01 |
| Manufacturer | Polar Aurora |
| Material | Metal |
| Product Dimensions | 142.9"D x 94.09"W x 79.13"H |
| Style | Backyard Garden Patio Lawn |
| Top Material Type | Metal |
| Water Resistance Level | Waterproof |
J**T
You need a friend, and a whole day
This review is for the 8x6 Polar Aurora Outdoor Metal Shed. It's a long review, go get yourself a beer. (TLDR about midway.) I bought this shed to store my yard tools in. I placed it on a prepared concrete pad, anchored it with expanding lag bolts, and sealed the underside with butyl tape. It's big enough to hold my large (3" throat @ 10hp) chipper/shredder; a lawn mower; all of my shovels, hoes, and rakes; my weedeater and all of its attachments; and some yard chemicals like fertilizer and grass killer. I wanted to get a wheelbarrow in there too but the 8x6 just wasn't big enough. That's not any kind of criticism about the shed - it's just meant to give you an idea of how much stuff it can hold. As other reviewers have mentioned, all the painted metal pieces were covered in plastic. I strongly recommend that you remove this plastic, and I truly hate to make that recommendation because it's a time-consuming task that is 100% not enjoyable. But, the plastic is imperfectly applied in places, and in these places where it isn't in contact with the metal, there's a chance water can get in there and sit. This metal is super-thin, folks. Even galvanized metal succumbs to rust eventually. Don't leave the plastic on. I included some hints on removing it at the end of my review. The shed arrived extremely early. So early, in fact, that the concrete wasn't ready yet. I had to let the shed boxes sit outside for 5 days while my concrete cured. I planned the whole concrete pour around the delivery date of the shed. So while I normally love to get my orders early, in this case, it wasn't ideal. The boxes are large and I had no place to keep them indoors. However, I'm not deducting stars for that, it's just FYI in case you try to plan as carefully as I did. Packaging was OK but not the best. There were a couple of pieces that had slight damage to one edge or another. Nothing was dented, though. None of the damage was a deal-breaker for me and most of the damage was obscured after assembly. I did take off a star for this. They could easily add in some foam to help the packaging without much trouble and without affecting the excellent price point by much. The assembly hardware is plainly marked and it's just about impossible to mix up which screws are used in which steps. I had extra screws and washers at the end so they definitely made sure to include spares. The assembly instructions were well-done and easy to follow. (I will suggest that you find and use a magnifying glass, though. Sometimes the way to tell how to orient a piece is to observe which way the oblong holes are running - horizontal vs. vertical - and man are they tiny in the pictures.) Generally speaking, though, you shouldn't be able to assemble things incorrectly. Build quality was surprisingly good. I expected a much less solid structure at this price. Fitment was overall pretty excellent, holes lined up during assembly ~95% of the time. (Keep in mind that in something this complex with literally hundreds of screws, NO ONE is going to get 100% perfect fitment. Not the manufacturer, and not the builder.) When holes didn't align I was able to move one piece or another to force alignment. This is where the helper comes in really handy. Only when that didn't work, did I resort to my own self-tapping screws. That was pretty rare, though. To reinforce to you how sturdy this shed is: in order to fasten the roof cap ridge thingy, I had to actually lay down on the shed's roof. I weigh over 250 pounds and it was solid. I did create a couple of dents, but that was my fault for putting weight down in an unsupported spot. So, this shed is definitely sturdy. Don't let the thin-gauge metal walls fool you. I'm really pleased with this purchase. Buying this and assembling it myself saved me several hundred dollars over getting one locally - which more than paid for the concrete that I put the shed on. The shed surprised me with its quality and ease of assembly. The finished product looks good. The doors open easily and the shed is solid. I would definitely recommend this shed to others, and in fact, if I needed a second shed, I'd buy one of these again. ***TLDR*** A surprisingly solid shed that anyone with decent DIY skills can build. A helper is needed. Peeling the plastic takes about as long as assembling the shed. Instructions and assembly materials are very organized and easy to follow. You may encounter some fitment issues that can be easily overcome with some self-tapping screws. Shipping was really fast but packaging could use a little improvement. You need to make plans for flooring (none included) and/or anchoring to the ground. Assembling the shed required: *A friend/helper + beer for payment *A stepladder *A step stool (or, the ladder, if it's short enough to go inside the partially-constructed shed) *An impact driver w/ phillips and allen bits *Pliers or sockets (there are a few bolted connections in addition to all of the screws) *An enormous amount of patience (because, plastic peeling) Other things I used that others might not need to worry about: *concrete anchors *Butyl tape or other sealant *Self-tapping screws (I mostly used these where fitment issues kept me from getting the holes to align.) OK, here are some pointers you may find helpful.... *The plastic you've read so much about in these reviews is actually regular old plastic wrap. It's not applied with any adhesive, it's just shrink-wrapped. Removing it is very much like peeling sunburn skin off your arm. Heat guns/hair dryers don't help, and neither do rubber wheel adhesive removers. *When peeling the plastic, look for thin little straight lines. They usually run long-ways for the whole length of the piece. These lines are actually perforations, and they are meant to rip away from the rest. Typically, you'll want to focus on a plastic strip near one of these lines to get it started. Once it's started, work just that one strip all the way down the piece until it's removed. Then go back to where you started from and start the next strip, and remove that one. Continue in this way until it's all pulled off. My helper and I experimented with this technique and it seemed to be the fastest way. For reference, he was trying to peel the plastic from a piece all at once and keeping it all together. Once I started just pulling the individual sections/strips, I was getting done faster. ALSO - don't worry so much about the plastic that's on the interior of the shed. It's not likely to get wet. *The washers are nylon and come in a 12x10 sheet. What I did was pull one row off the sheet, so I'd have like 10 or 12 of the washers together in a line. Then, when placing screws, I'd just hold the whole strip, put a screw into the last washer in the row, position it, and drive it in. Finally, I would yank on the strip of washers to break off the one that I just screwed down. This was easier and faster than trying to separate all the washers individually. *Don't allow things to lean against the walls of the shed until it's all the way together. The walls can flex quite a bit until the roof pieces go on. I caused some fitment issues by leaning my roof pieces against the walls while assembling other parts. *The screws they give you are not self-tapping, so if you do have a fitment issue that keeps holes from coming into alignment, go get a self-tapping screw. The ones they give you will just spin and not dig in. *When putting on the roof pieces, the instructions have you go from front to back. I found the easiest way to do this was to work from inside the shed, standing on a short step stool to get my head and shoulders above the roofline. It's a tight squeeze to put on the next-to-last roof pieces, but if you can get those from inside, the last two pieces are really easy to reach from outside when you're on a stepladder. How I anchored and sealed it: The instructions have you build the floor frame first. Immediately after that you start screwing on the wall pieces. In between those two steps, we did the following: *Centered the frame on the concrete pad and marked its boundaries *Helper stood on the frame to keep it steady while I made starter holes for the anchor bolts *Removed frame, made anchor holes, sank anchors *Returned frame, ensured proper alignment. Then, flipped frame upside down in-place *Applied butyl tape to the outermost edge of the frame's underside *Flipped frame back over and settled it down on the anchor bolts *Tapped frame into place with a 2x4, then went around the edges and tapped it some more to seat the butyl tape against the concrete. Bolted the frame down on the anchors.
P**S
Decent for the money, but don't expect it to be heavy duty
I bought this shed to house normal garage items (lawn mower, garden tools, a couple of bikes), and finally got around to building it a couple of weeks ago. This is the first shed I've build, so I needed to do a little homework. A foundation is needed, so I built one with some pressure treated 2x4s and some deck stained plywood, with crushed stone supporting it. This pretty much cost me an additional $200 in materials. I also had to buy some galvanizes roofing screws to anchor the shed to my foundation, as none as included (although the bottom most rails do have holes to mount the shed to a foundation). So be aware, the foundation and the hardware to affix the shed to it are your responsibility. The shed is metal, but it seems pretty thin. The structure relies on the accordion style shaping of all the sheets of metal. I did find some scratches here and there, but these parts were still usable. I also found a plastic film of some of the sheets, but I choose to leave it on just in case. I'm much more concerned with function than my shed looking pretty. Getting a friend to help is advisable, especially so someone can hold parts in place; I built my shed by myself, and it took two afternoons. In my case, I am a handyman, and I did use a Dewalt powerdrill for assembly. with the sheets of this shed being so thing, I had to take a lot of care using my drill; most every part needed my torque setting to be set to 1, and even then, I had to be careful not to strip out the screws. Screws are mounted mostly with a plastic washer on them, I assume to keep the rain from running through the screw holes. There also is a gap at the peak of the roof with an additional, smaller peak to shield it. I haven't noticed any water getting in, but I'll update about that later. A ladder and a little creative thinking was needed to reach some of the screw holes and the aforementioned top peak, as I have little confidence in this structure supporting the weight of a grown man. The doors do have a little bit of a gap, but do close and even lock properly. I did put a Harbor Freight lock on it, but honestly, this door won't keep a determined adult out. Perhaps a kid, a small animal like a cat or dog, but no way these doors will hold against a reasonably fit adult with a crowbar, or even something like a pipe. I did have some issues with screwing one door on, as the screws for the hinges stripped out in the shed, requiring me to drive to my local Home Depot to find replacement screws and the nuts that will fit them, and then drilling holes to allow my longer screws to fit it. It was a hassle, and I can imagine this would stop some dead in their tracks. In the end, it's ok. Worth the price, but I'm strongly considering re-enforcing the structure with a 2x4 internal frame, and possibly spraying the roof down with a roof patch spray. Not sure about how I'd fix that gap in the peak, but I'll think of something. But these additional fixes I just mentioned are for my own peace of mind; I haven't found any issues with it yet. I'll write an update next spring; I'm interested to see how this thing handles a North Eastern winter.
A**Ü
Poor quality
I understand the price is really cheap but it takes 6-7 hours to assemble. The quality is really poor the doors are not shutting well the roof collapsed after getting 2 inches of snow. Unless you’re willing to buy it and reinforce it yourself I would not recommend it.
A**R
DO NOT BUY FROM THIS COMPANY!!!!
THE SHED WAS SENT IN TWO SHIPMENTS, MORE THAN A WEEK APART. I PAID $300 TO HAVE MY HANDYMAN PUT IT TOGETHER FOR ME. IT TOOK HIM THREE DAYS BECAUSE IT WAS SUCH A STRUGGLE. THE BOLTS WERE INCORRECT, AND DID NOT MATCH THE BOLT HOLES. THERE ARE GAPS THAT WILL LET THE SNOW AND RAIN IN. THERE IS A GAP AT THE TOP, WHERE YOU CAN SEE LIGHT. IT WAS ADVERTISED AS EIGHT FEET BY SIX FEET, AND IT WAS OFF BY SIX INCHES. THE DOORS DO NOT MATCH UP, WITH ONE A FEW INCHES TOO LARGE. THERE IS NO WAY TO LOCK IT! IT WILL LET ALL THE ELEMENTS IN AND I LIVE IN SNOW COUNTRY. I AM SEVENTY YEARS OLD AND DISABLED. I HAVE TRIED TO CONTACT THE COMPANY PERSONALLY AND THEY DO NOT EVER ANSWER THEIR PHONE. THEY HAVE RESPONDED BY SENDING ME A RETURN SLIP AND TOLD ME TO HAVE IT DISMANTLED AND SENT BACK. I PAID $300 TO HAVE IT PUT TOGETHER, AND I CANNOT PAY ANOTHER $300 TO HAVE IT DISMANTLED AND THEN PAY TO HAVE IT HAULED AWAY TO POST IT. I HAVE EXPLAINED THIS TO THE COMPANY ON THE AMAZON WEBSITE. THEIR RESPONSE? "LET US KNOW WHEN YOU SEND IT BACK." "WHAT PART WAS BROKEN?" THEY KEEP PUTTING ME OFF, AND I BELIEVE THEY ARE TRYING TO PUSH IT TO THE POINT THAT IT IS TOO LATE FOR ME TO GET A REFUND. I WANT A REFUND FOR MY PURCHASE PRICE, AND SHIPPING. THE $300 THAT I PAID TO HAVE IT PUT TOGETHER? I DON'T KNOW. DO NOT BUY FROM THIS COMPANY! MY EXPERIENCE HAS BEEN HEINOUS. AMAZON SHOULD BACK UP THE PRODUCTS THAT THEY ADVERTISE, AND BE MORE VIGILANT FOR FALSE ADVERTISING. I AM NOT GETTING ANY HELP. DO NOT BUY FROM THIS COMPANY.
Trustpilot
1 week ago
3 weeks ago