🚀 Upgrade your iMac to pro-level speed and storage—DIY style, no compromises!
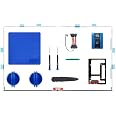
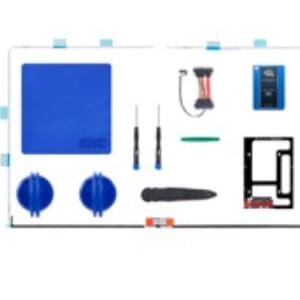
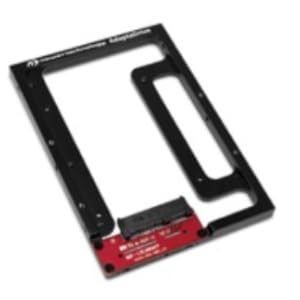
The OWC SSD Upgrade Bundle is a comprehensive DIY kit designed to boost your 2012-2015 27-inch iMac’s performance with a 1.0TB 6G SATA SSD delivering up to 532MB/s read speeds. It includes all necessary hardware like a drive converter bracket, thermal sensor cable, and installation tools, supported by expert tutorials and a 3-year warranty, making it the ultimate upgrade for professionals seeking faster, reliable storage without software hacks.


| RAM | 512 MB DDR SDRAM |
| Memory Speed | 333 MHz |
| Hard Drive | 1E+3 solid state |
| Brand | OWC |
| Series | OWC2700DDRS512A |
| Item model number | OWCK27IM12HE1TB |
| Item Weight | 1.12 pounds |
| Product Dimensions | 3.9 x 2.8 x 0.3 inches |
| Item Dimensions LxWxH | 3.9 x 2.8 x 0.3 inches |
| Color | Noir, Or, Vert |
| Computer Memory Type | DDR DRAM |
| Flash Memory Size | 1 |
| Hard Drive Interface | Serial ATA |
| Manufacturer | OWC |
| ASIN | B0026SB27Y |
| Is Discontinued By Manufacturer | No |
| Date First Available | April 17, 2009 |
A**N
Brilliant Upgrade Kit that makes installing a stimulating challenge.
I have to admit from the outset that I am a technical fool. This is fully proved by me purchasing the OWC SSD Upgrade Bundle in the first instance!I own a 27” iMac late 2013 and noticed how the impressive speeds have slowed down over the years. I am seriously waiting for Apple to bring out a new larger screened all in one iMac. However, not knowing when and even if this will happen I thought I would attempt to upgrade the iMac both as a project but more so as a challenge to occupy me.I watched endless videos on various sites but especially on OWC’s own site. These were wonderfully informative and gave me the confidence to do the upgrade.Having purchased this via the US Amazon site, as it wasn’t available in the UK, the kit arrived in no time at all, which impressed me no end.What deterred me from attempting to do this immediately was that the description of the install process being described as ‘Difficult’.I opened the box and immediately got cold feet. I doubted myself and so returned to watching the install videos. The more I watched the more confident I felt that I should send the kit back!! But having come this far I knew there was no going back.So a week after the kit arrived. I did the first brave thing and inserted the adhesive cutter wheel into the computer. Again, in my mind, I replayed the videos. Breaking the seal was easier than I imagined and the screen separated from the main body of the iMac with considerable ease.I disconnected the 2 cables and stood and marvelled at the sheer beauty of the internal workings of the iMac. Before doing anything else I cleaned the inside of the iMac and all of the old residue adhesive.Before removing the hard drive I ensured the hard drive contents were transferred fully to the new SSD. This took about 5 hours using a reputable Carbon Copy Cloner site.I then set about removing the hard drive. Having every tool I needed to hand thanks to the kit was a huge help and increased my sense of confidence. The drive was easily removed and the I assembled the SSD into the new adaptor bracket and replaced the nodules/screws from the hard drive surround to the new adaptor frame. Inserted this into place connected it applying the heat sensor and reconnected the screen leads and tested it by powering it up.It was a magical moment when everything worked. I immediately noticed the speed improvements. I now set about adding the adhesive strips. These are straightforward to apply and again there are videos which cover these.I carefully followed the advice OWC give and left the Mac to bond. After 8 hours I reconnected the iMac and it was perfect. A job brilliantly done even if I say so myself.After a few hours of using the iMac I noticed the upper part of the screen had separated from the main body.Even though I purchased this kit from Amazon US, I notified OWC Customer Support of this issue and their response was first rate. They immediately dispatched replacement adhesive strips, which arrived two weeks later and again after thoroughly removing the residue of the old adhesive I then reapplied the strips.Some two weeks later everything continues to be impressively brilliant.The responsive and the Read/Write speeds are staggering. I suspect that I have given my iMac a new lease of life for a fraction of the cost than if I were to have had this SSD professionally installed.Even if I say it myself, I deserve a pat on the back for challenging my lack of technical know how and increasing my skills set whilst achieving an end result that I am truly proud of.I cannot recommend more highly the OWC SSD Upgrade Bundle. It comes with everything you need and the support both online from the install videos and when I needed human support was outstanding.Despite the adhesion issue, I am giving this 5 stars, as despite the sealant failing the first time, the support response was so brilliant that I feel OWC went above and beyond to ensure I was one very happy International customer.Indeed it’s a pity that OWC hasn’t a UK presence.I have shared my experiences with friends and have highly recommended OWC products as the ones to rely on.Thank you OWC.
D**A
Almost everything you need...
You'll need to buy an adapter to plug the new drive into a USB slot on the back of iMac so you can clone the drive. I recommend watching several videos on how to upgrade it before ordering. The kit has quality contents. I had some difficulty in two areas, not the fault of this kit. When I cut the seal on the screen, it fell away so easily, it yanked a ribbon cable from the logic board, damaging the cable end. Fortunately, replacements are under $20 on Amazon. Use extra care and you'll be fine. Another issue was cloning the disk. It migrated all my data but not the OS. I had used CC Cloner software for this, perhaps if I had used the Mac utility, it would have been completed on the first try. My solution was to do an OS download/install right over the data. It took a couple of hours but everything works great now.Being a late 2015 iMac and now a legacy model, this was a relatively inexpensive upgrade for boot speed and operating speed. It boots fully in under 30 seconds vs 90 seconds. I also upgraded my RAM to 32GB. Simple and inexpensive.
T**R
This is a fun project for a secondary computer
5 stars with a caveat: only because I had a hard time locating the manufacturer’s instructional videos that I know existed. If you are planning to complete this upgrade be sure to have a helper around to assist you with re-attaching your iMac screen; I was unable to complete it 100% correctly with the new adhesive due to doing this on my own, one side is liable to fail overtime due to still having some of the blue tape on, it began curing very quickly. Now that the Mac is back together, though, this has made my computer very snappy and is much better than the factory HDD. I even was able to patch to the latest OS and have found everything working nicely. Be sure to allow plenty of time for your adhesive to cure with the Mac screen down on a soft surface to avoid issues. The included drive is excellent and I had exactly the right tools needed to complete the install.
T**Y
They Provide Everything You Need - Fairly Easy to install
So my iMac had been having trouble just randomly restarting and finally wouldn’t boot back up. What to do??? Saw this replacement kit and thought I’d give it a try and see if I could resurrect my iMac. Full disclosure, I failed to double check the size of my machine and I ordered the kit for 27” and come to find out mine is the 21.5” model. However, everything in the kit worked EXCEPT the adhesive strips which of course were cut exactly for the 27”. (So I’ve been able to order just the adhesive for the 21.5”) - double check your machine size!But this was not too hard to do. They have videos on their YouTube channel which walks you through everything. I put the drive in and closed it up on its back so the glass wouldn’t fall forward (without the 21.5” adhesive) and turned it on! It solved the problem. I was able to 1) Format the drive 2) Install the MacOS 3) Install my software. Worked like a charm and I’m so happy as I really didn’t have budget to buy a new computer!!Great kit if you want to upgrade your drive or you just need to breathe fresh air into your iMac! Literally everything you need to do the job is included. Very satisfied customer!! Let’s hope the drive lasts and doesn’t fail. Any more, however, I store my important files in the cloud.
Trustpilot
2 days ago
1 month ago